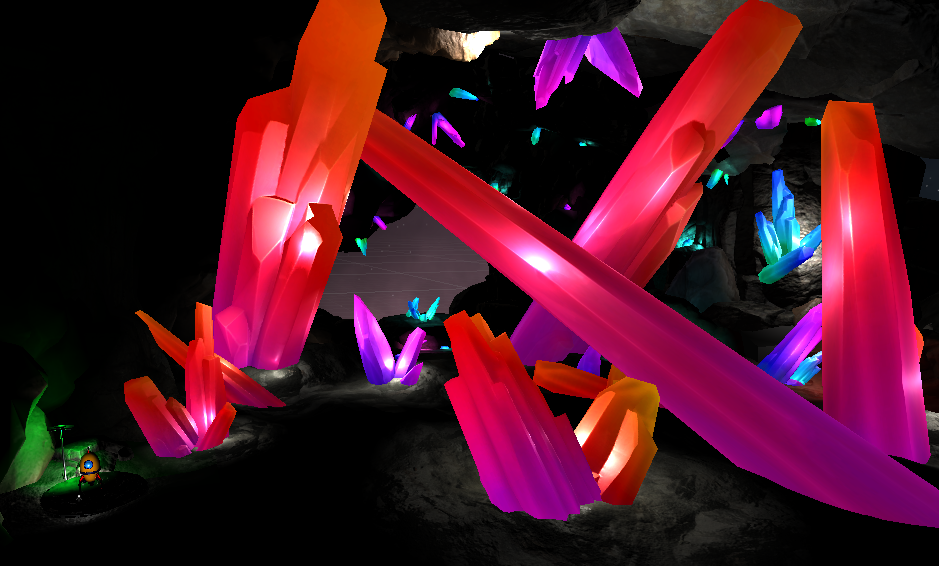
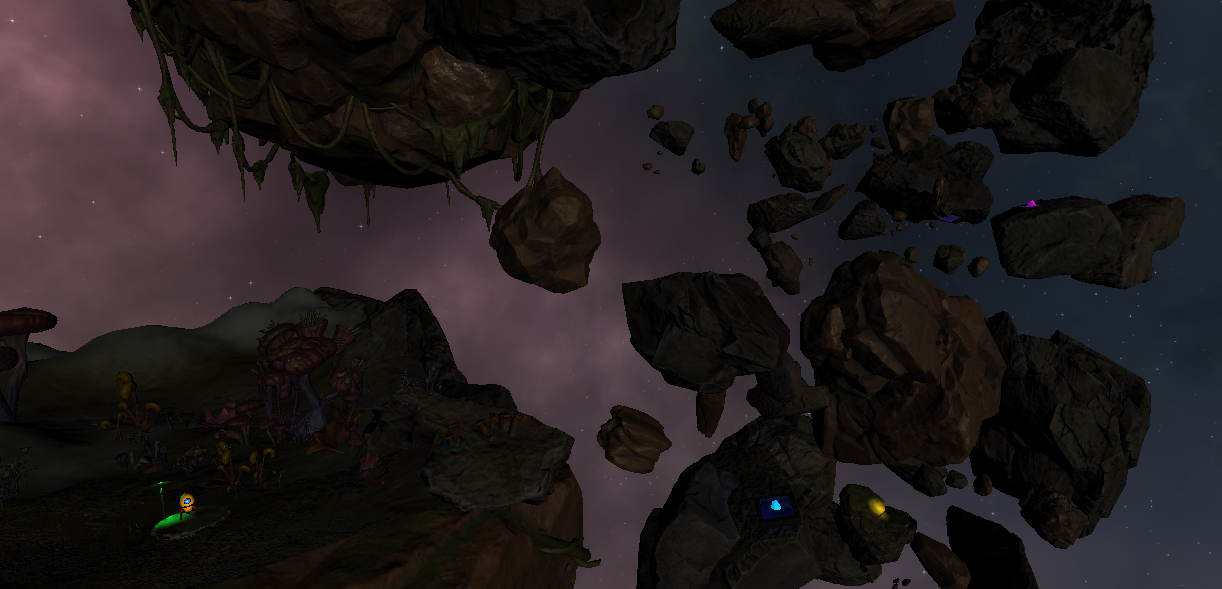
Welcome to the ISA, the Intergalactic Space Agency. You are here because you want to be a pilot. In order to become the next ISA pilot, you must endure five brutal simulated tests. Do not take these tests lightly! Contact with any object in the simulation will lead to a failure. Test your skills and show us that you are the next great ISA pilot.
Project: Escape Endospire was my third and biggest solo project. It's a classic platform inspired game that uses flight based movement and 3D art to change the perspective from the classic 2D style. The main goal of the game is to make it through five brutal tests that test your skills using this flight based movement. Each area introduces new environments and new dangers. Project: Escape Endo spire was developed for PC and was released on Itch.io.
As this was a completely solo project, I acted as project manager, lead programmer, lead artist and lead level designer. The development time for this game took around 2 and a half months. The development process was an amazing and difficult experience. In addition to programming, I learned Blender for 3D art, studied level design, managed social media platforms to advertise the game and organized the project entirely. Early development involved changing the game's mechanics and style multiple times. After iterating on the game several times, the mechanics and style were decided and production began. The final week of development was the best feeling and I was extremely proud of what I had created and accomplished.
The Journey
Challenges I Overcame
Developing a game is difficult. Developing a game alone is even more difficult. However, solo development gives you opportunities to learn and grow your skills. Here are some of the challenges I overcame and what I learned.
Creating functional and efficient code to help to reduce bugs, and allow the game to run better and faster.
Learning how to prototypebetter to test mechanics and features efficiently without wasting development time.
Learning how to create 3D art in Blender so I can understand how the process works and so I can create unique environments.
Learning level design to make fun and unique levels for players to enjoy.
My Impact
Since this was a completely solo project, I worked on all the gameplay mechanics, level design, audio, etc. However, we will be focusing on only the gameplay mechanics. This game features a number of different gameplay mechanics. My impact on this game are as follows:
Gameplay, UI & Audio: - Player controller. - Collision Handler - Object Oscillation - Rocket Refueling - Scene Transitions - Fuel Bar UI - Main Menu UI - Menu Selection UI - Interactive UI with rocket fuel - Music Transitions between scenes - Main game audio - Win Screen Audio
Level Design - Designed and created 5 full levels. - Implemented art assets in Unity Engine. - Implemented all audio into the game using Unity Engine. - Tuned and balanced moving objects for player to avoid as well as static objects for player to maneuver around.
Leading the project by Implementing an agile development model, holding SCRUM meetings and overseeing the development process.
Creating an interesting and interactive world by Implementing physics based mechanics for items in the game.
Managing the project by using software like Trello to keep everything organized and timely.
Gameplay Mechanic Descriptions & Video Examples
Project: Escape Endospire - Breakdown
Project: Escape Endospire took about 3 months to develop. It was developed using C# in Unity as well as Blender for some assets. This section is to showcase videos & code snippets of the created mechanics.
Here are some examples of gameplay mechanics & features that I worked on! Each description of the mechanic will have a video. If you'd like to see the code as well, it will be posted at the bottom of the page!
** Note: some of these videos will have background music is disabled to avoid loud music in your headphones. See the music section to view audio implementation **
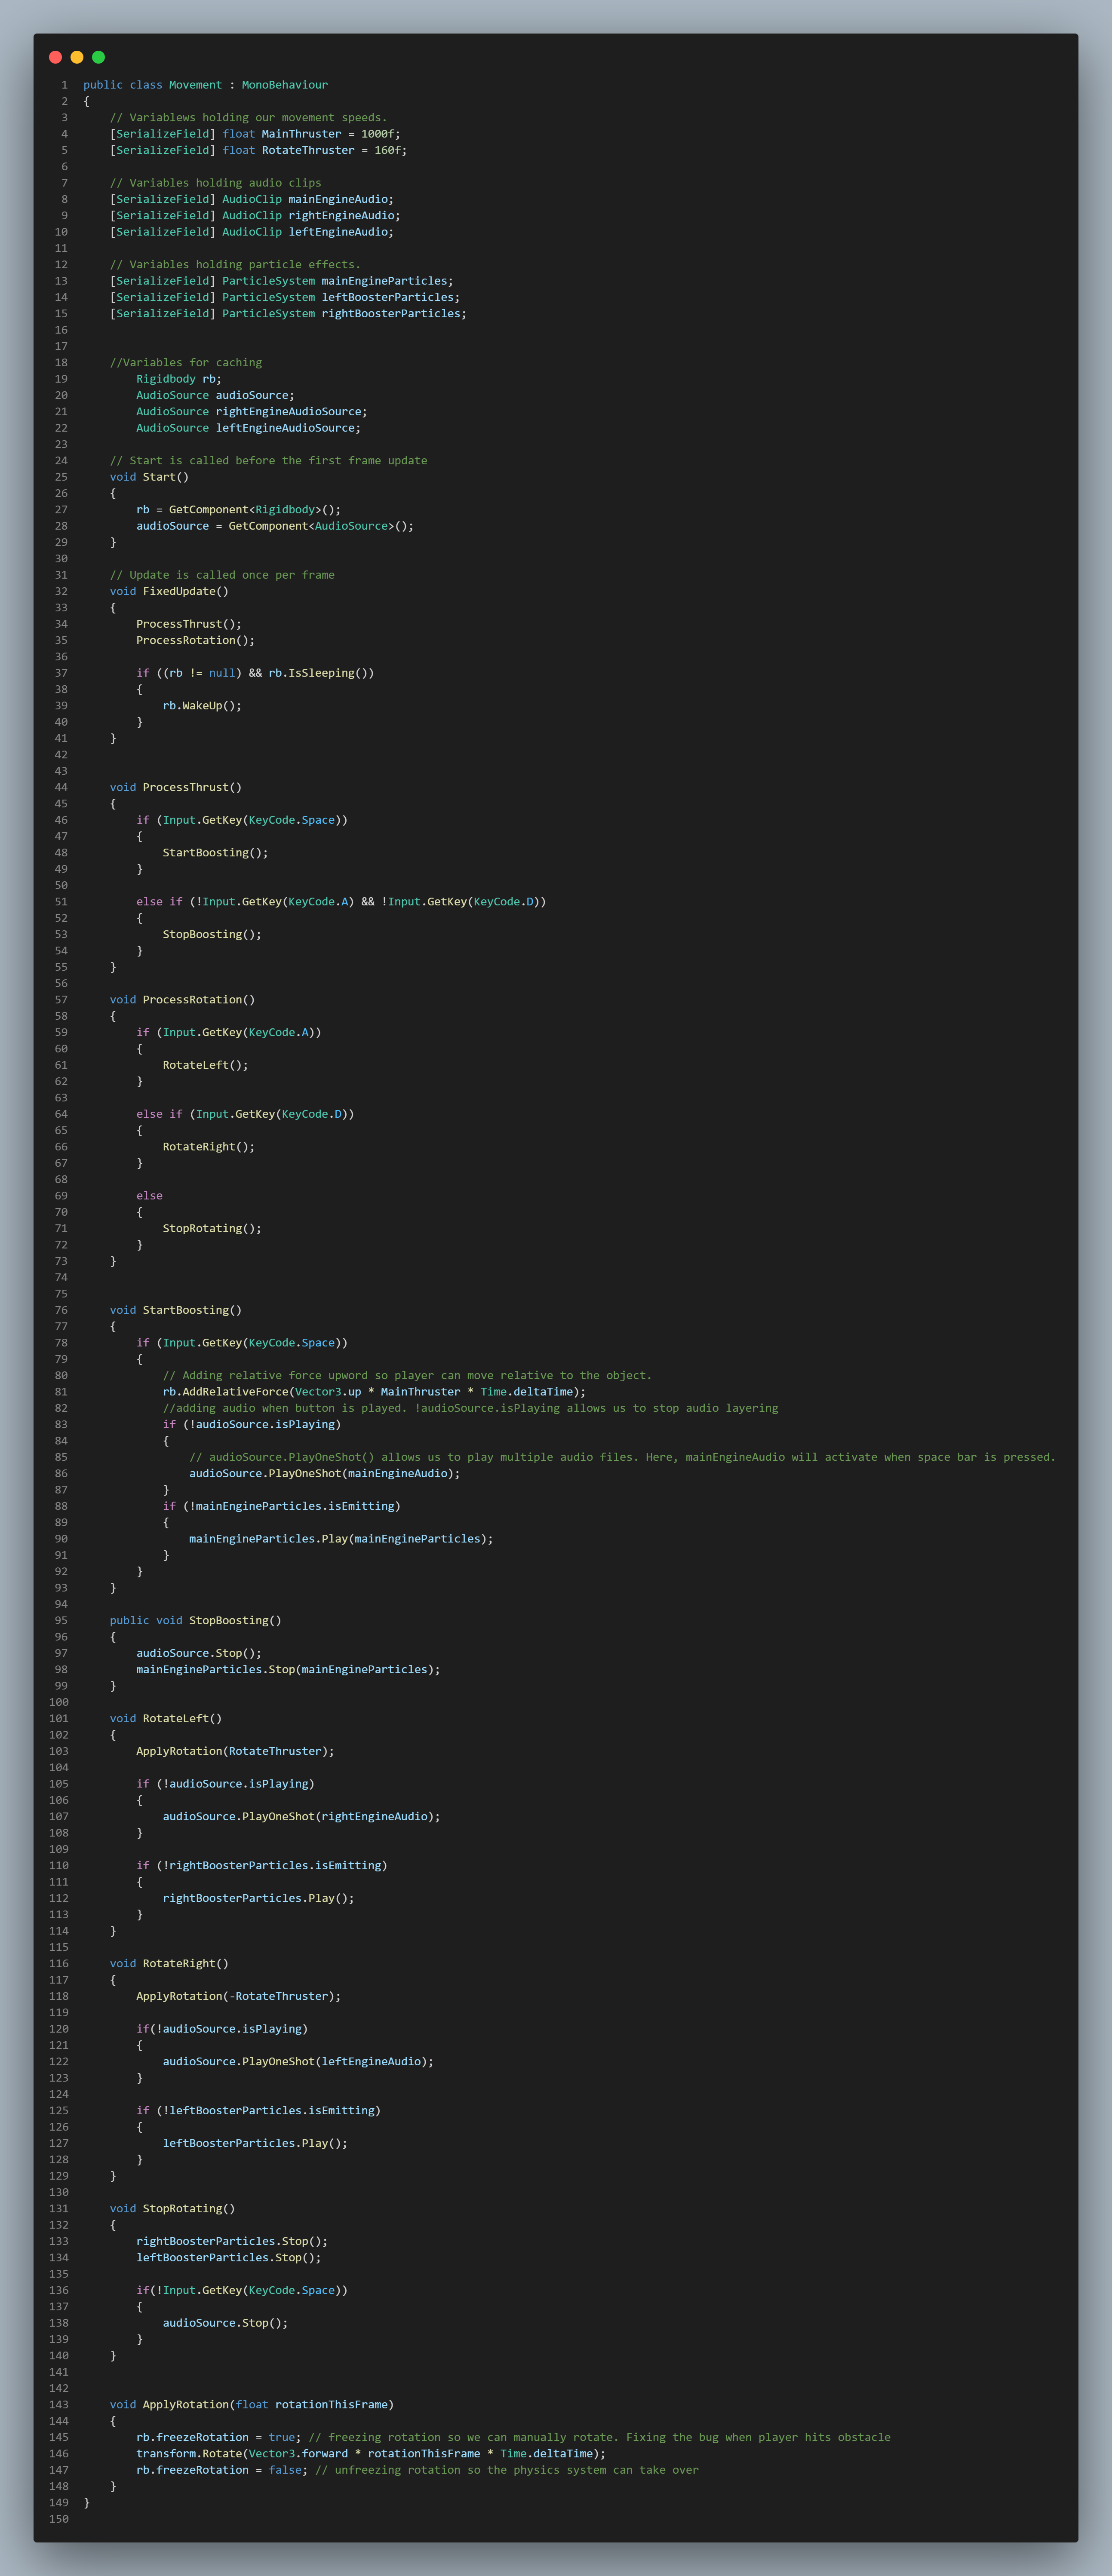
Player Controller
Here is a video of the player controller. To make the player move, I created a "Start Boosting" method. Originally, I tried using AddForce to the rocket's rigidbody, but it didn't feel very good and was slightly buggy. To fix this, I used "AddRelativeForce" with a Vector3.up. This relative force was attached to the bottom of the rocket to give a more realistic feeling. Audio is also played in this method. This method is only run when the player holds down space.
In addition to the upward movement of the rocket, I also needed to add rotation so the player can move through the level. 4 methods were created for this, "Rotate Right", "Rotate Left", "Stop Rotating" and "Apply Rotation". The first 2 methods for right and left call the "Apply Rotation" method to allow the rocket to turn and plays audio & particle effects. Apply Rotation uses a Vector3 to rotate the rocket and freezes the rigidbody's rotation if not turning. Finally "Stop Rotating" stops particles and audio when the player is not holding down space.
Player Collision Handler
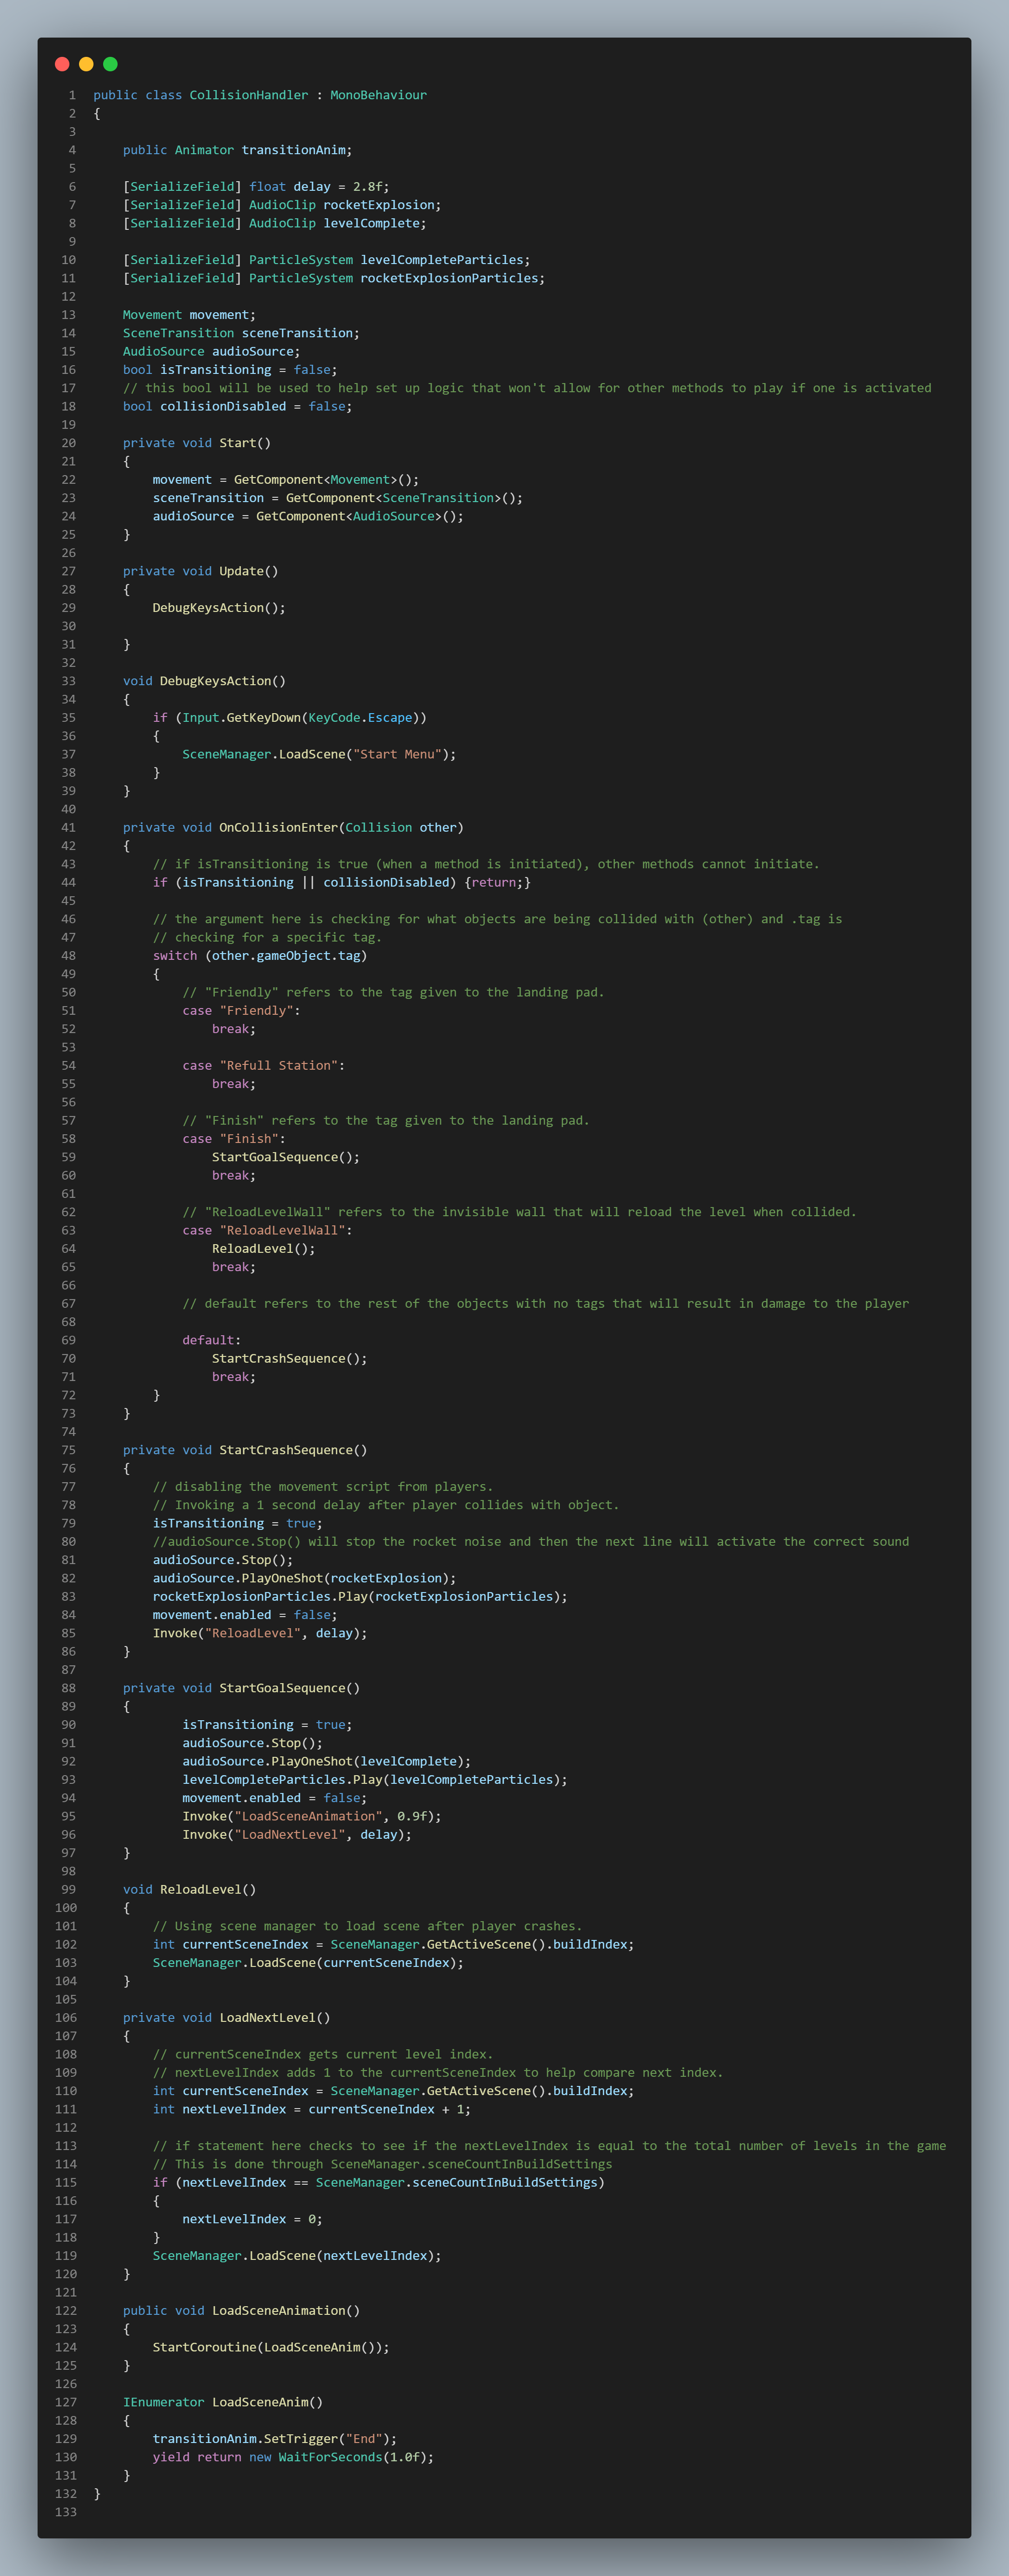
The next video here is for the collision handler that checks to see if the player has collided with anything dangerous. This game was designed to be a brutal platformer, so the slightest mistake could lead to a explosive end. The Collision Handler uses an "OnCollisionEnter" with a series of switch statements to check what the player collides with. The cases the switch checks is "Friendly", "Refuel Station", "Finish", "ReloadLevelWall" and the default case. All friendly checks do nothing to the player and they can collide with those objects. Refuel stations work like "friendly" and we will discuss those later. "Finish" initiates the "StartGoalSequence" to start the next level and "Reload Level" reloads the level from the start. If any other object collides with the player, the "Start Crash Sequence" method is run.
"Start Crash Sequence" is a method run when the player dies. In this method, the rocket's audio stops and crash audio is instantiated. Movement scripts are set to false (disabled) and rocket explosion particles are played. Finally, the level is then reloaded.
"Start Goal Sequence" is a method run when the player reaches the finish goal. In this method, the boolean value "isTransitioning" is set to true, level finish audio & particles are played and movement is disabled until transition ends. Finally, an animation for scene transition starts. At this point, the next method "Load Next Level" is run which gets the current scene index and adds 1 to it. That is then fed into the Load Scene method and the next level can begin.
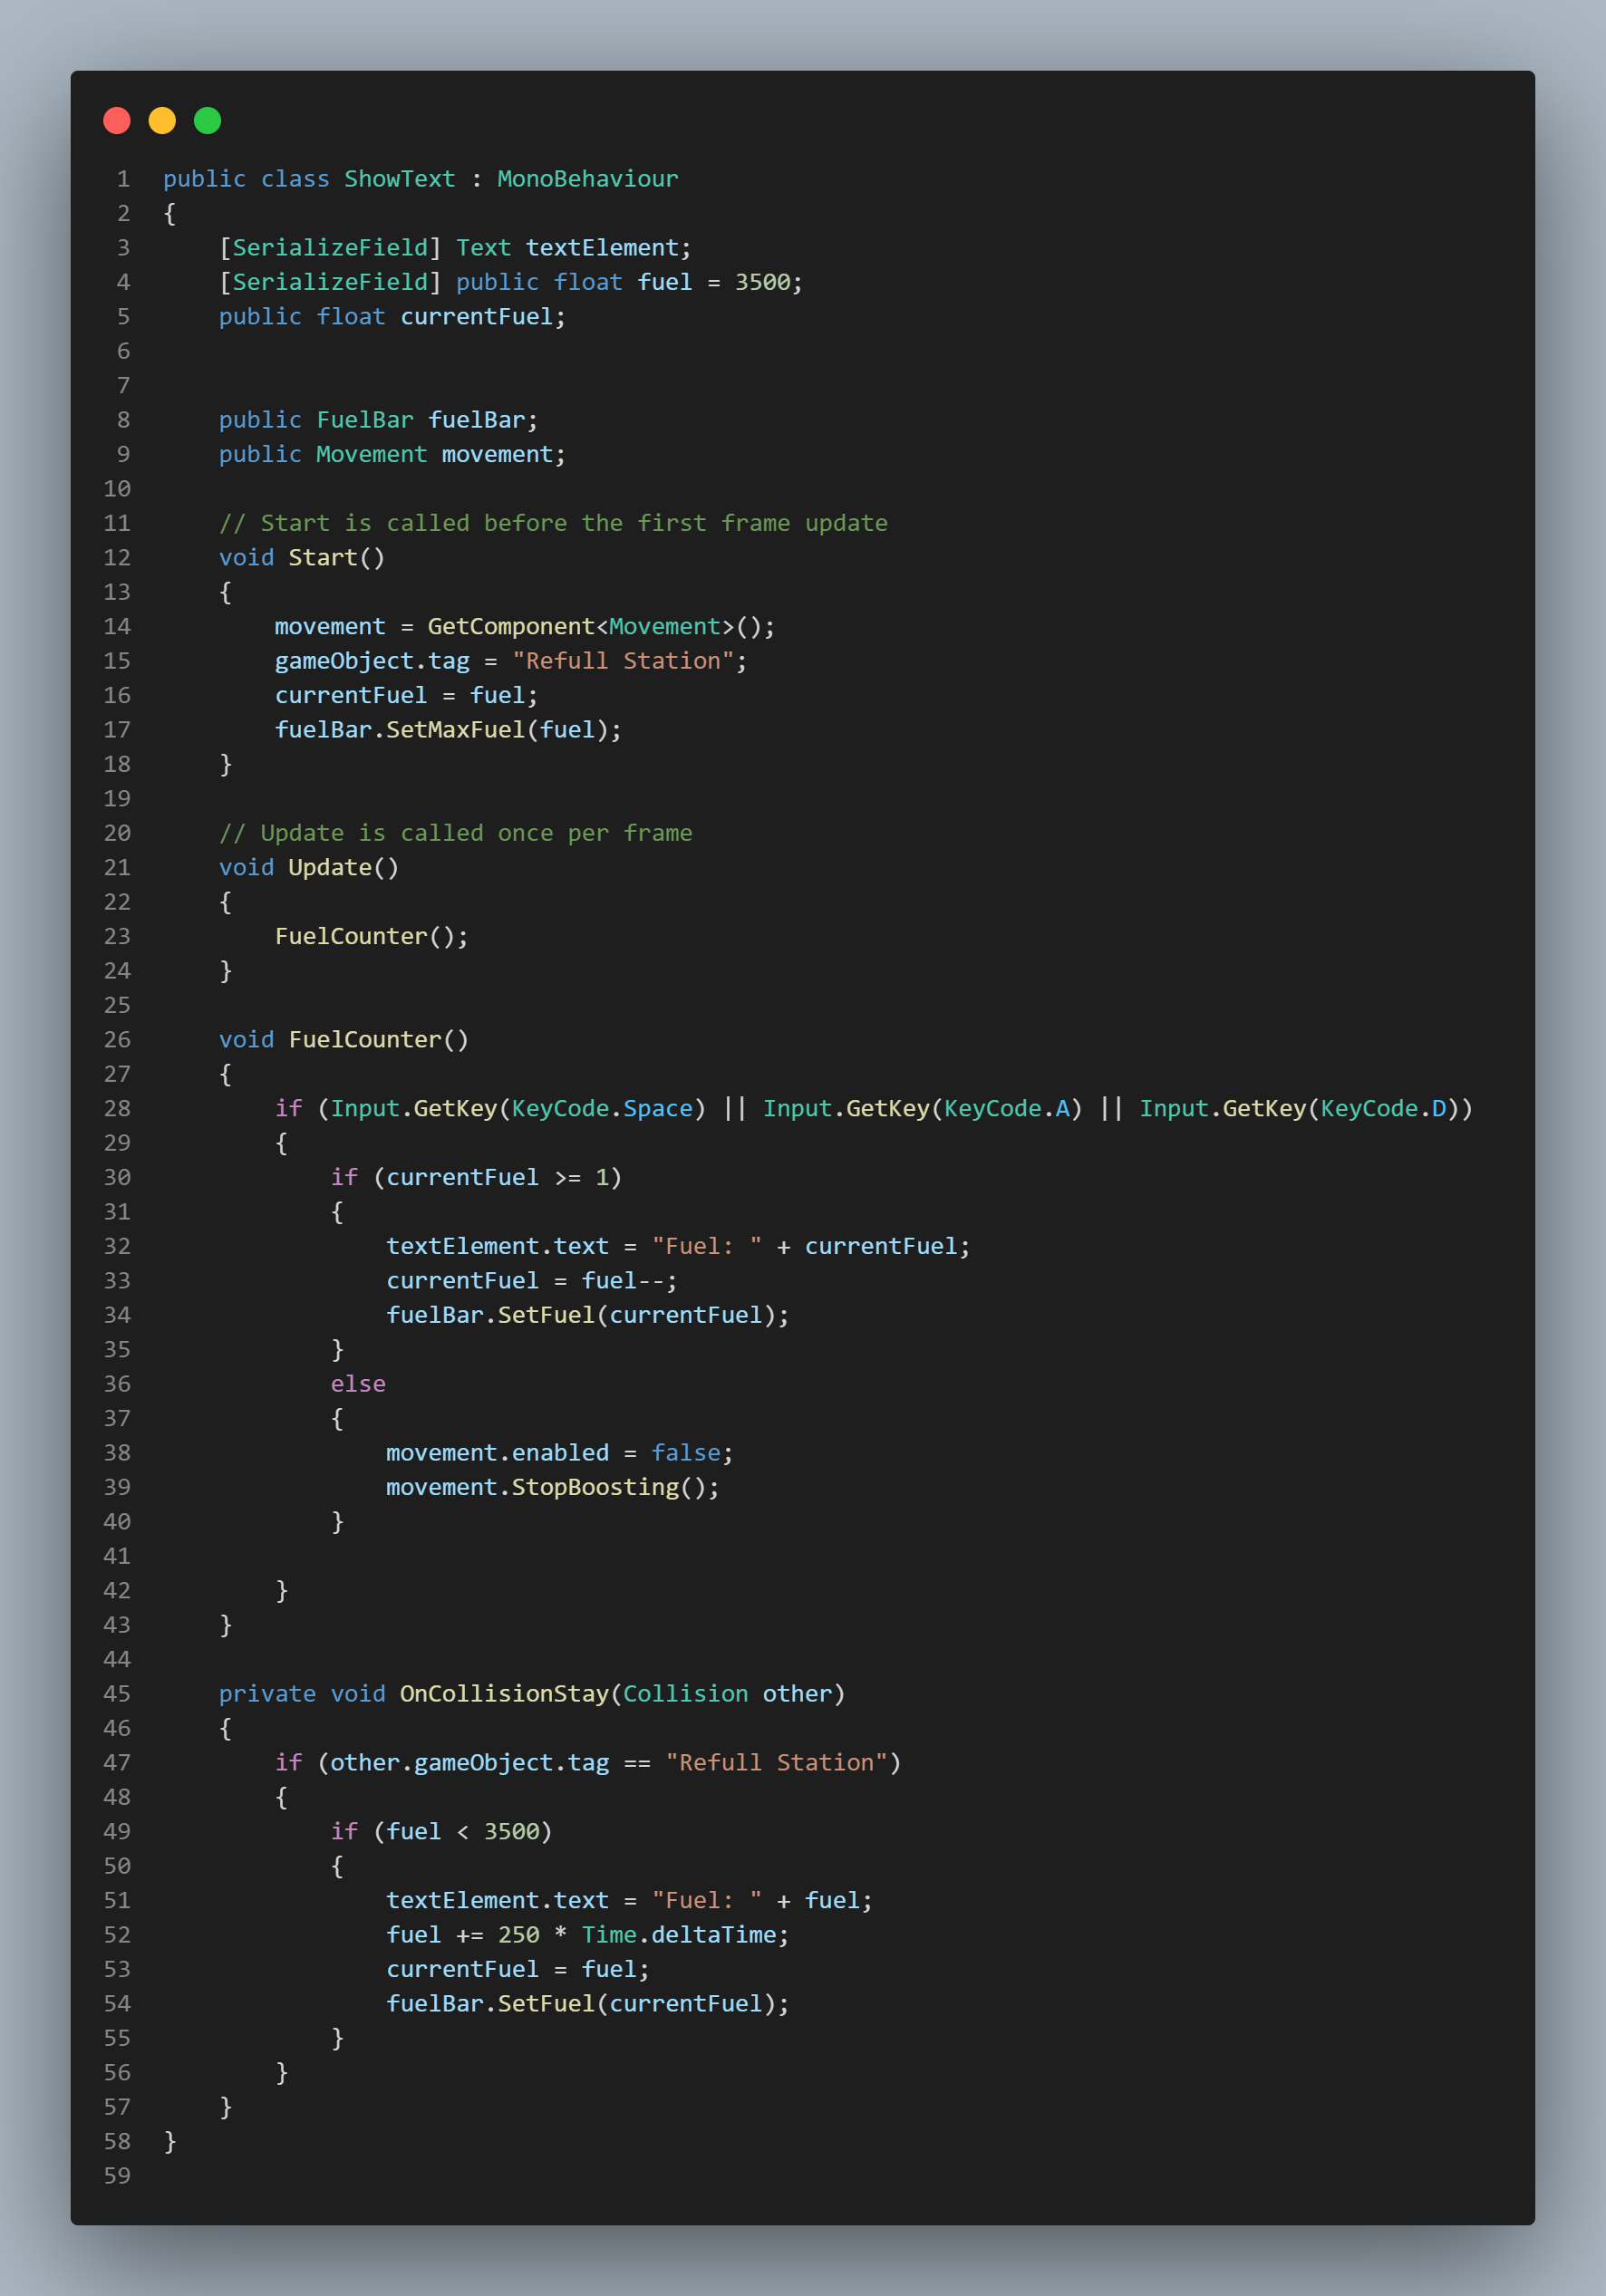
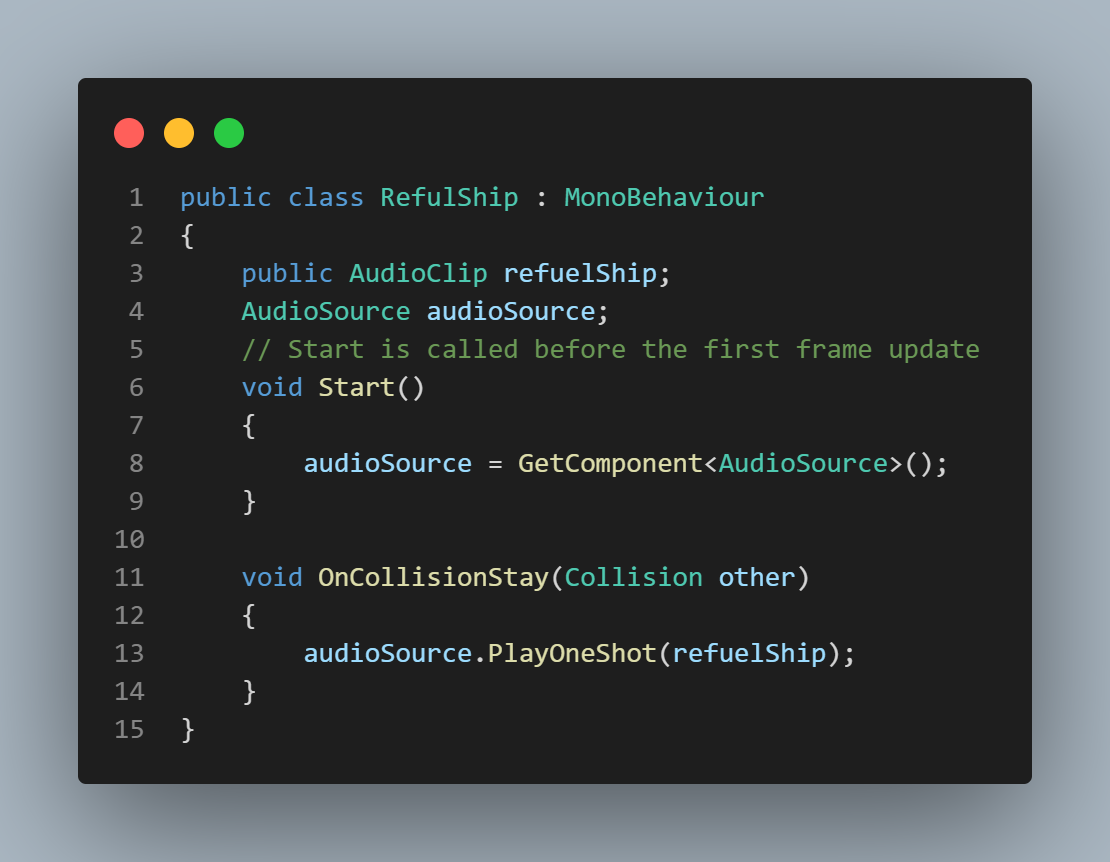
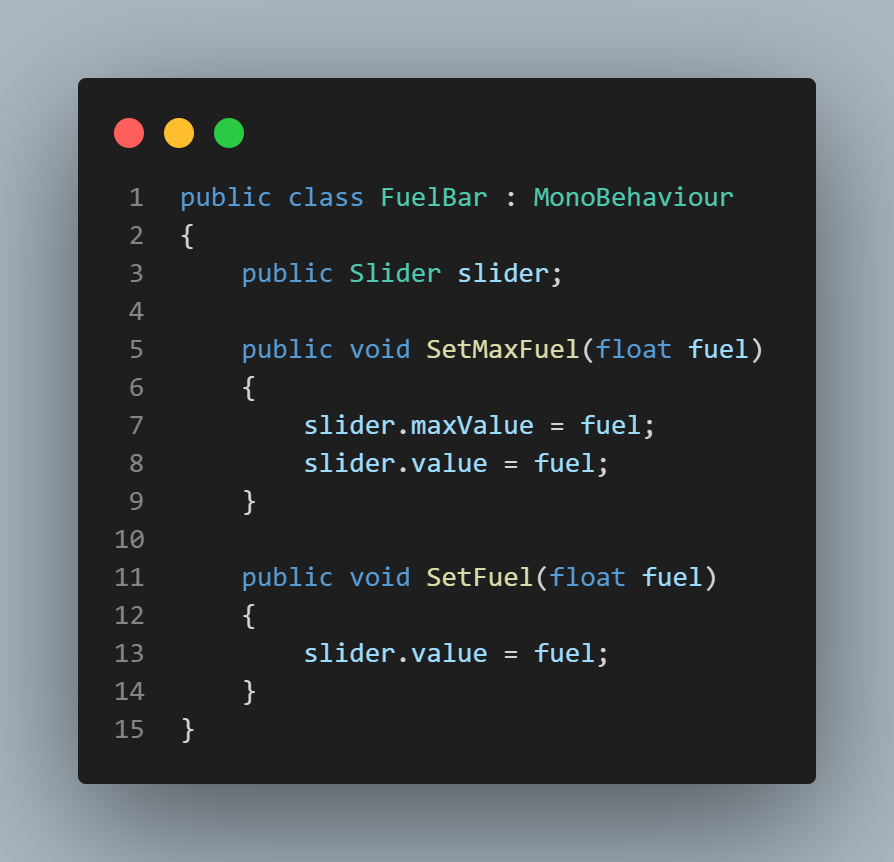
Refuel Rocket
This is the game mechanic for refueling the player's rocket. During some levels, the player will need to refuel their rocket to make it to the goal. To refuel, the player simply needs to land on the yellow landing pads and refueling will begin. This mechanic is split into three scripts, "Refuel Ship", Fuel Bar and "Show Text". Originally, this mechanic's logic was only in one method. However, due to some bugs, I decided to move some of the functionality with the UI.
The first script "Refuel Ship" handles the audio for when the rocket lands on the refueling pad. The second script "Show Text" handles both the UI and integer values of the rocket's fuel. This script continuously runs the "Fuel Counter" method in Update. This method checks if the player is moving and reduces the fuel for the amount of time the player is pressing space. If no fuel is in the rocket, the movement script is disabled and boosting stops. This method also takes the "Set Fuel" method from the Fuel Bar script and updates the red UI fuel bar according to the amount of fuel left.
Finally, this script uses an "On Collision Stay" to check if the player is on the refuel pad and is staying there each frame. If the fuel is under a certain specified amount, it is refueled gradually. The UI bar is also updated accordingly via the Fuel Bar script
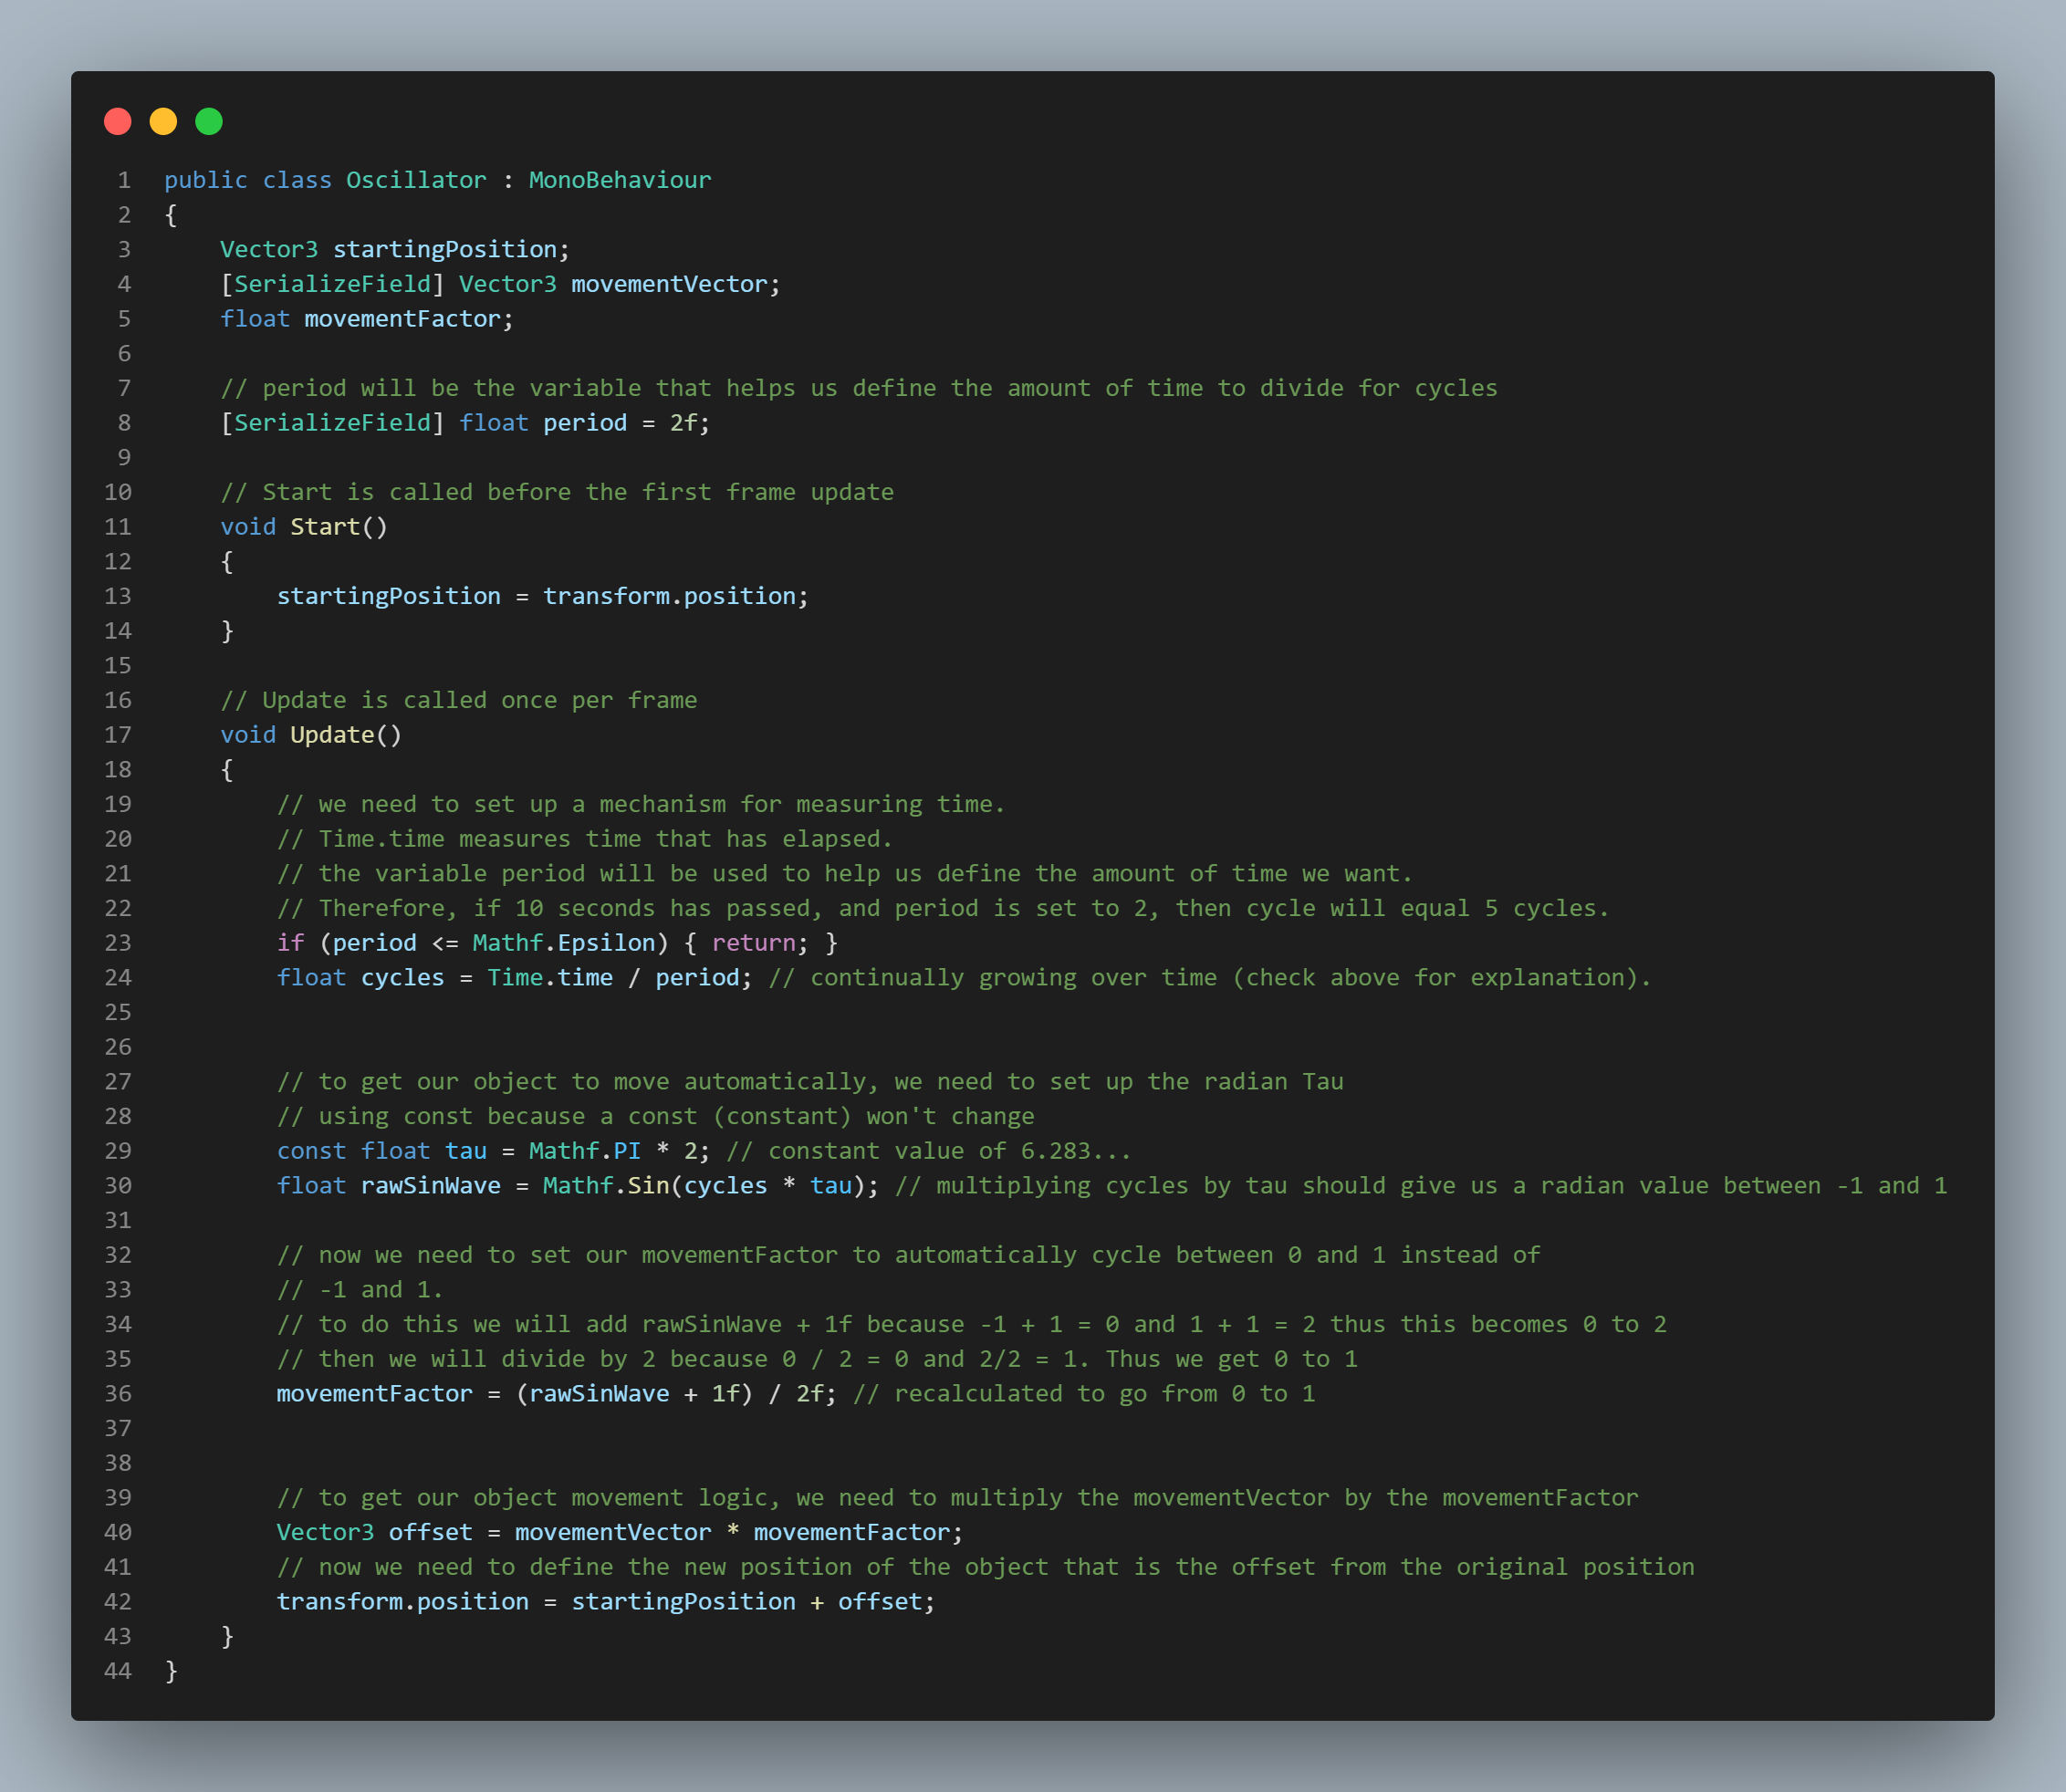
Oscillator
This next mechanic is for object oscillation. This game was designed to be a space platformer, so I needed certain environment objects to float and to pose a danger for the player. In order to do this I fist set up a mechanism to measure time. The variable "period" was created to help define the amount of time to divide for movement cycles. I then took the period of time we need and divided that with Time.time and set that to a variable called cycles. (Meaning if 10 seconds have passed, and period is set to 2, then cycle will equal 5 cycles).
Next, to get our object to move automatically, I set up a radian Tau. To do this, I created a const variable "tau" which takes Mathf.PI * 2. This gives us a constant value of 6.283... After this I created another variable called "rawSinWave" and set this to cycles multiplied by tau. By doing this, it would give us a radian value between -1 and 1.
Now that I had the radian value between -1 and 1, I needed to set the Movement Factor to automatically cycle between 0 and1 instead of -1 and 1. To do this, I add "rawSinWave" + 1f because -1 + 1 = 0 and 1 +1 = 2. Thus this becomes 0 and 2. Then I divide by 2 because 0 / 2 = 0 and 2/2 = 1. Thus I can get 0 to 1.
The final step was to determine the movement logic. To do this, I multiplied the Movement Vector by the Movement Factor. Then, I defined the new position of the object that is the offset from the original position.
Scene Transition
This video showcases the simple scene transition I created for this game. I didn't like that the screen would freeze during a level transition, so I implemented this simple solution. To do this I created an animated canvas image that increases it's opacity when the player reaches a goal and another canvas image that decreases it's opacity when the level starts. An IEnumerator called "Load Scene Anim" holds the animation trigger and time. It is then triggered when the player reaches the goal.
Game Music
The next mechanic is the game music. The game itself uses a number of SFX such as the rocket sound, death noise, etc. These SFX were implemented inside other scripts responsible for their functions. The background game music & win screen music are handled separately. The background music itself is run in the Unity Engine's built in sound application. I attached the audio file I needed to the Audio Source component and set it to loop. However, I wanted the music to continuously play between the levels.
To do this, I used the Awake method in the Music Transition script. Inside Awake I checked to see if the script was null. If not, I set the variable Instance to the script. I then used the "DontDestroyOnLoad" which takes in the instance variable. Doing this allows for the music to play when each level loads. The only time the music is destroyed (disabled) is when the player exits the game and/or gets to the win screen.
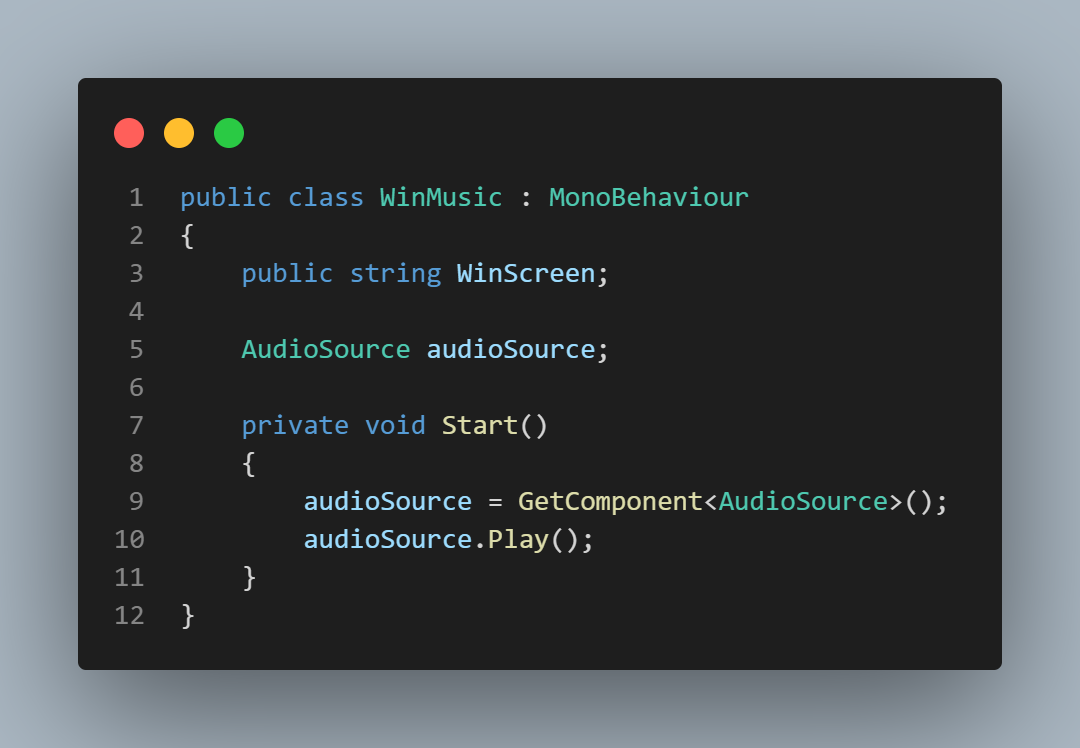
The win screen script is extremely simple and uses "audioSource.Play()" to play the background music on this level.
Main Menu
The final mechanic I will be showcasing here is the main menu. The functionality for the main menu is pretty simple. I implemented UI buttons and used the built in "OnClick" checks to enable/disable the canvas objects that I needed. For example, on the main menu, if I click "Select Levels", the On Click methods will disable the main menu and enable the levels canvas objects.
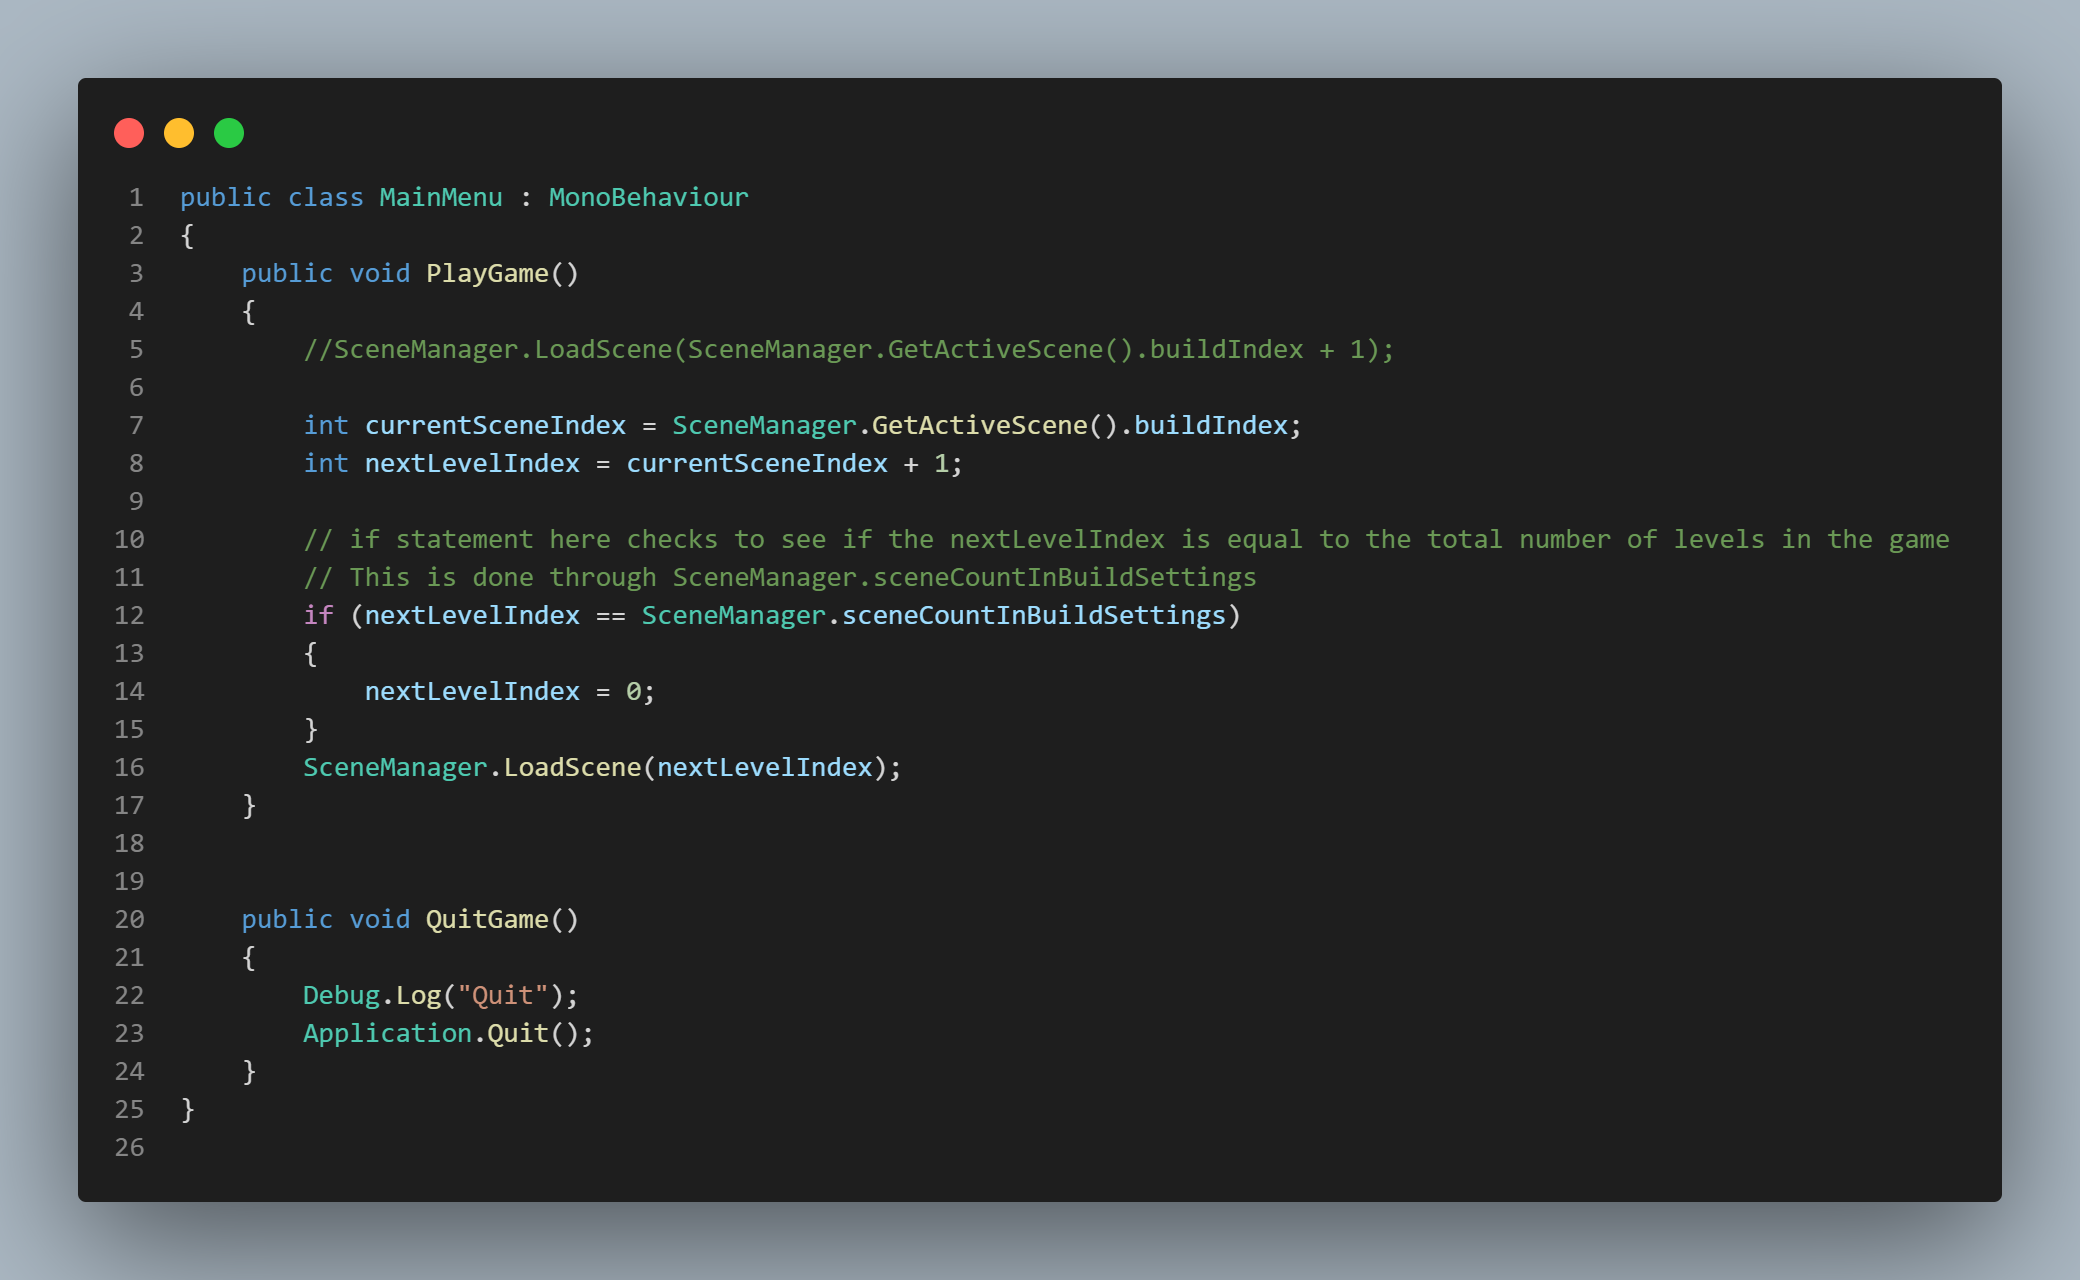
For the level loading mechanic I used Unity's scene manager. For the "PlayGame" method that is used with On Click, I first made an integer variable called "currentSceneIndex". This variable gets the current scene index by checking the build index. I then created another variable called "nextLevelIndex" which takes the variable for current index and adds 1. Finally, I used an IF statement to check if the nextLevelIndex is equal to the total number of levels in the game. If so, the index goes back to 0. Otherwise, the next level plays.
To quit the game, I just used the "Application.Quit()" method and call it when players click "Quit".
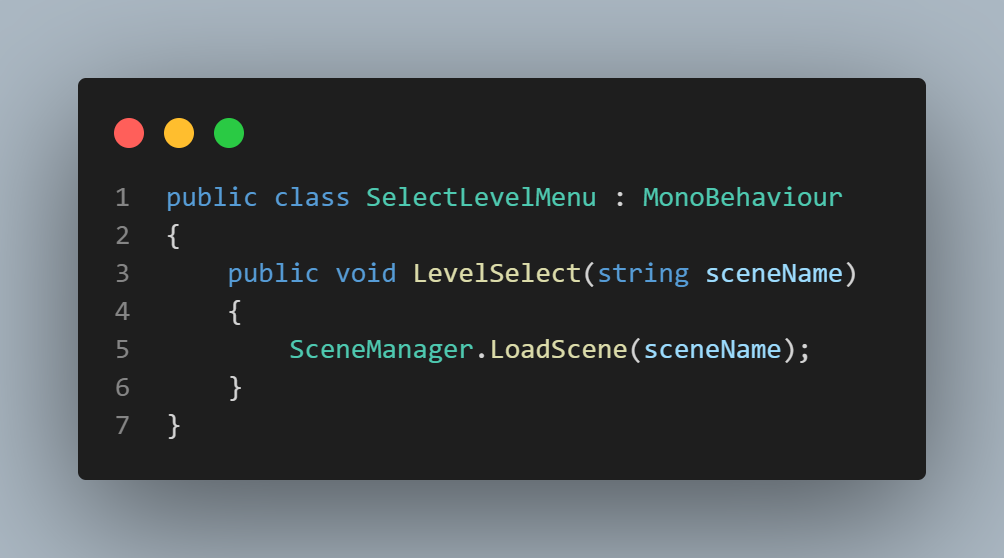
Finally, for the Select Level Menu script, I made a method called "LevelSelect" which takes in a string parameter. This parameter is used to help determine which level should be loaded when the player clicks a button.
Gameplay Mechanic Code Examples
Player Controller Script
Here is the script of the player controller code.
Player Controller
Player Collision Handler Script
Here is the script of the Collision Handler script.
Collision Handler
Rocket Refuel Scripts
This is the logic for the rocket refueling mechanic.
Rocket Refuel UI & Integer Values
Rocket Refuel Audio Handling
Fuel Bar Slider UI Script
Object Oscillator Script
Here is the script for object oscillation.
Oscillator Code
Scene Transition Script
Here is the script for the scene animation & transitions.
Scene Transition Code
Game Music Scripts
Here is the scripts that handle playing game music & their transitions.