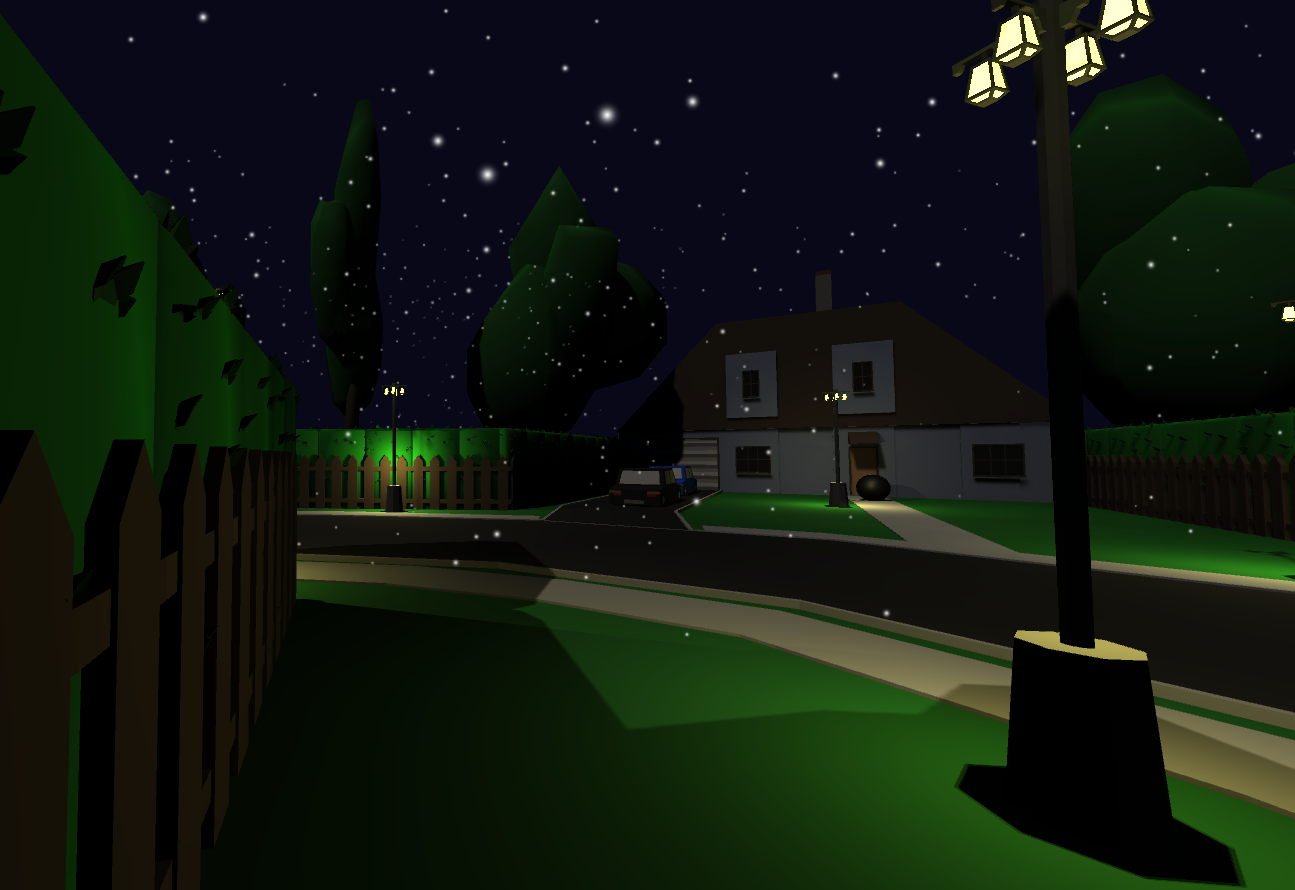
Haunted Christmas Delivery was developed as a week long game jam. The team was comprised of 3 people, an artist and two programmers. In this game, the ghosts of Christmas past have been set loose! Help make people happy on the night of Christmas by delivering gifts to their doors! Try not to get spooked by the spooky ghosts.
Game jams allow us to test the skills we currently possess and quickly learn new ones. This game jam was no different. We had ten days to make a Christmas themed game. The team I was leading was comprised of three individuals, one artist and two programmers. I took the role of lead programmer. This project was a great way for me to check my skills and use a lot of what I learned in university. Using these skills and also utilizing my past experiences, I could see huge improvements from my previous projects. These improvements are also thanks to the amazing team I was working with.
My previous game development and app development projects were done alone. This time I was running a team. The methodologies I used when developing alone were not enough for this project. To help organize and improve productivity, we implemented an Agile development methodology and altered it so we could fit it within a week. We planned our sprints every two days. Before each sprint, we planned game mechanics, design and art. After two days, we would test the mechanics we created and moved ahead with the next sprint until the end of the week.
This project also helped me improve my project management skills. During development I learned a lot about planning the project, defining the scope, implementing the development methodology, and communicating with the team. At the end of production, I could see a big improvement in this skill set.
The Challenges & Impact
Challenges I Overcame
Making a game in a week was extremely fun & challenging. Here are some of the challenges we faced as a team and overcame:
Defining the scope of the game that fits a week of development by communicating with the team and deciding first what the fundamental mechanics we needed for the game are and separating those from optional mechanics and features.
Creating a coding standard for the team by consulting online resources and deciding on one that worked for us.
Quickly programming mechanics for the game by utilizing the agile methodology to help us manage our time and productivity.
Quickly finding and fixing bugs in our code by testing regularly using peer reviewed testing.
Creating an AI for the game in a week by working together with a great team member.
My Impact
Due to the strict time frame we had for the game jam, there were times when we shared development roles. However, thanks to our talented team, I was able to focus mainly on programming and project management. Here are some of the things I did for the project.
Coding various gameplay mechanics & systems, such as - Character Controller. - AI Behavior with Co-Developer. - Player Damage Logic. - Enemy Combat Logic. - UI Implementation. - Object Oscillation. - Player's ability to throw objects. - Player's ability to hold objects. - Health & Stamina System. - Implement Audio. - General bug & error fixing. - Player objective & win logic.
Implementing an agile development model, holding SCRUM meetings and overseeing the development process.
Implementing physics based mechanics for items in the game.
Gameplay Mechanic Descriptions & Video Examples
Haunted Christmas Delivery - Breakdown
Haunted Christmas Delivery was developed in 1 week for a game jam. It was developed using C# in Unity as well as Blender for some assets. This section is to showcase videos & code snippets of the created mechanics.
Here are some examples of gameplay mechanics & features that I worked on! Each description of the mechanic will have a video. If you'd like to see the code as well, it will be posted at the bottom of the page!
Player Controller
This first video showcases the Player Controller script. This script manages the player's ability to walk, run, look around, crouch, & jump. The player's ability to move is located in the "UpdateMovement" method. This method takes unity's old input system and uses it to allow the player to use WASD to move. We took the "Horizontal" and "Vertical" movement inputs and set them to their respective variables. We then normalized the inputs. We also used Vector2.SmoothDamp() to smooth the movement direction. The "GetSprintInput" method simply sets a Boolean value to true when the sprint key is pressed. If the value is true, the "Sprint" method sets the Movement Speed variable to the Sprint Speed. The player's Stamina stat is then decreased for as long as the player is sprinting. Audio is also played during this time.
Another script called "StaminaRecharge" handles the player's ability to regain stamina when they aren't running. Both the integer value & UI are updated here.
The next method, "Jump" handles the player's jump ability. An IF statement checks to see if the player is grounded & if the space key was pressed. If so, the player's Velocity-Y is adjusted and then the player is able to jump.
Finally the method "Crouch" handles the crouch mechanic. An IF statement checks if the player is pressing the correct key, if they aren't already in the crouch animation, if they are grounded and if they aren't sprinting. If all these values are okay, the Movement Speed is set to the Crouch Speed and a Coroutine is started which handles the players controller's height for the crouch.
Player Stats, Player Collision Handler, & Healing_Medkit
This next video showcases various scripts. The Player Stats script, Player Collision Handler Script, & Healing_Medkit Script Scripts. Due to the amount of scripts that will be described, I will add the video first and then have the descriptions below.
Player Stats
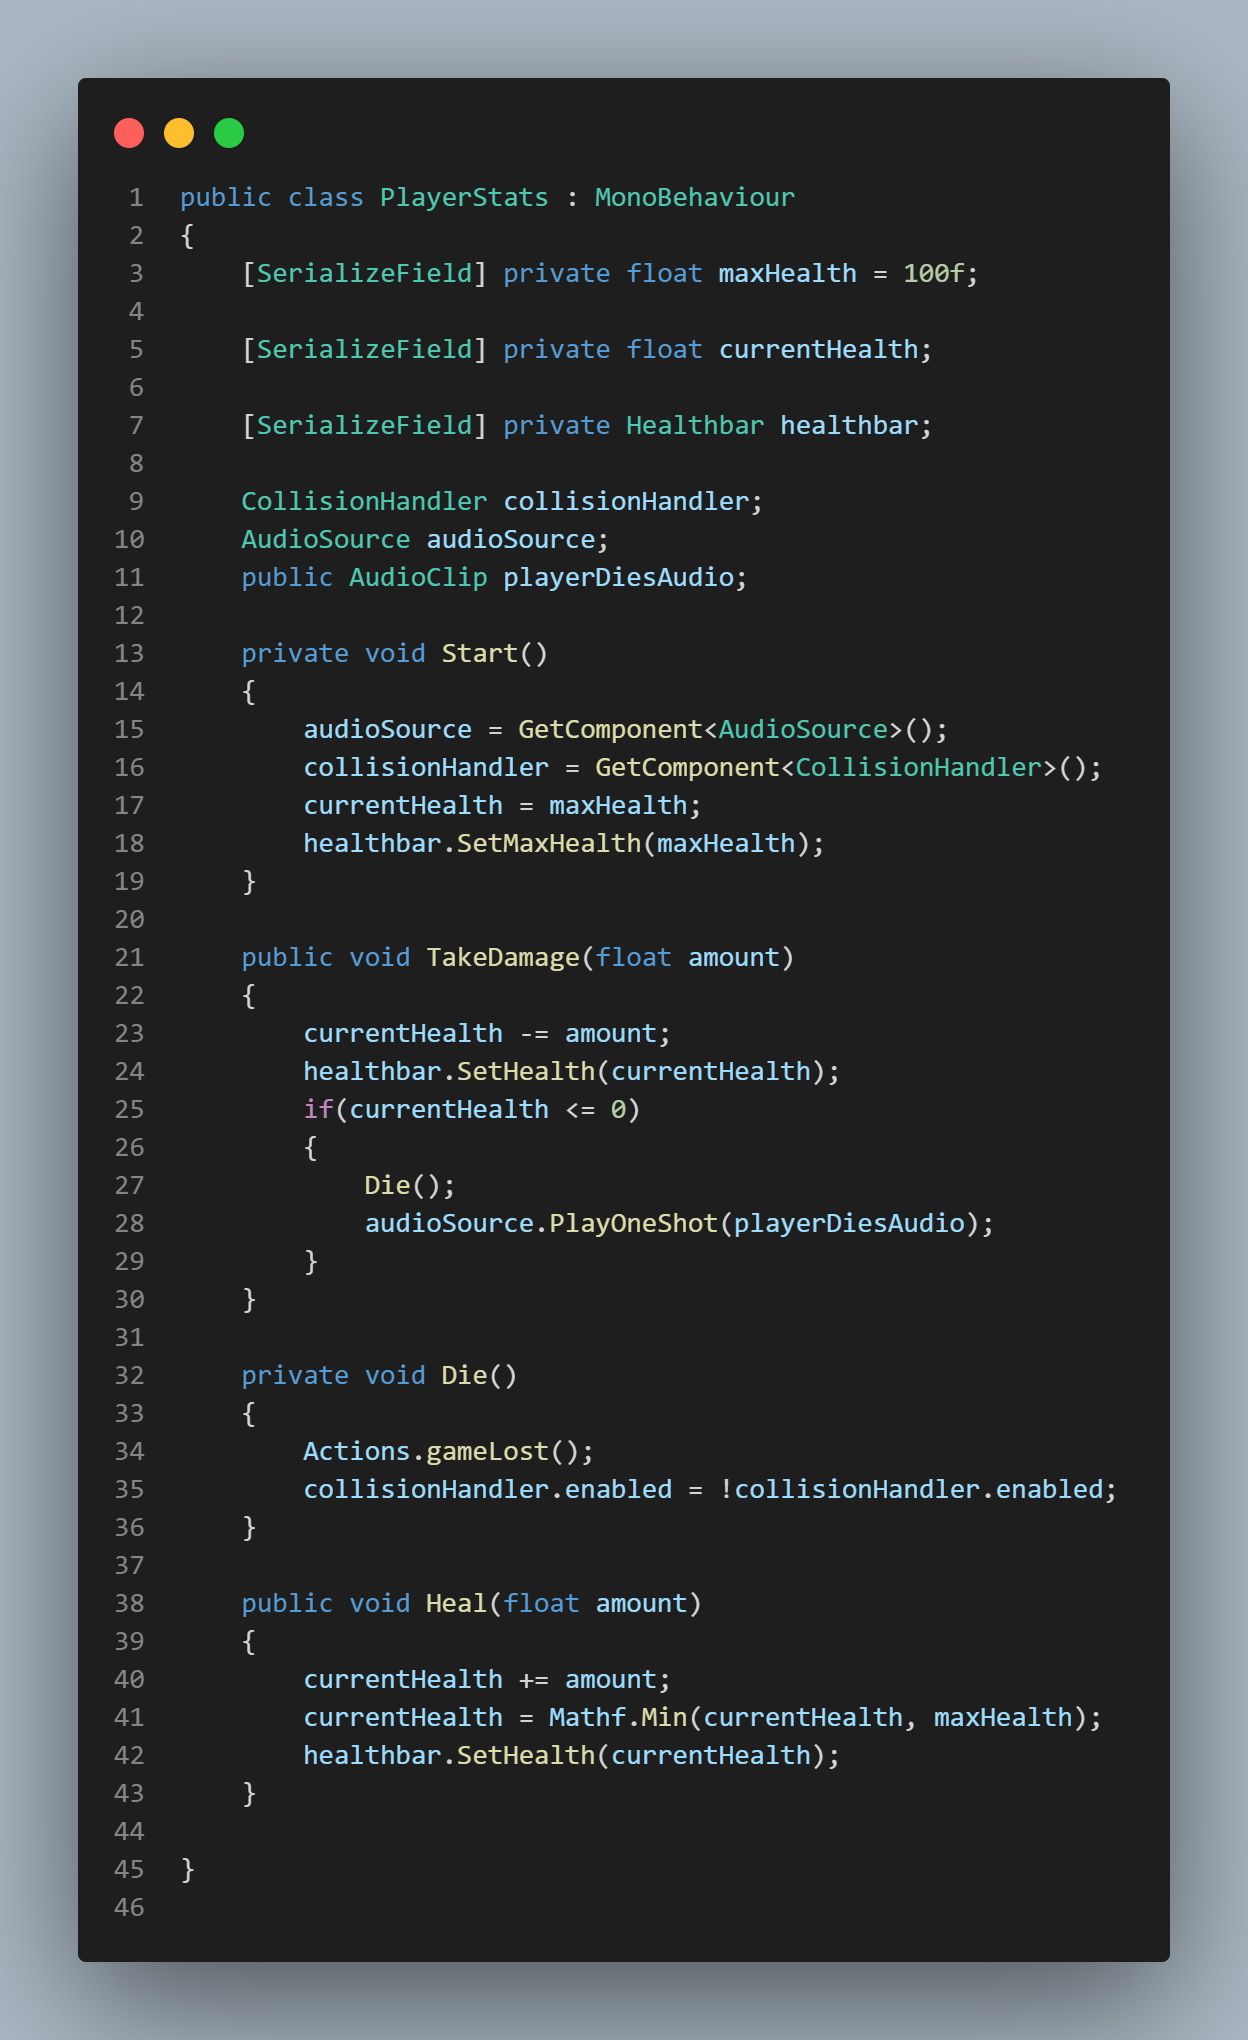
The first script we will discuss is the Player Stats script. This script handles one of the major mechanics shown in this video. This script handles the player's ability to take damage, die & heal. Additionally, this script handles some of the audio.
First we have the "TakeDamage" method which takes in a float for amount of damage. This method takes the damaged value from the Collision Handler and decreases that from the current health. The health bar UI is also set equal to the current health. Once the player's health points reach zero, the next method "Die" is run. Audio for the player's death is also played here.
The Die method simply gets the gameLost method from Actions and disables the Collision Handler script.
Finally, the last method is the "Heal" method. This takes a float parameter for the amount of health. Once the player heals, the Medkit script sets the heal amount and this method adds the appropriate float to the current health. The Health Bar UI is also updated to the current health.
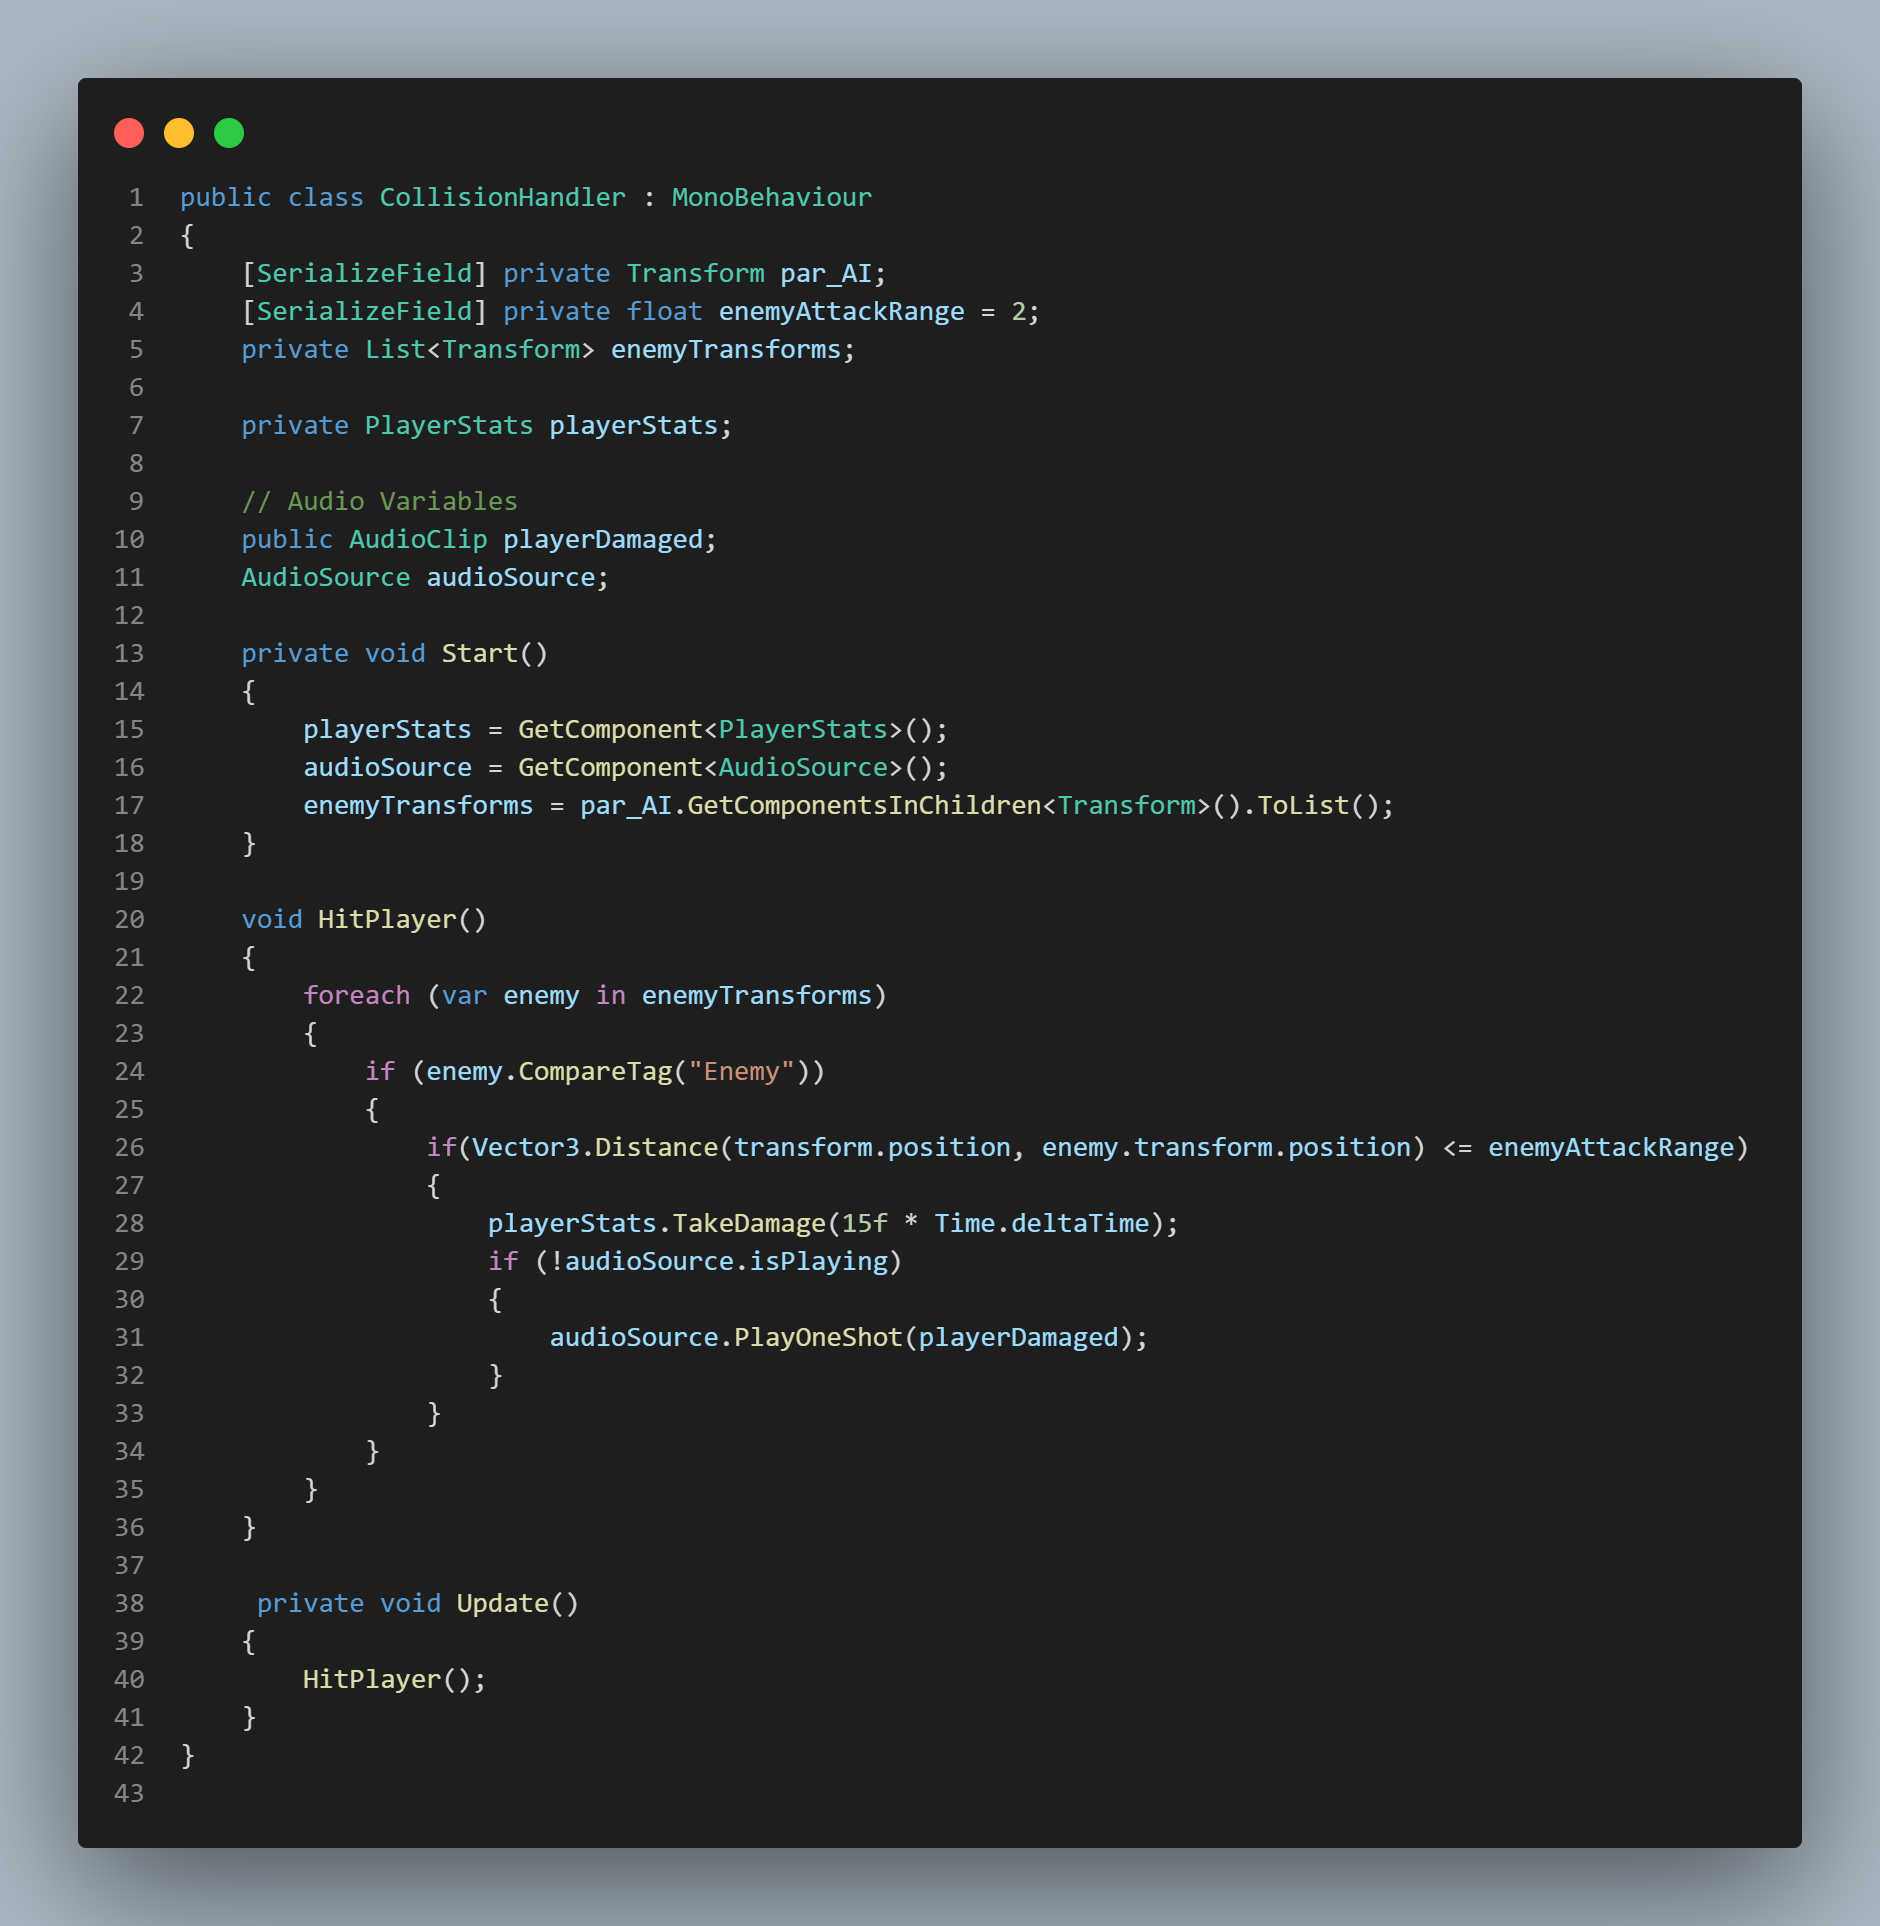
Player Collision Handler
The next script handles the player's collisions with the enemy. This script is attached to the player. This script contains one main method called "HitPlayer". Here it uses a for each loop and runs through a list of objects that contain the enemy game objects. If the player collides with these objects, an IF statement checks the distance between the player & enemy and also checks the AI's attack range. If all of these values are okay, the player will take a predetermined amount of damage via the Take Damage method in the Player Stats script. Audio of the player getting hurt is also played.
Med Kits & Cooldown UI
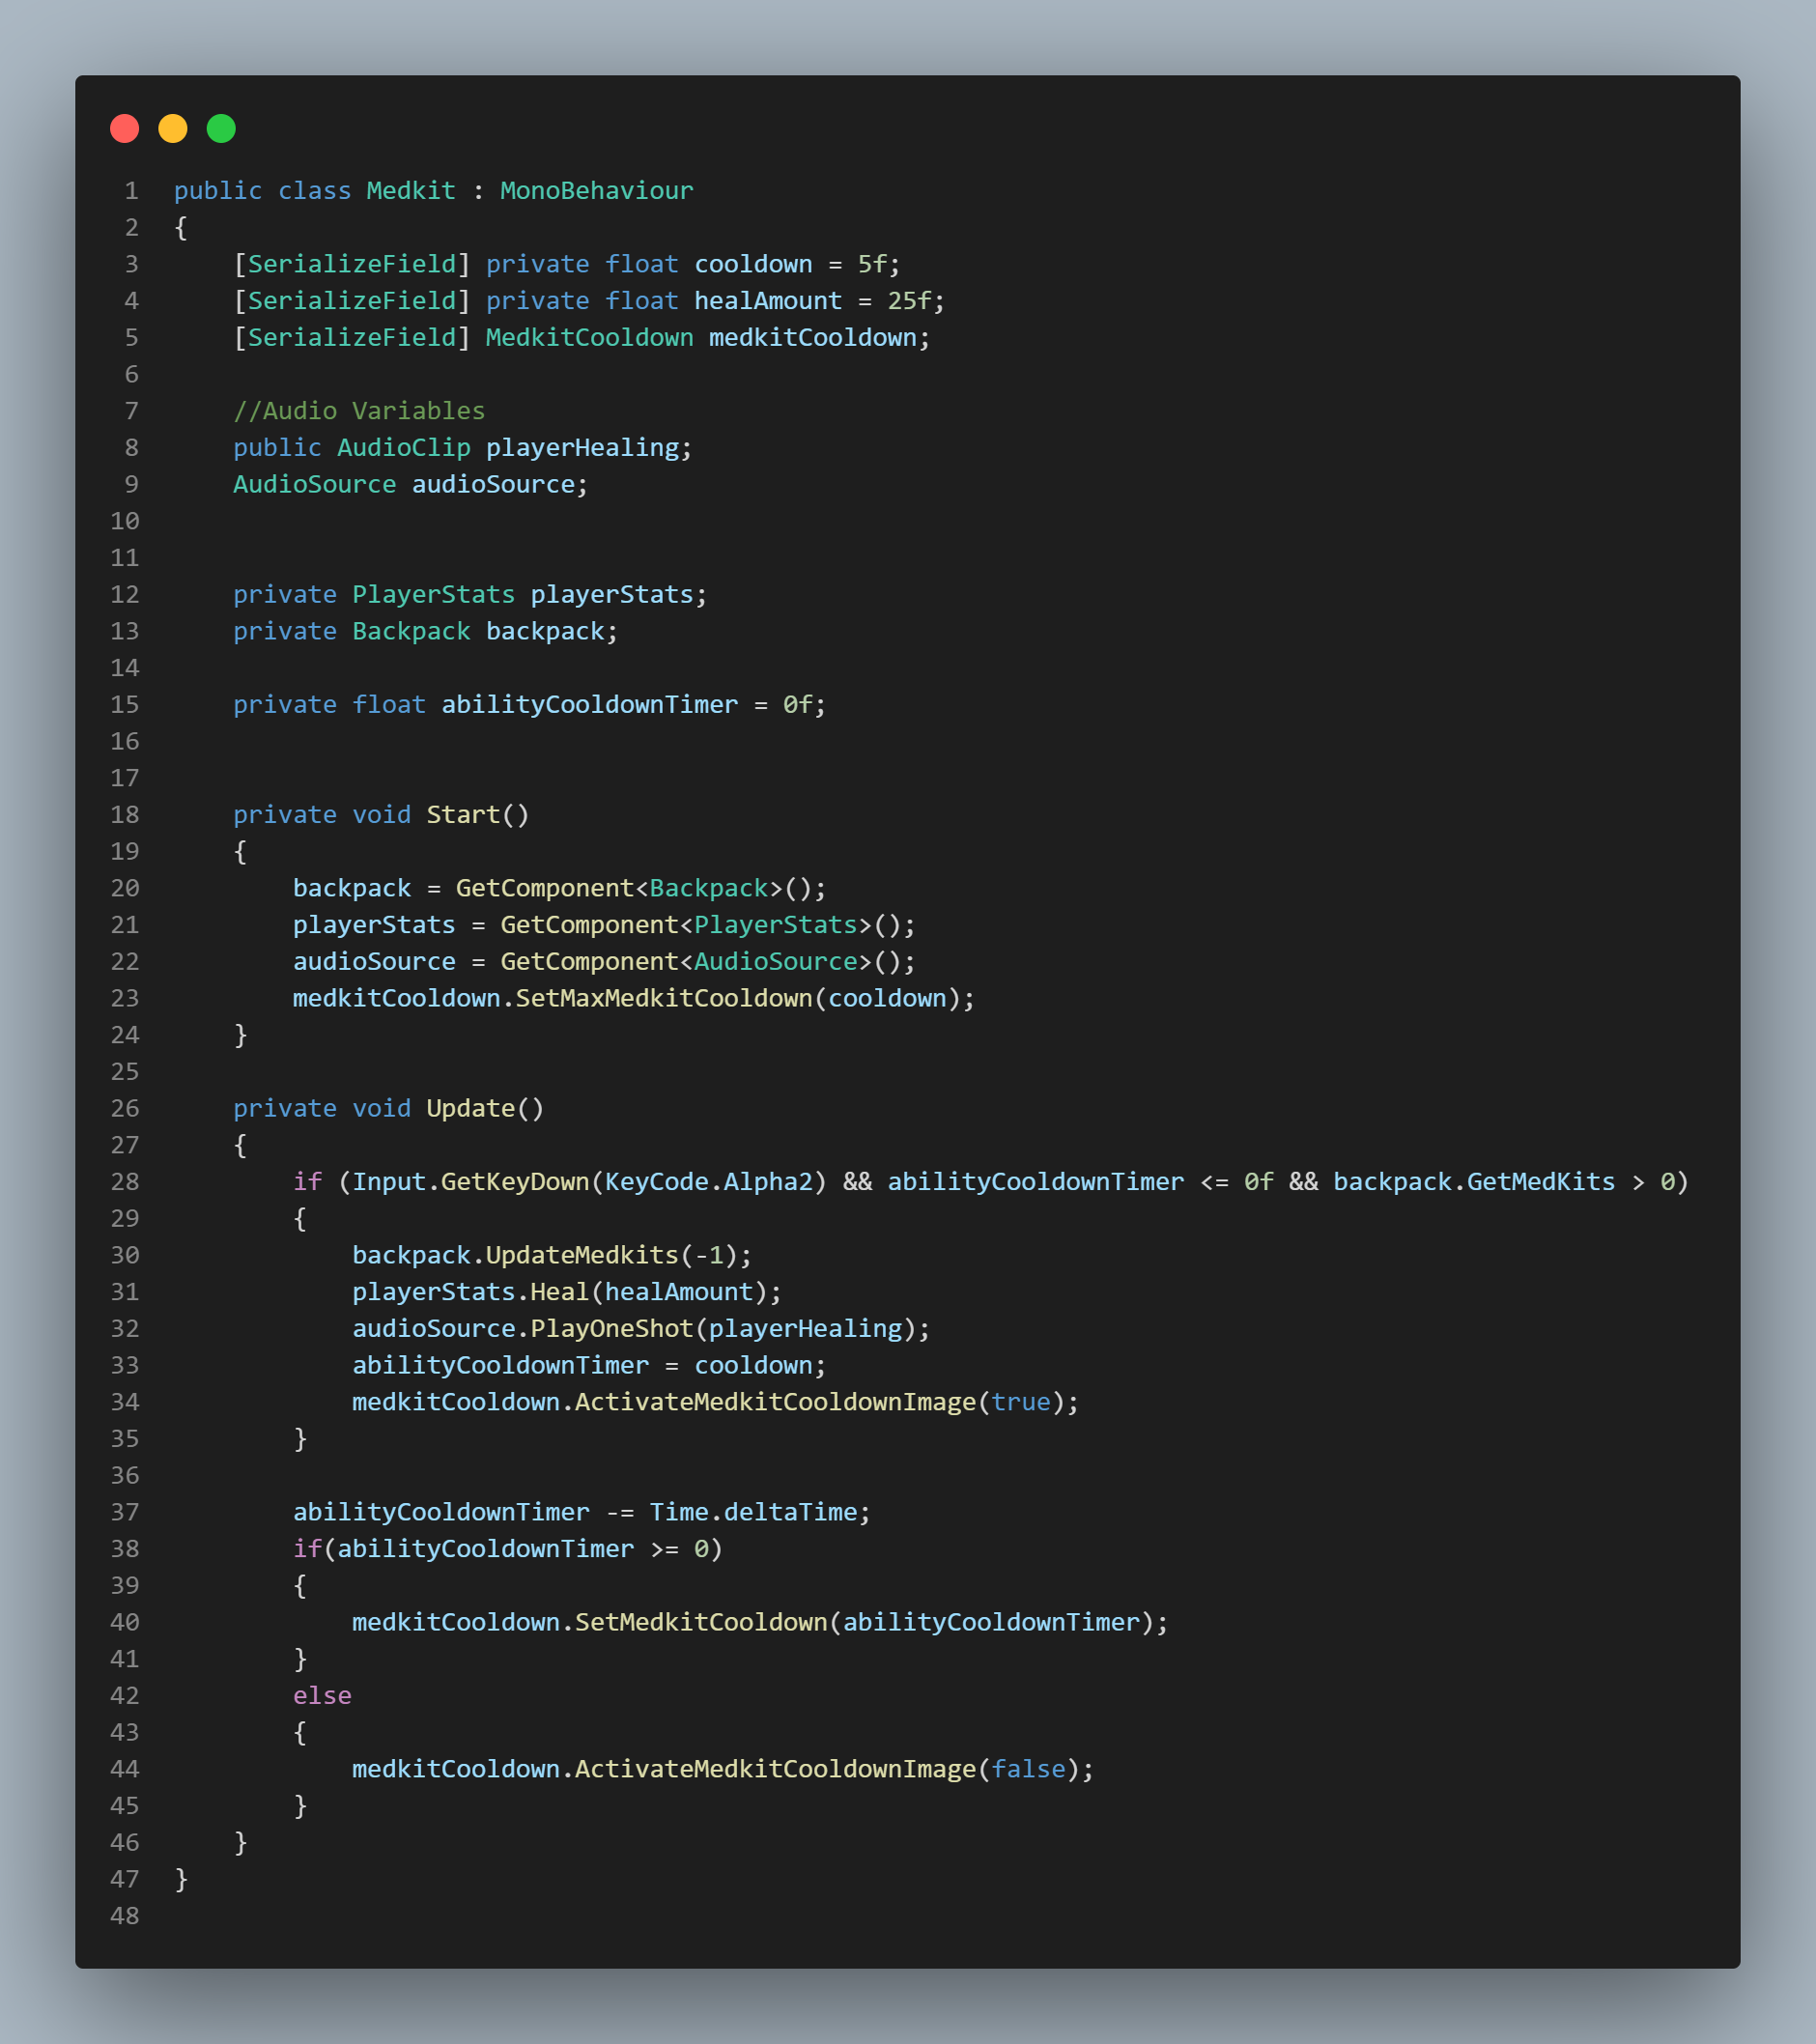
This next script is holds the logic for med kits in the game that allow the player to regain health points. This script's code is all located in the Update method. If the player presses the number 2 and the cooldown timer is not active, the Player Stats method "Heal" is called and uses the variable "healAmount" which determines how much HP the player will regain. An audio will also play.
A cooldown timer was also added to this script to ensure the player doesn't continually press the button to regain health. While the timer countdown is active, a UI image also updates as the timer decreases.
The player's inventory is also updated in this script if they use a med kit. The inventory/backpack script will be discussed later.
Player Inventory Script
Next we will look at and discuss the player's inventory & item collection mechanics. These two scripts work together to make the player's inventory work.
First we will discuss the script, "Backpack". To make this work, I defined variables that hold the max number of items the player can hold and the current number. The max number of items a player can hold is 3. In order to update these values, I created two methods, "UpdateMedKits" and "UpdateBells". Both of these methods take in an integer parameter that updates the current number of that item. It also updates the Text Mesh Pro UI text with the appropriate number of items. This is updated when the player adds / removes and item.
Item Collection Handler
The next script is the Item Collector. This script uses a OnTriggerEnter to determine if the player has collided with the items. In this trigger check, I used the tag names of the items to check. If the player did collide with the object, either the Update Med Kits or Update Bells method is called from the Player Inventory script and the item's current value is updated. A pickup audio is also played and the object is destroyed.
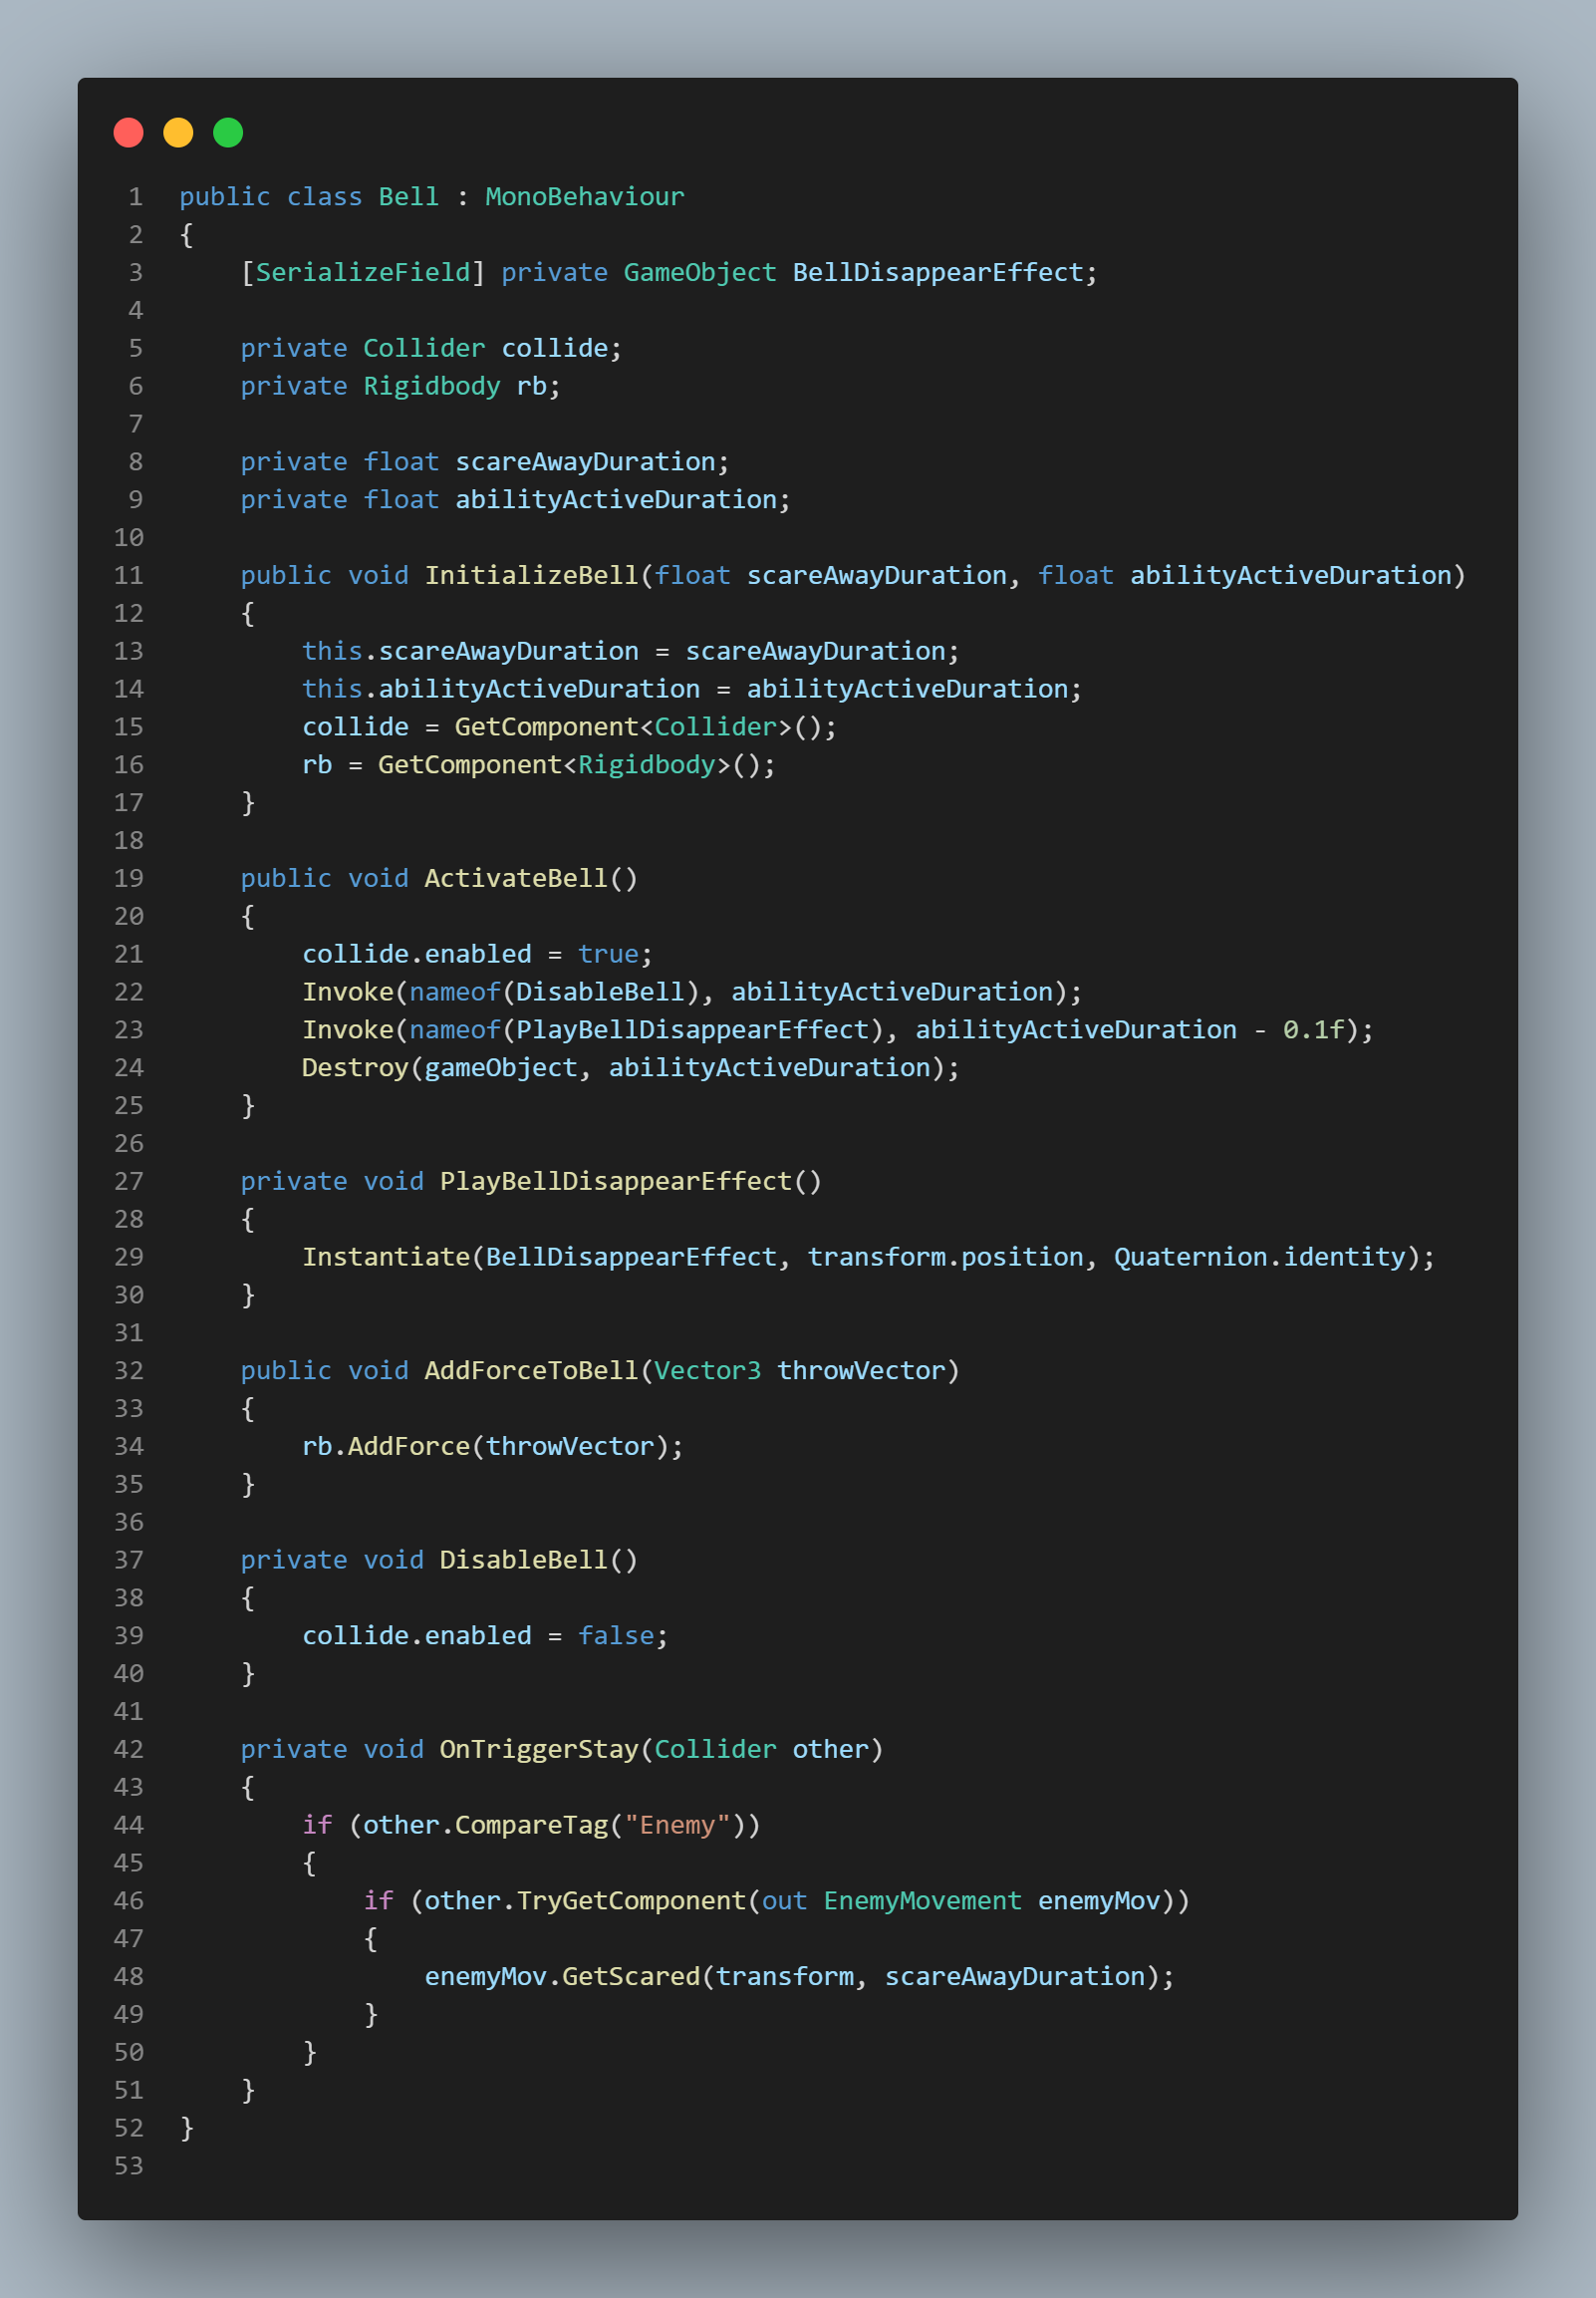
Bell Item
This mechanic was shown briefly in the previous video when I showed the inventory & it's UI being updated. This mechanic is for the Bell object. The bell in Haunted Christmas Delivery allows the player to scare away the enemy.
The first method in the Bell Script is the "InitializeBell" method which takes in two float parameters, "Scare Away Duration" & "Ability Active Duration". This method, as the name suggests, initializes the different parts of the bell object. First it sets both the parameters to themselves and caches both the collider & rigidbody.
The next method is the "ActivateBell" method. Here, the bell's collider is enabled, and the other two methods in this script are Invoked. Finally the game object is destroyed. The two methods that are invoked in the Activate Bell method are the "PlayBellDisappearEffect" & the "DisableBell" methods. The first method instantiates the effect when the bell disappears and the second method disables the bell's collider.
The final method is "AddForceToBell". This method allows the player to throw the bell. It can do this because this method takes in a Vector3 parameter which then uses the bell's rigidbody and uses AddForce() with the parameter.
Finally, this script has an OnTriggerStay which checks to see if the Bell makes contact with the enemy. If it does, it communicates with the enemy controller and runs the "GetScared" method to make the enemy run away.
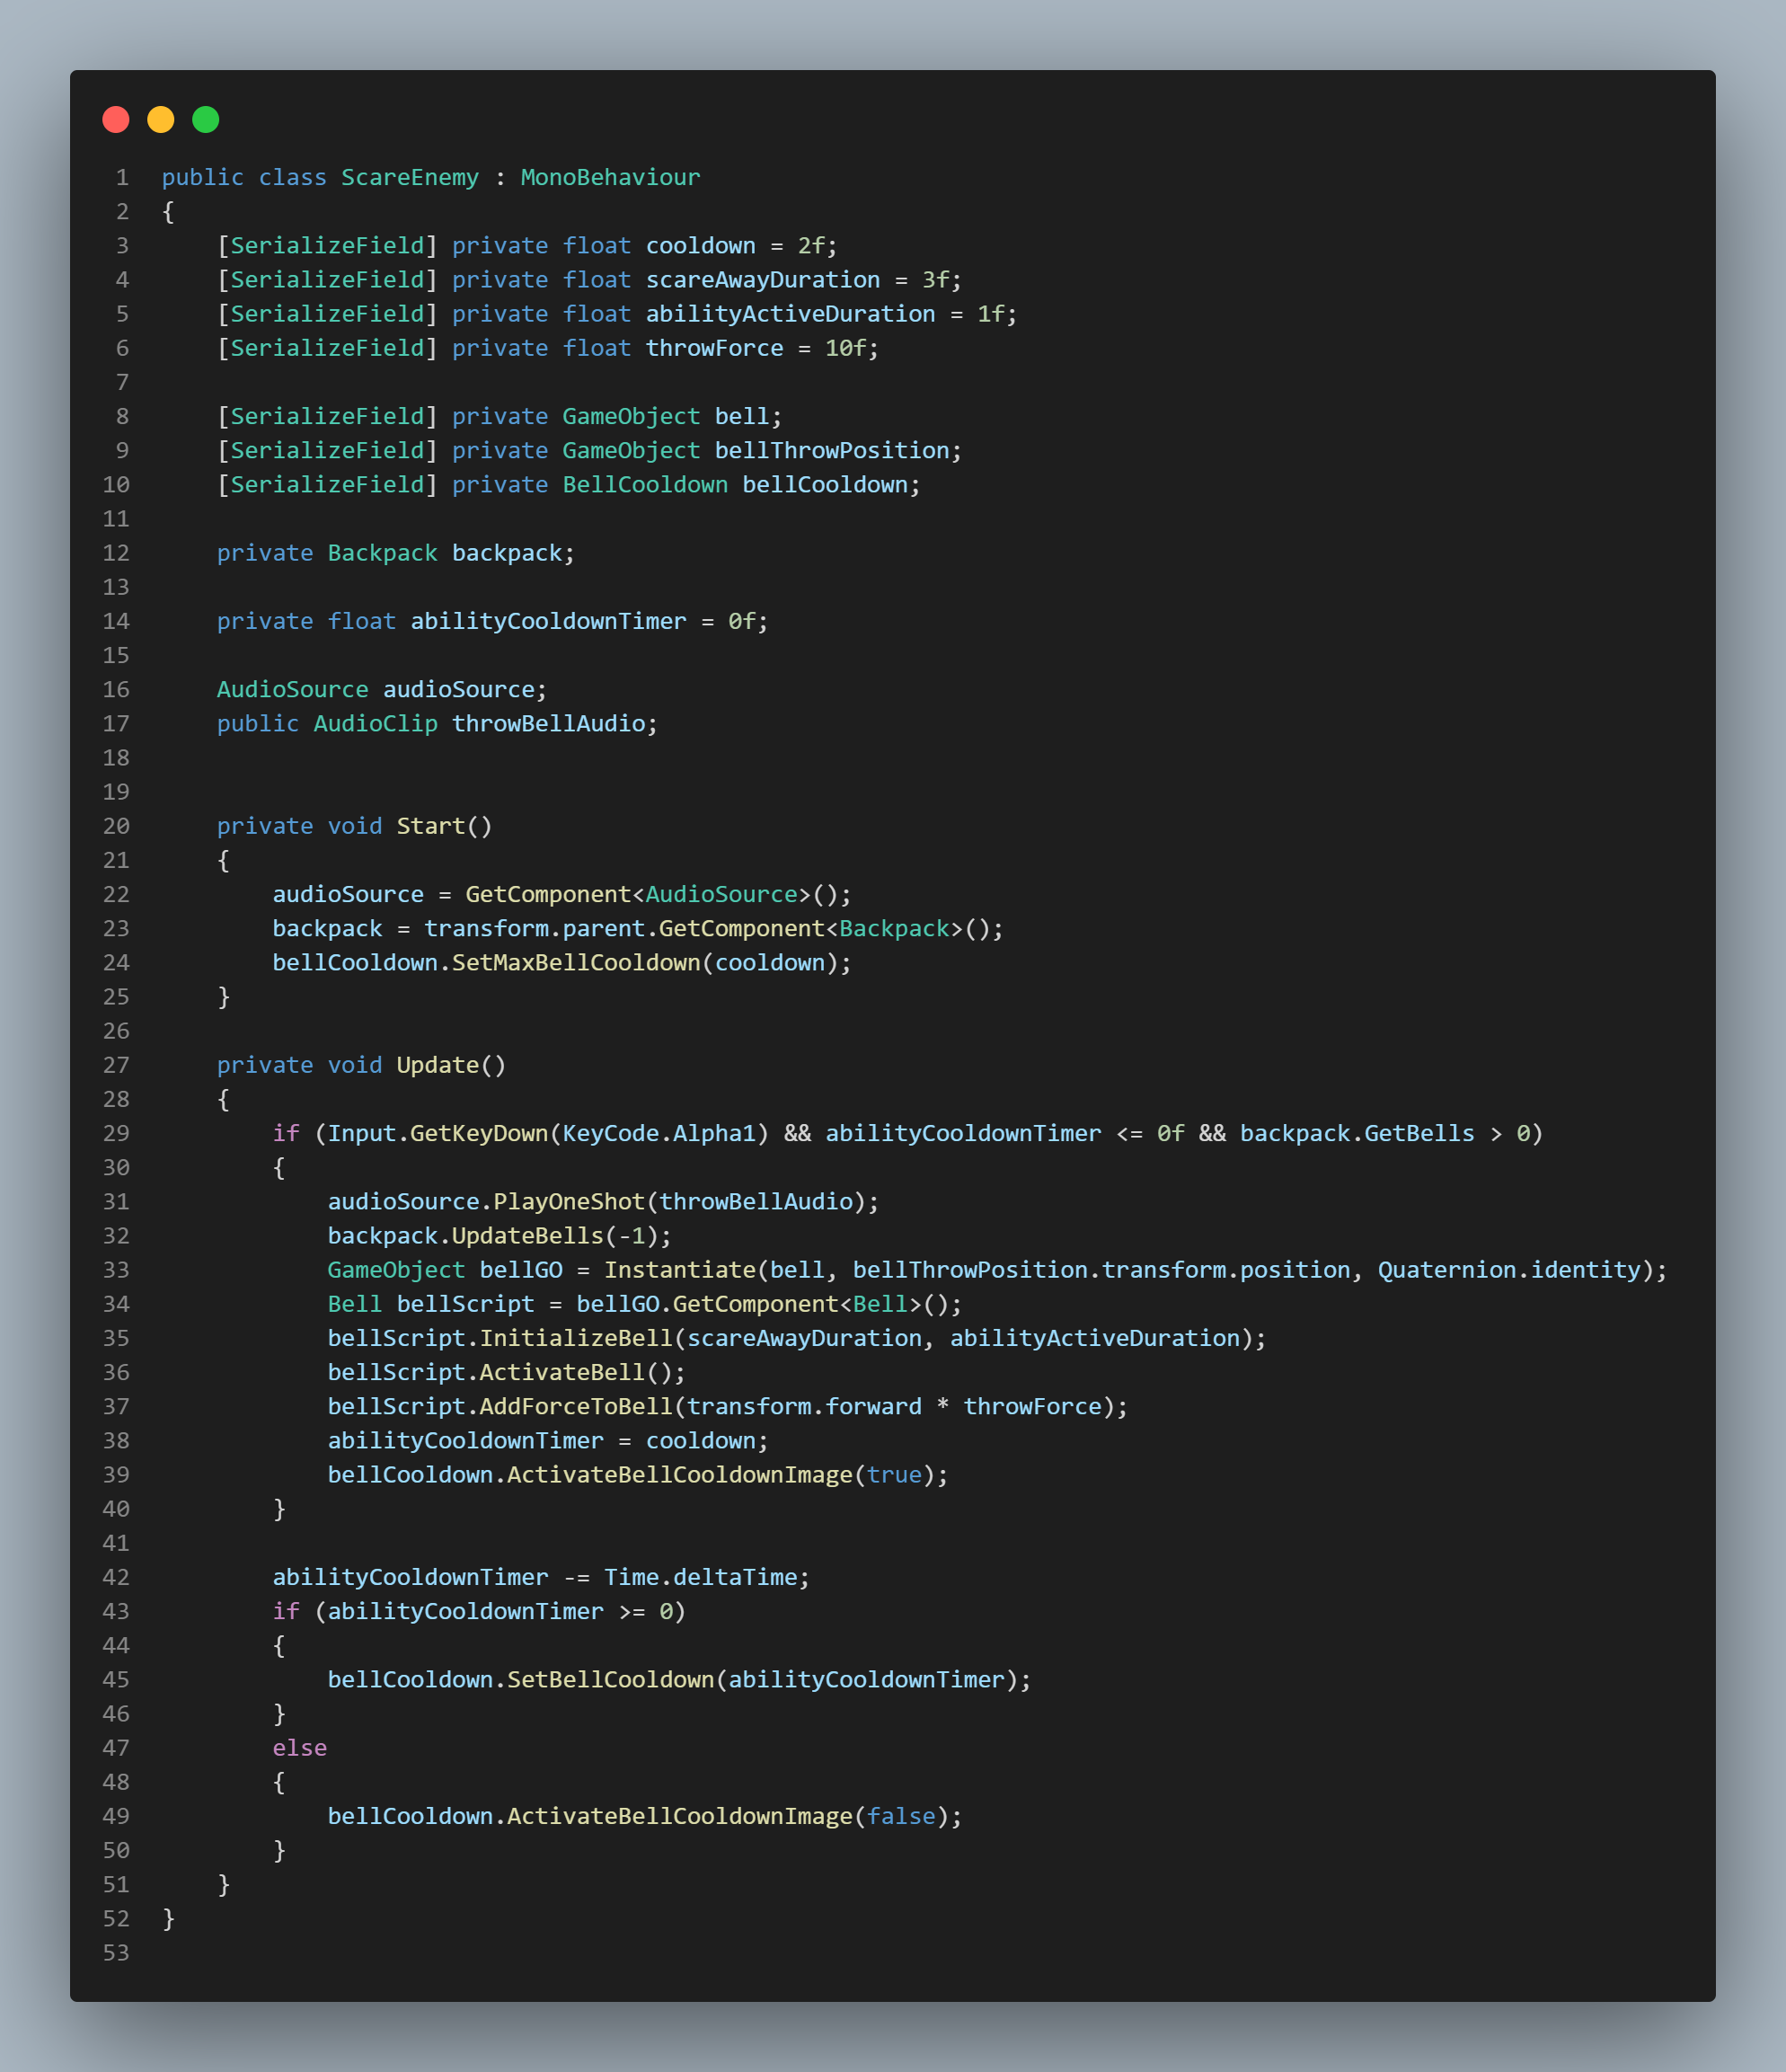
Scare Enemy (Bell Values)** EDITING **
This script was created to handle multiple functions. First in the Update method, it checks to see if the player pressed 1 & if the cooldown active. If these are okay, the Bell script's method "AddForceToBell" is updated with a throw force value. This allows the player to throw the bell. Additionally, the "scare away duration" & ability active duration" values are also passed into the appropriate method.
Next, the player's inventory for the bell item is updated and decreased. Finally, the ability cooldown timer value & UI image are updated accordingly.
Present Scripts
The next series of scripts make up the functionality for the presents, their spawn locations, physics, pickup ability, delivering logic, etc. These presents are the goal of the game and work as a puzzle for the player. I will briefly describe what each of the scripts do and after add the video showcasing the mechanics.
Pick Up - Presents
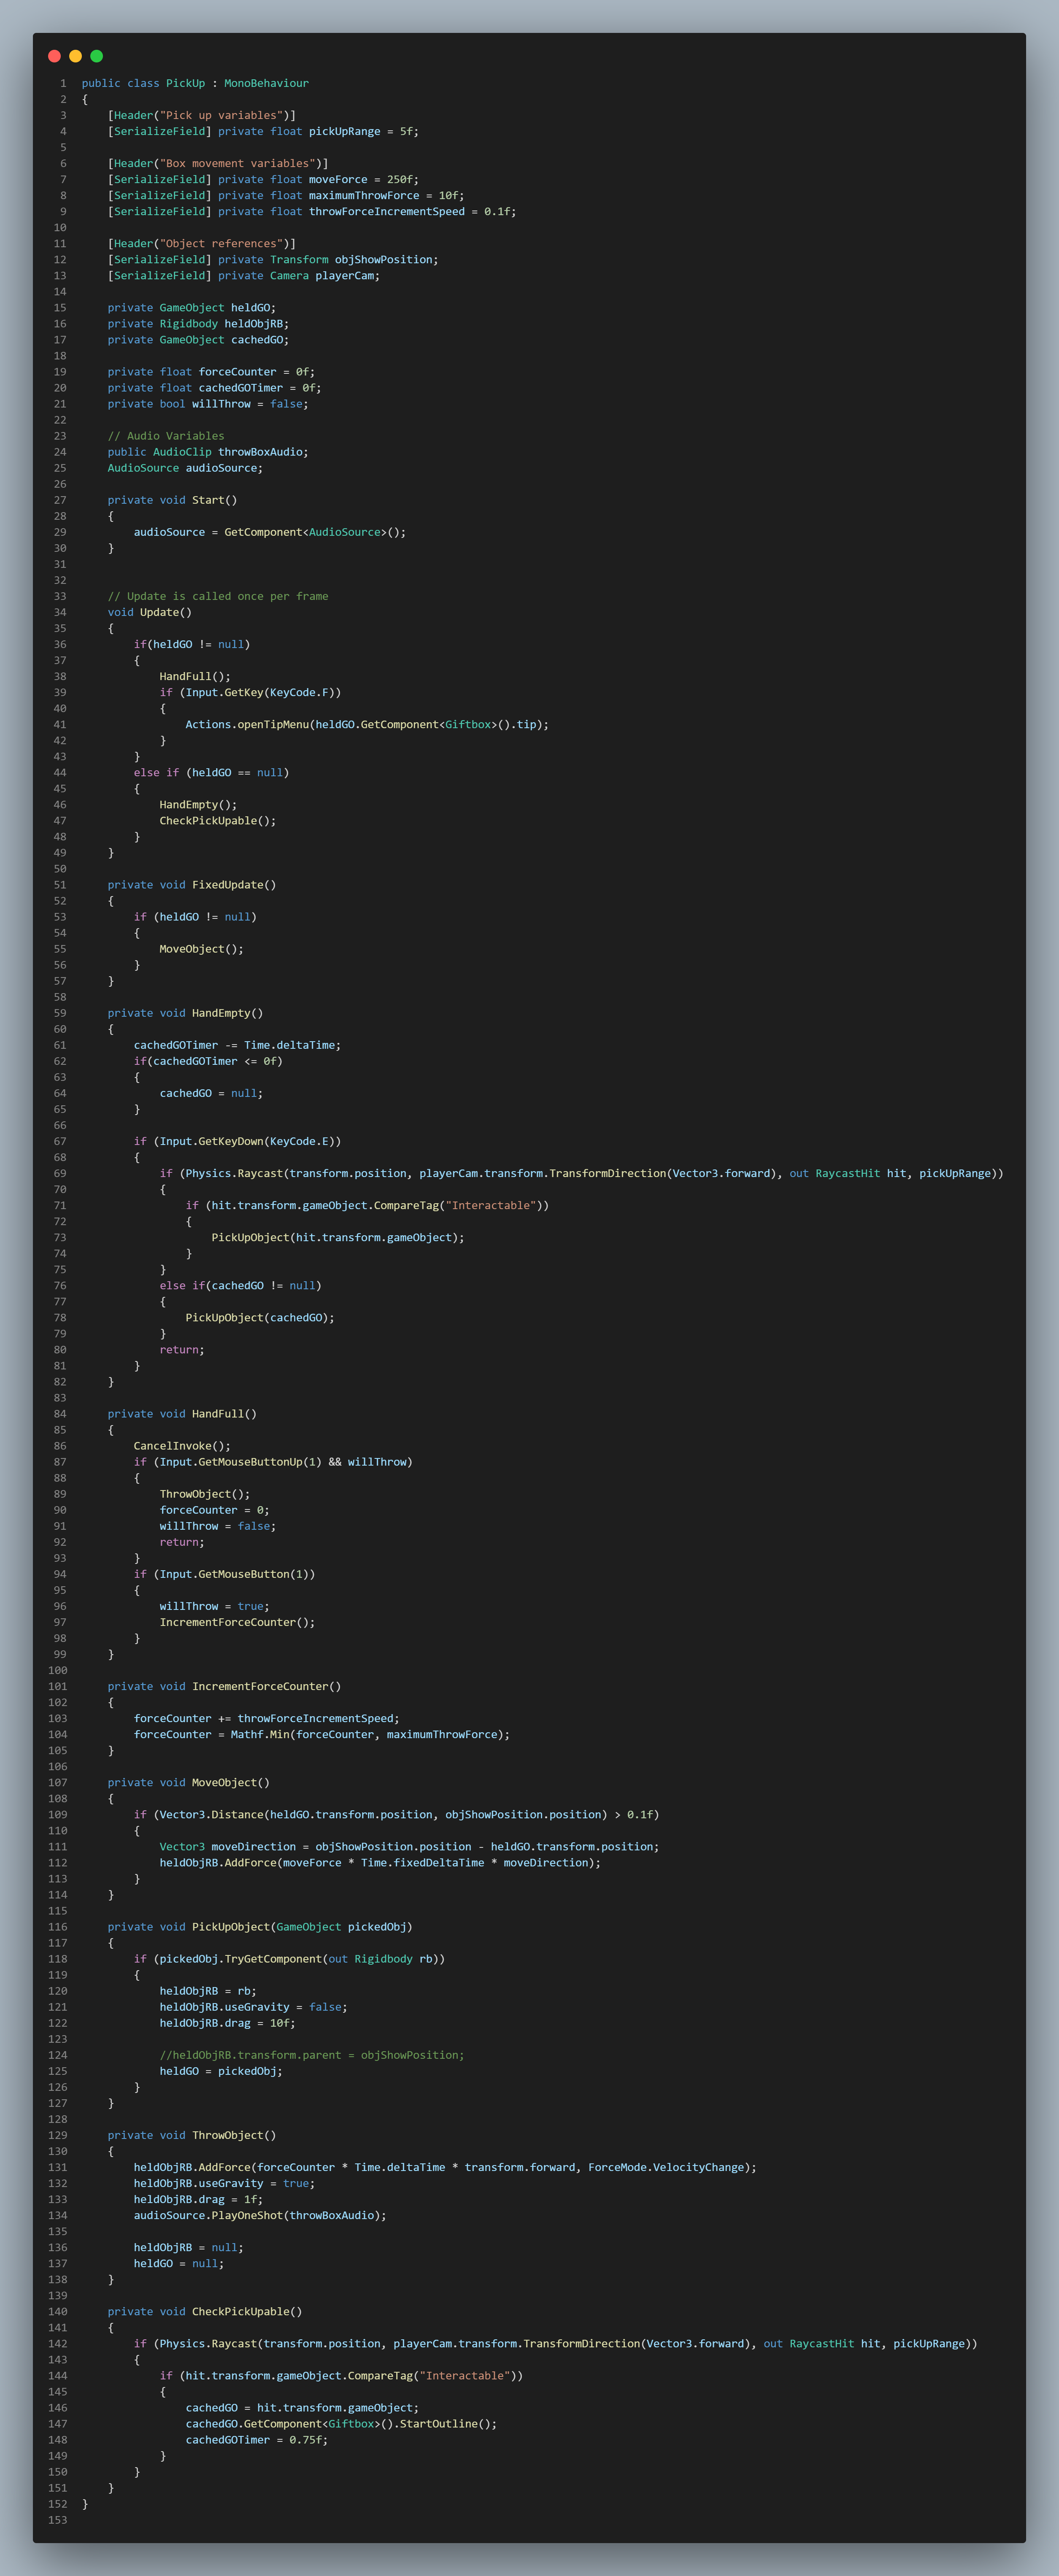
The first script in this group is the Pick Up script. This code allows the player to pick the presents up, & drop them and/or throw them.
The first method in this script is the Update method. Here an IF statement is checking whether the player is holding a present or not. If they are holding a present, then another IF statement allows the player to press "F" to get a hint to where they need to deliver it. This functionality is run via the "Actions" script. If the player is not holding a present, then the "HandEmpty" and "CheckPickUpable" scripts are run. Additionally, in the FixedUpdate method the "MoveObject" method is running.
The next two methods "HandsEmpty" and "HandsFull" check if the player is holding a present or not. The Hands Empty method, when the player presses "E", sends out a raycast in the forward direction in a specified range. If the raycast hits an object with the tag "Interactable", then the "PickUpObject" method is run. The Hands Full method on the other hand handles the player's ability to throw presents. If the player left clicks the "ThrowObject" method is run and the variable "forceCounter" is set back to zero. However, if the player holds left click, the forceCounter is continually added upon which will make the player's throw much farther.
The "PickUpObject" method allows the player to pick up the presents accessing the objects rigidbody, setting the gravity to 0, setting the drag to 10 and storing that value into a variable which is then used in the MoveObject method. The Move Object method takes in the object's rigidbody's variable and uses it in conjunction with a Vector3 for movement and AddForce.
Finally the "ThrowObject" method takes the previously stored variable holding the object's rigidbody and uses the AddForce method. This method takes the previously discussed forceCounter and multiplies it by Time, transform.forward and ForceMode.VelocityChange. Gravity is then enabled, drag is set back to 1 and audio for throwing objects is played.
Box Manager
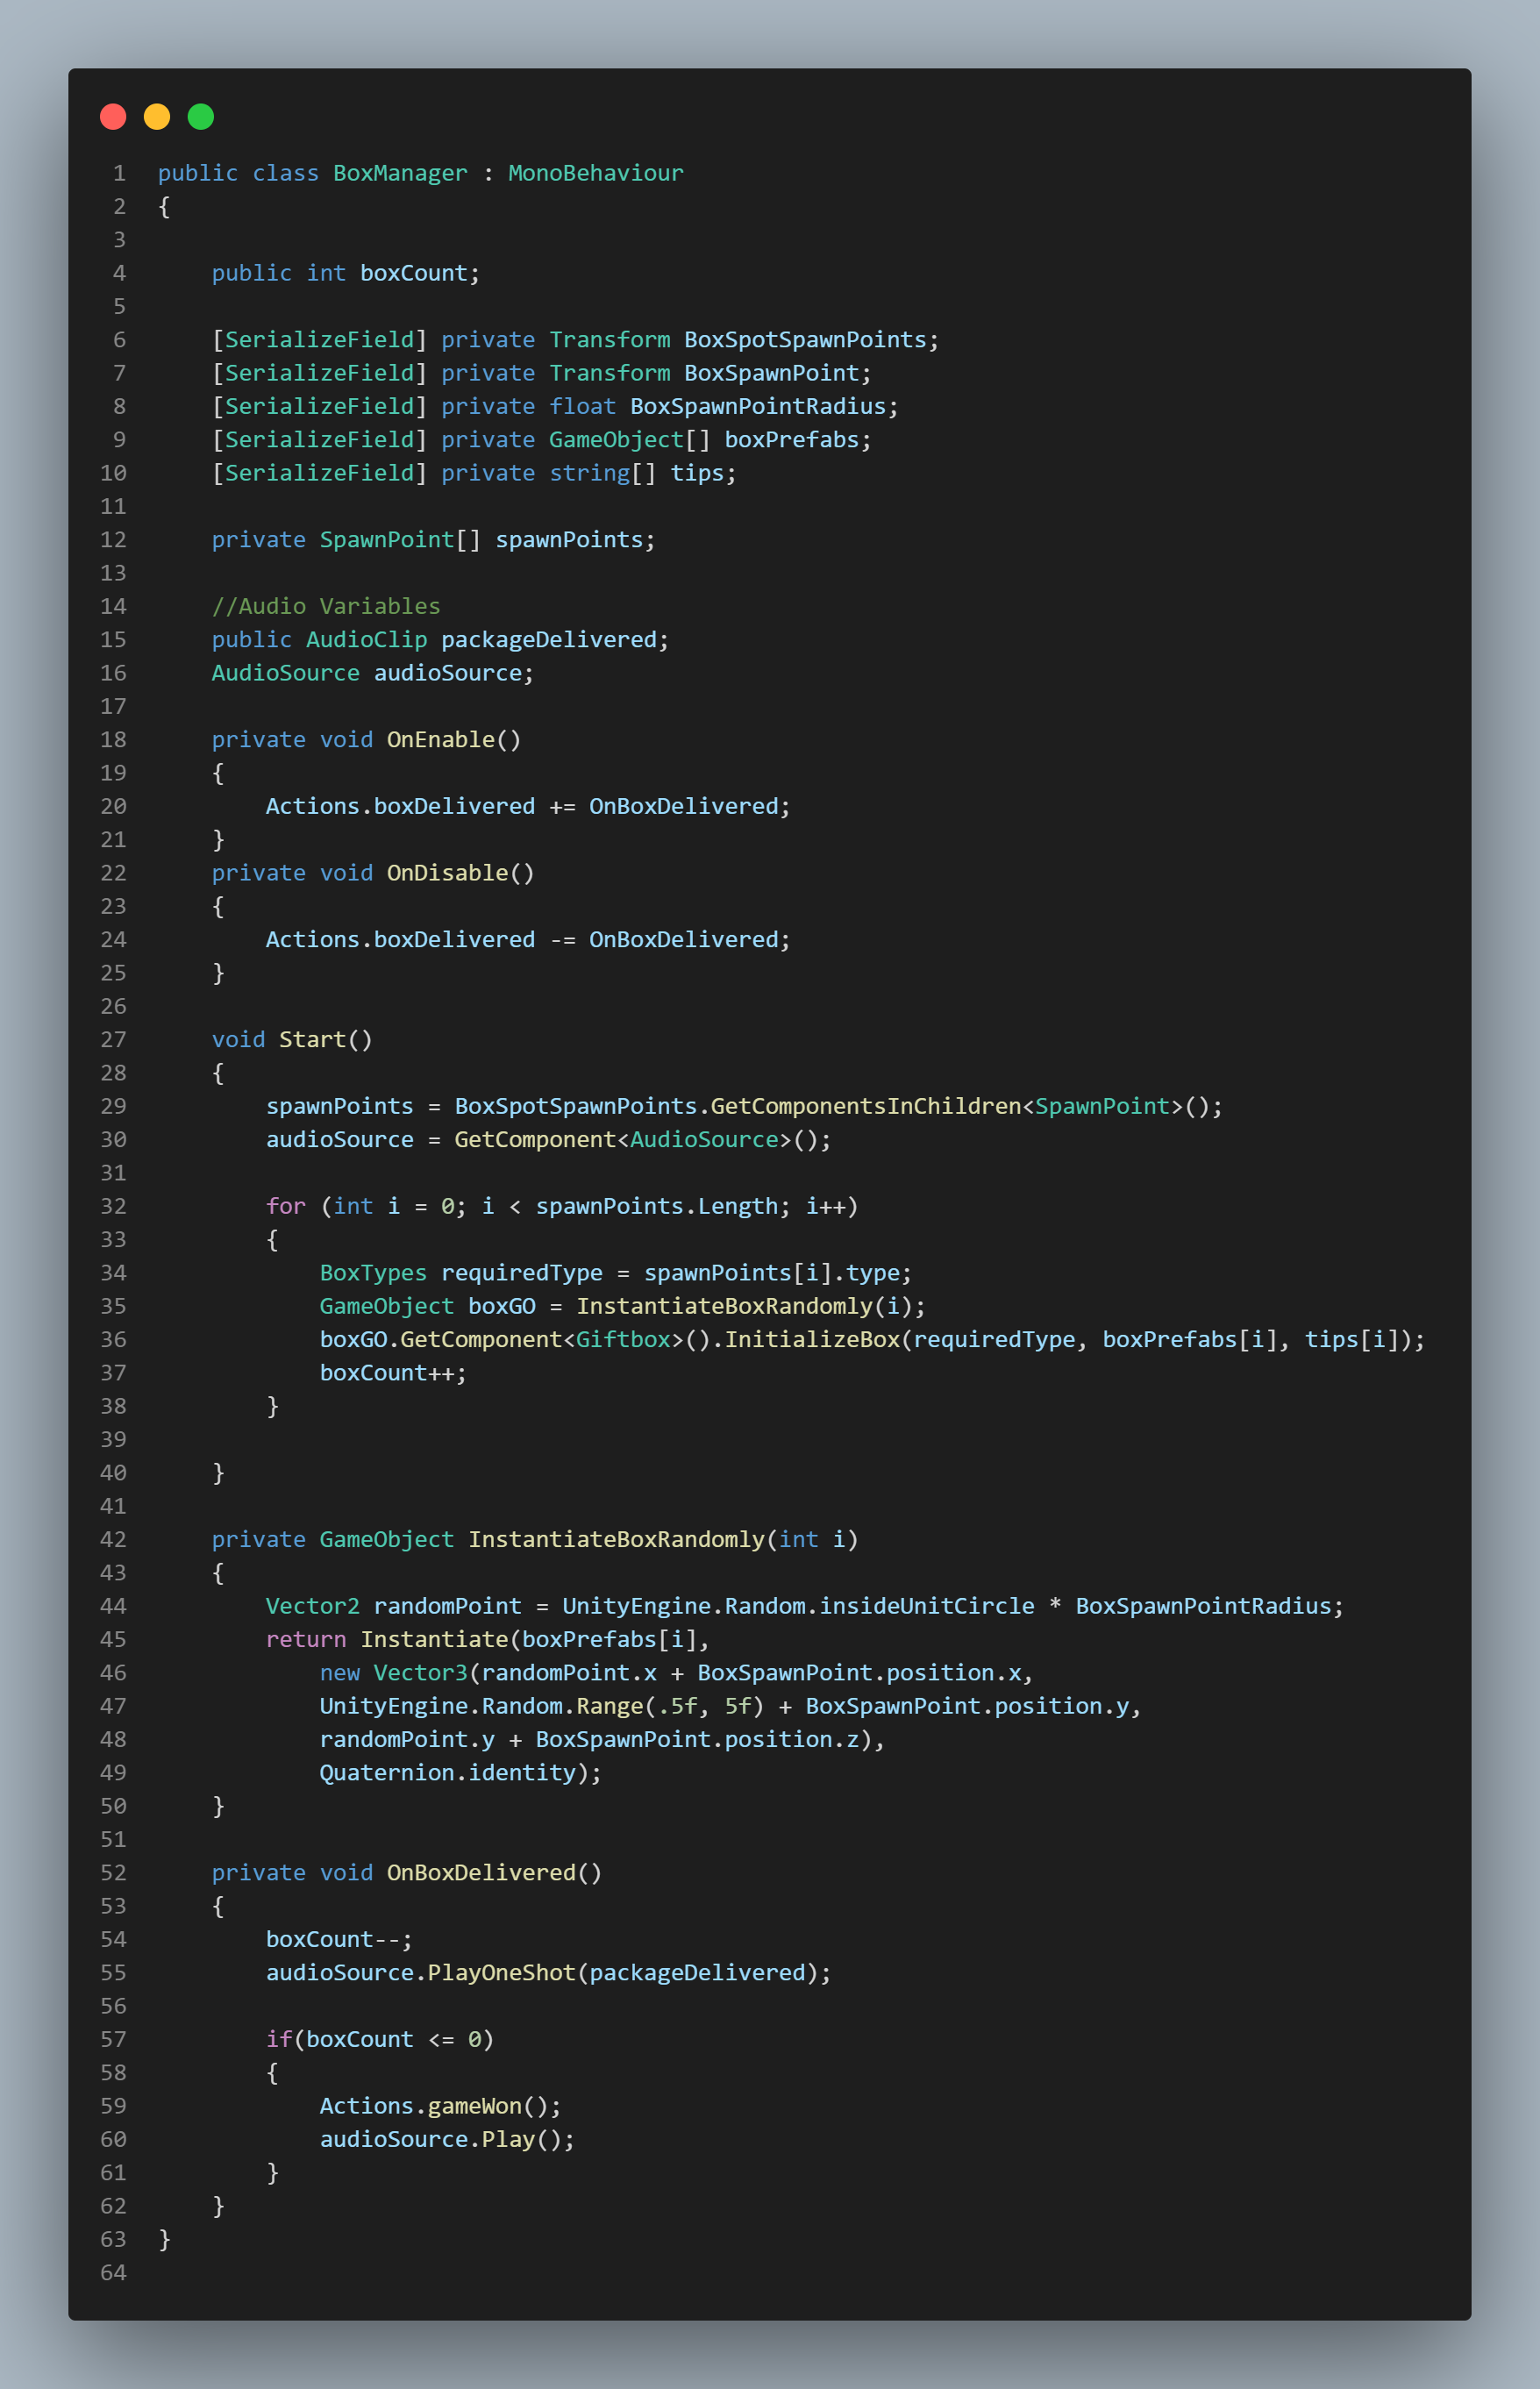
The next script is the Box Manager. This script manages the present's spawn locations at the start as well as handles the logic for when the player delivers a present.
In the Start method, for for loop runs through each of the objects in the Spawn Points array from the Spawn Point script. for each of the objects, the randomized spawn point, required type, prefab and hints are decided. For each object, the integer variable box count is also incremented. The randomized spawn points for the presents is determined via the "InstantiateBoxRandomly" method. This method takes a Vector2 variable called randomPoint and sets it to the BoxSpawnPointRadius multiplied by the unit circle. The points are determined by using Random.Range and the Box Spawn Points (and their Y-axis position).
Finally The "OnBoxDelivered" method decrements the boxCount every time it is run (when the player delivers a present) and plays an audio file. An IF statement checks to see if boxCount is 0. If so, the GameWon method is run.
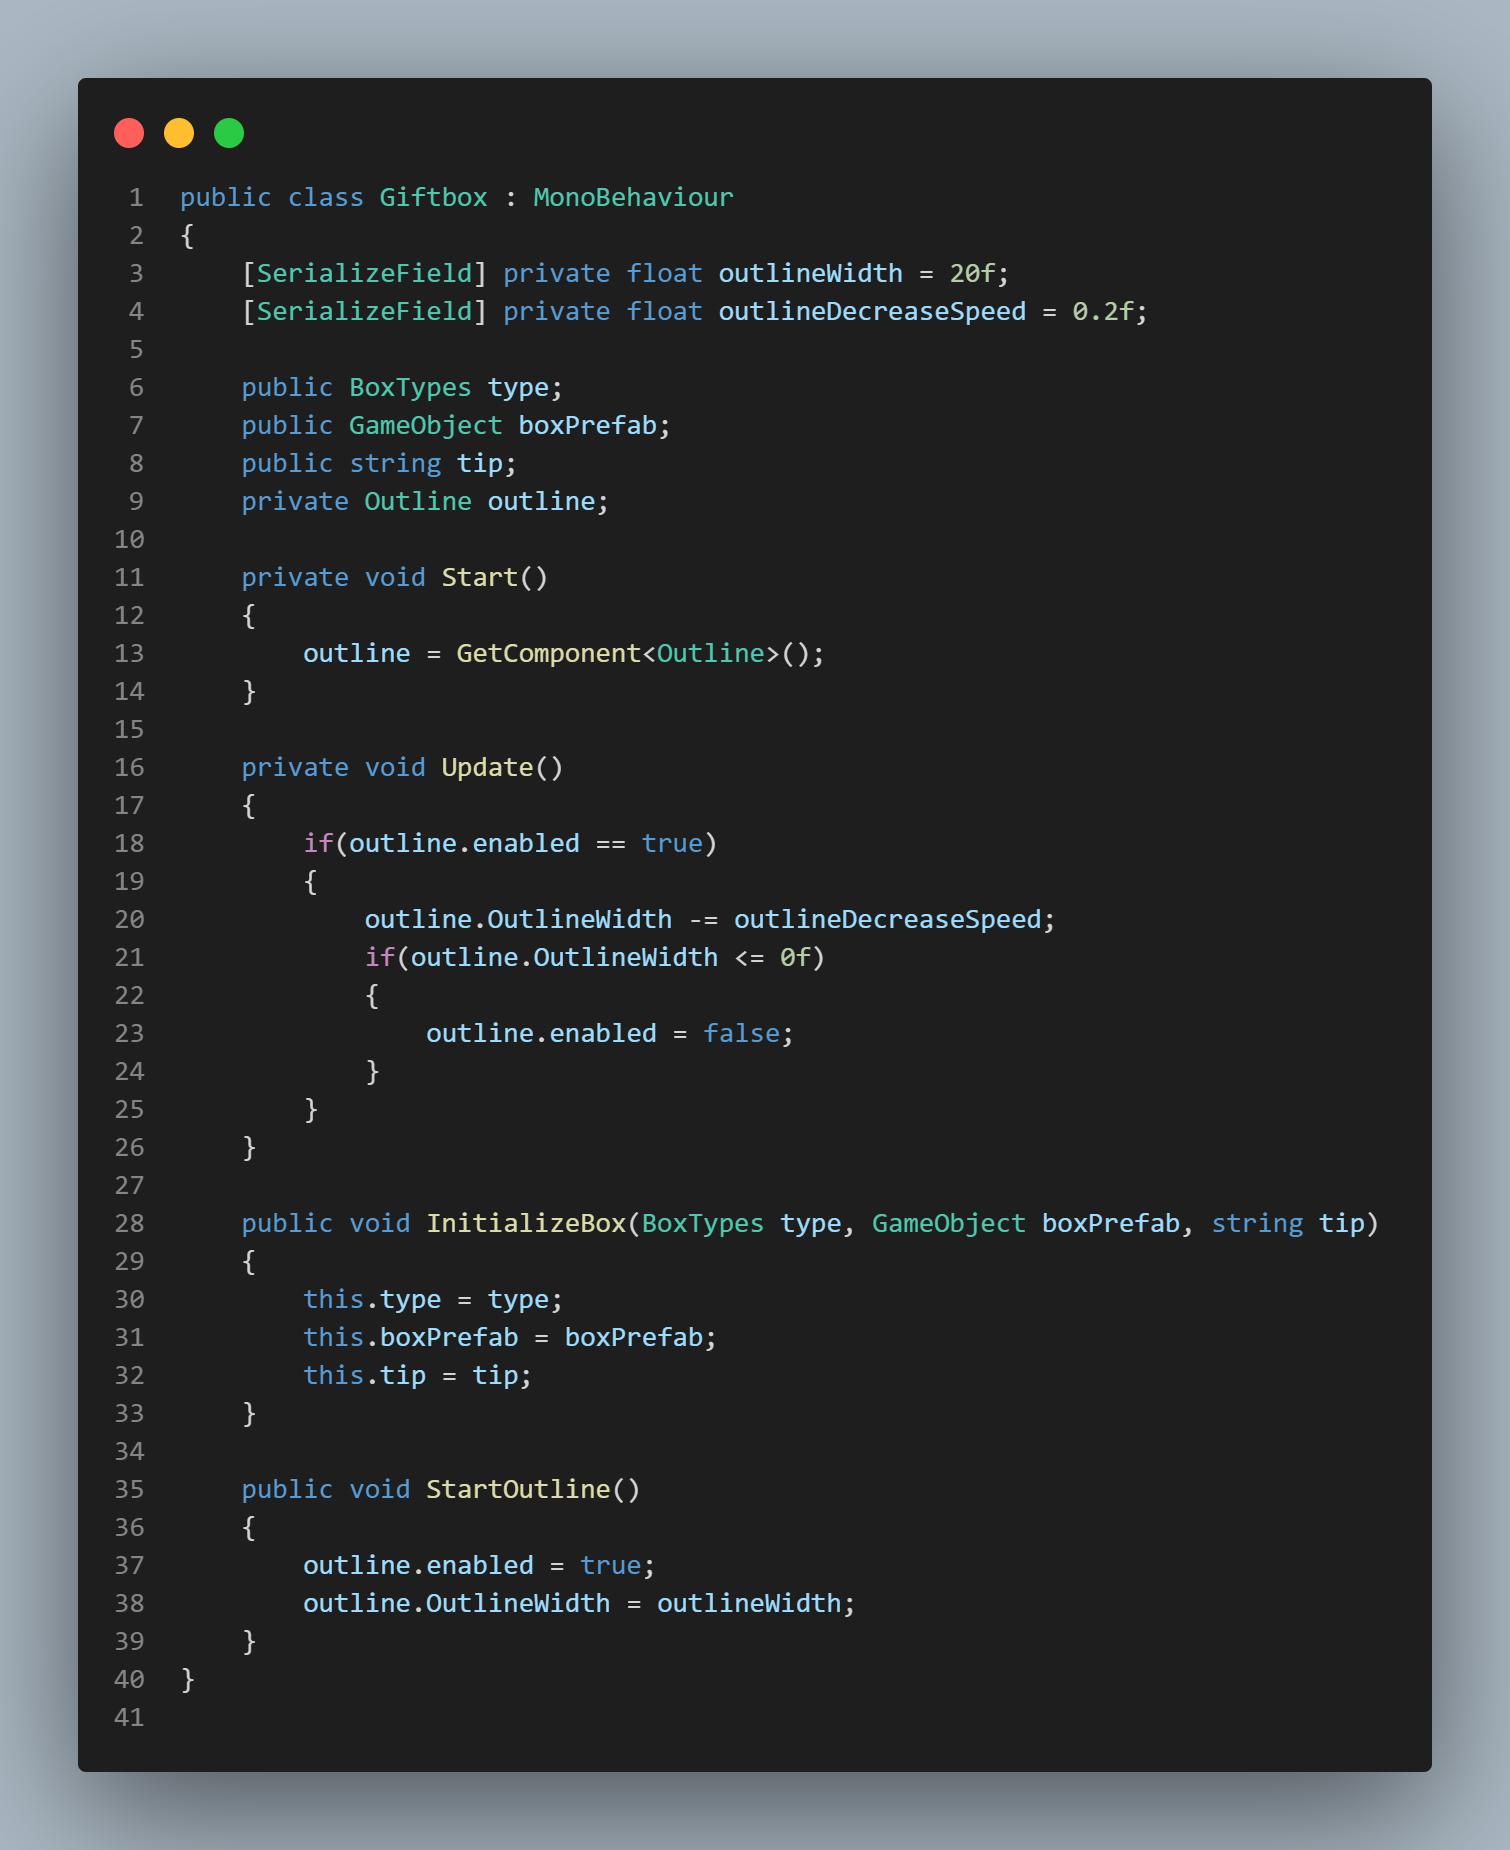
Giftbox
The Giftbox Script works together with the Pick Up script and the Box Manager script. Here the logic for the box type, present hints & present outline are enabled.
Spawn Point
The final script in this group is the Spawn Point script. This set of code is attached to each of the objects that mark the delivery locations of the presents. An OnTriggerEnter checks to see if the object the player is holding is an "Interactable". If so, then another check sees if the object is of correct type. If all of these checks are good, then the BoxDelivered method is run.
The BoxDelivered method is the next method in this script. Here the method from the Actions script is run, the correct box type is instantiated on the delivery location as well as the particle effects to let players know they are correct. Additionally, the box and each of its components that the player is holding are then destroyed.
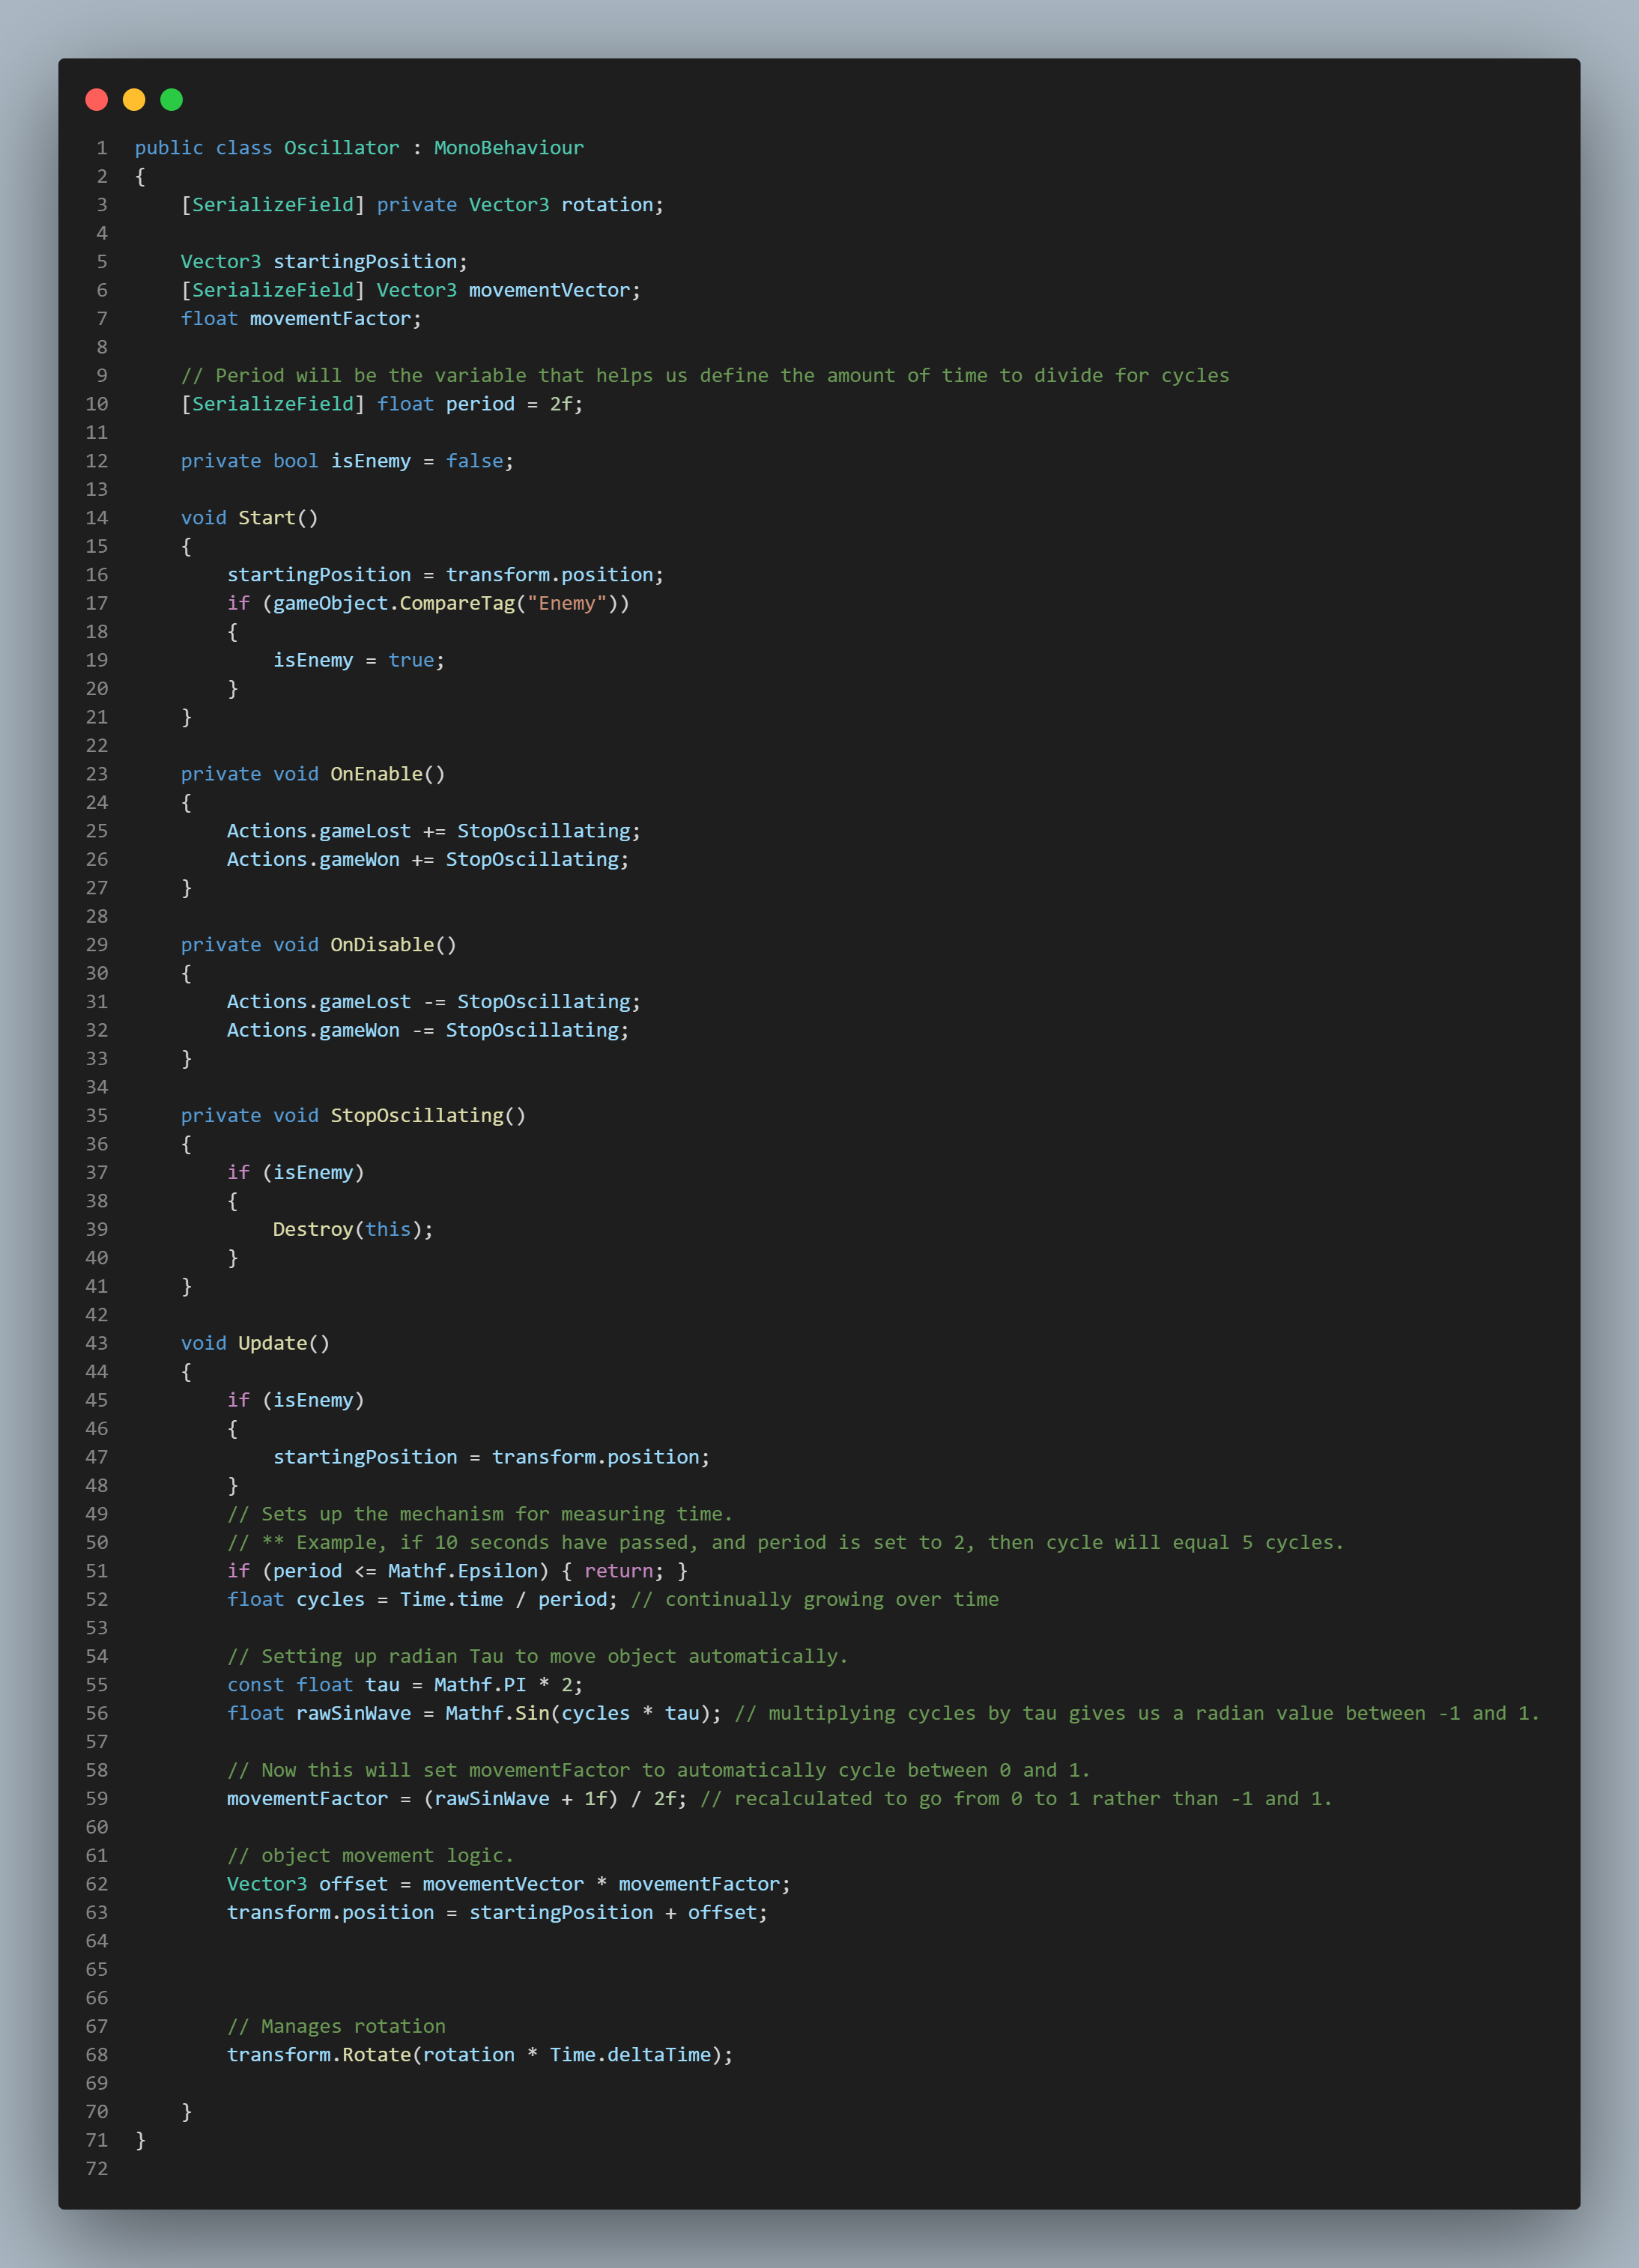
Oscillator
This next mechanic is for object oscillation. During development of another game of mine, I created this oscillator. This mechanic ended up being perfect for the powerups in the game, so I decided to implement it! To create objects that float, I first set up a mechanism to measure time. The variable "period" was created to help define the amount of time to divide for movement cycles. I then took the period of time we need and divided that with Time.time and set that to a variable called cycles. (Meaning if 10 seconds have passed, and period is set to 2, then cycle will equal 5 cycles).
Next, to get our object to move automatically, I set up a radian Tau. To do this, I created a const variable "tau" which takes Mathf.PI * 2. This gives us a constant value of 6.283... After this I created another variable called "rawSinWave" and set this to cycles multiplied by tau. By doing this, it would give us a radian value between -1 and 1.
Now that I had the radian value between -1 and 1, I needed to set the Movement Factor to automatically cycle between 0 and1 instead of -1 and 1. To do this, I add "rawSinWave" + 1f because -1 + 1 = 0 and 1 +1 = 2. Thus this becomes 0 and 2. Then I divide by 2 because 0 / 2 = 0 and 2/2 = 1. Thus I can get 0 to 1.
The final step was to determine the movement logic. To do this, I multiplied the Movement Vector by the Movement Factor. Then, I defined the new position of the object that is the offset from the original position.
Enemy Scripts
The next group of scripts makes up the Enemy AI. The scripts I will discuss are the Enemy Movement, Enemy Manager & Detect Player scripts.
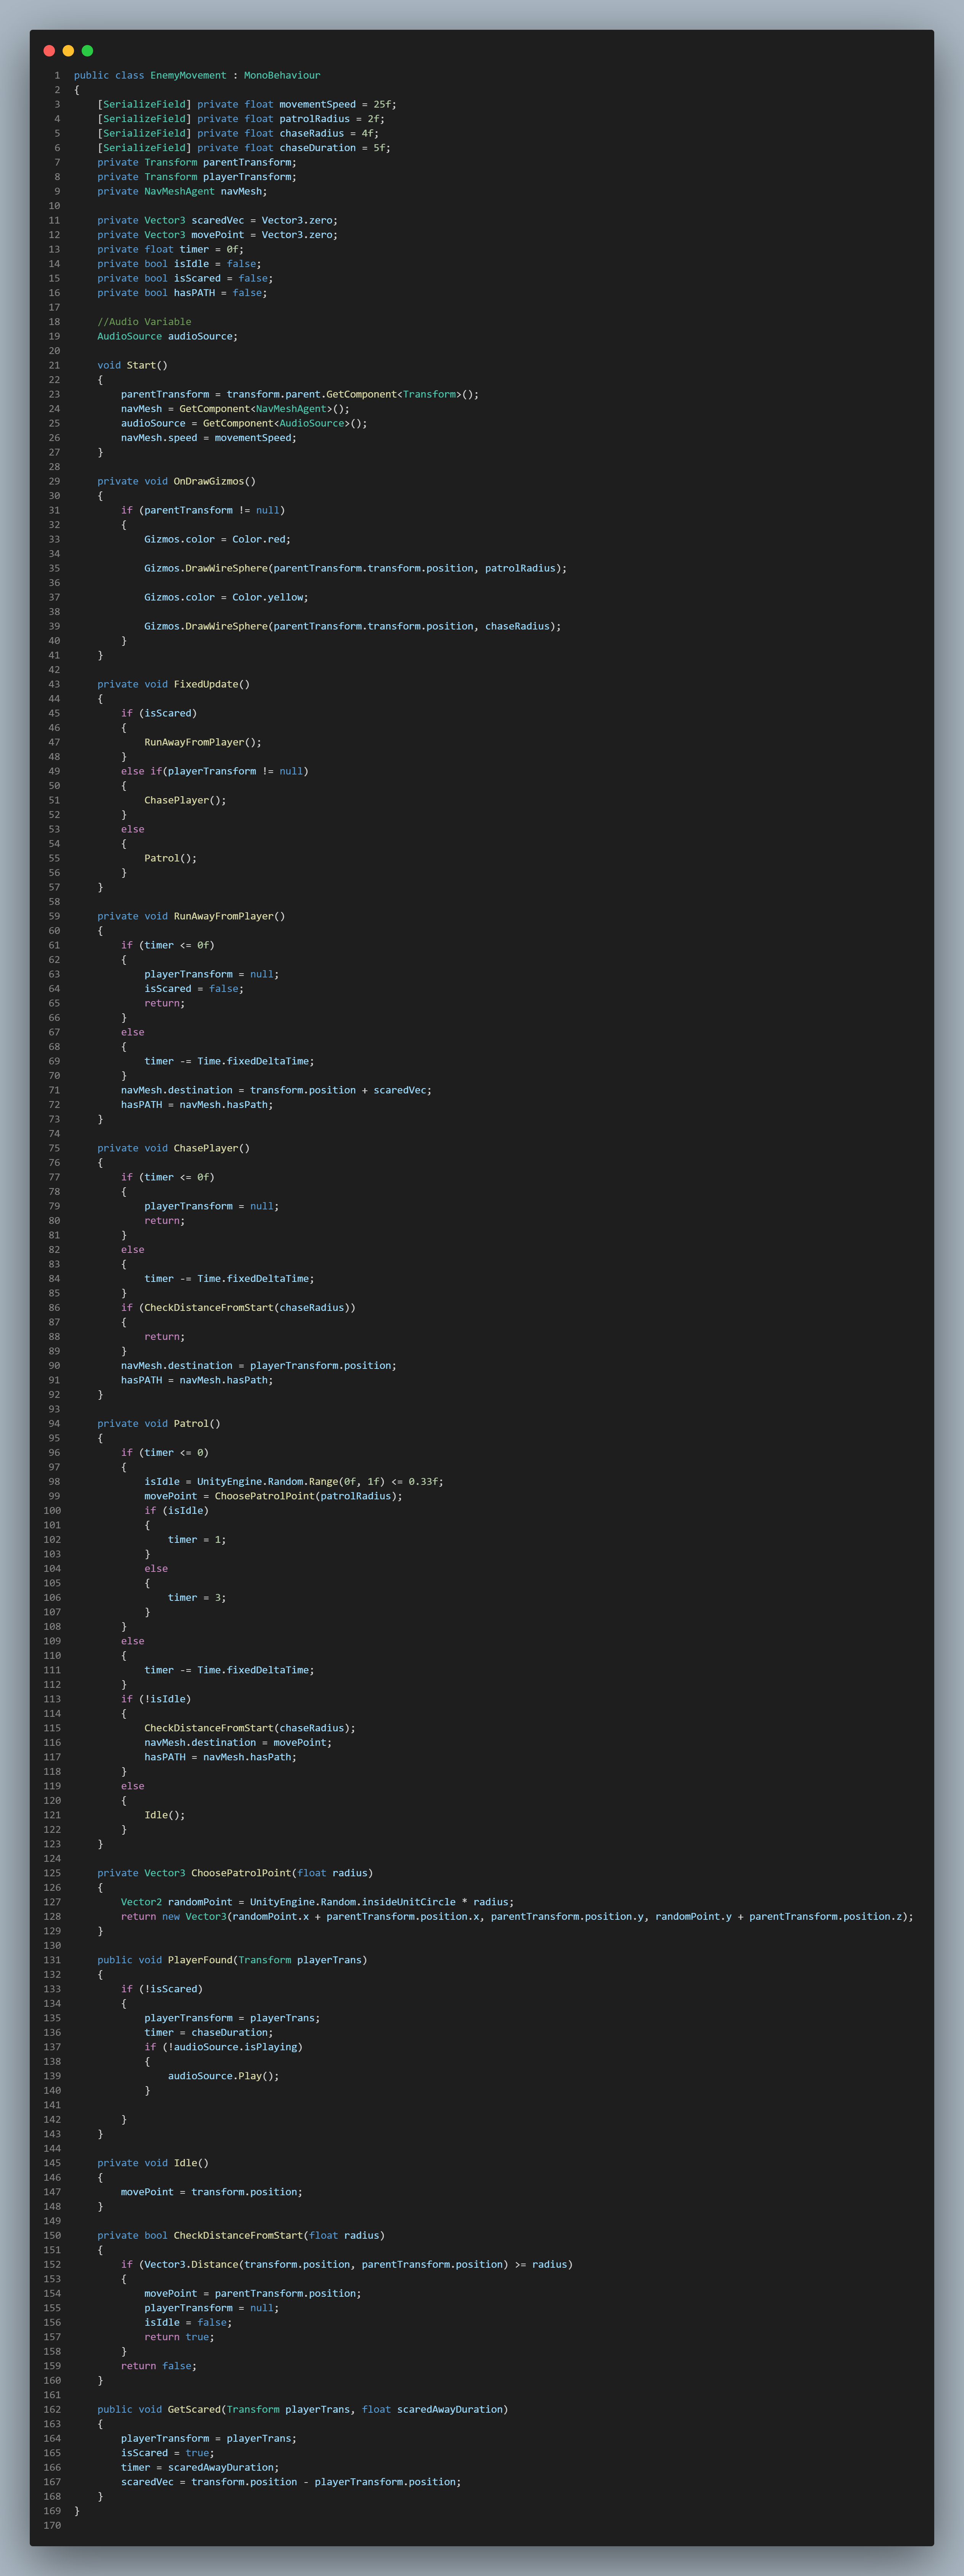
Enemy Movement | Enemy Manager | Detect Player
The Enemy Movement script is the largest in this group. It makes up most of the enemy AI functionality and calls the other script's methods to complete the functionality.
The Fixed Update method runs the different AI behaviors. First, if the variable "isScared" is true, the "RunAwayFromPlayer" method is run. Else if the player's transform is not equal to null, the "ChasePlayer" method is run. Finally, if all other checks fail, the AI will run the "Patrol" method.
The Run Away From Player method first checks and sees if the timer is equal (or less than) 0. If so, the player's last transform is set to null, "isScared" is set to false and the code returns. Else the timer decrements. The AI's NavMesh destination is then set to the position + Vector3 "scaredVec".
The Chase Player method also first checks if the timer is less than or equal to 0. It also checks the Distance from the starting position and takes the chase radius as a parameter. The NavMesh destination is set to the player.
The Patrol method uses the "ChoosePatrolPoint" method to determine what point the AI will move to. This uses a radius variable (The AI has a spherical area it can move in) and multiplies that by a random value from within the circle area. A new Vector3 is then determined which is the new point for the AI. In the Patrol method, another random number determines the Idle time which decrements when the AI is in an idle state. When "isIdle" is false, a new point is determined and the AI moves to that point.
Finally the "PlayerFound" method determines the logic for chasing the player. This method is helped by the Detect Player script. This script uses an OnTriggerStay to determine if the player is in range. If so, Detect Player gets acess to the parent script (Enemy Movement) and runs the "PlayerFound" method while passing in the player's transform. Once the transform is passed in, the timer is set to the chaseDuration, the player transform is locked in and audio plays (All as long the "isScared" boolean is not true).
In order for the script Detect Player to use the OnTriggerStay to detect the player, it gets help from the Enemy Manager script. This script helps set the logic for the cached sphere colliders that surround the enemy. Additionally, there is logic to change the radius size of the sphere colliders if the player crouches or not.
UI Elements
The final group of mechanics that we will discuss revolve around UI elements in the game. The first group of scripts we will discuss are the Bell & Med Kit cooldowns and the Health Bar & Stamina Bar.
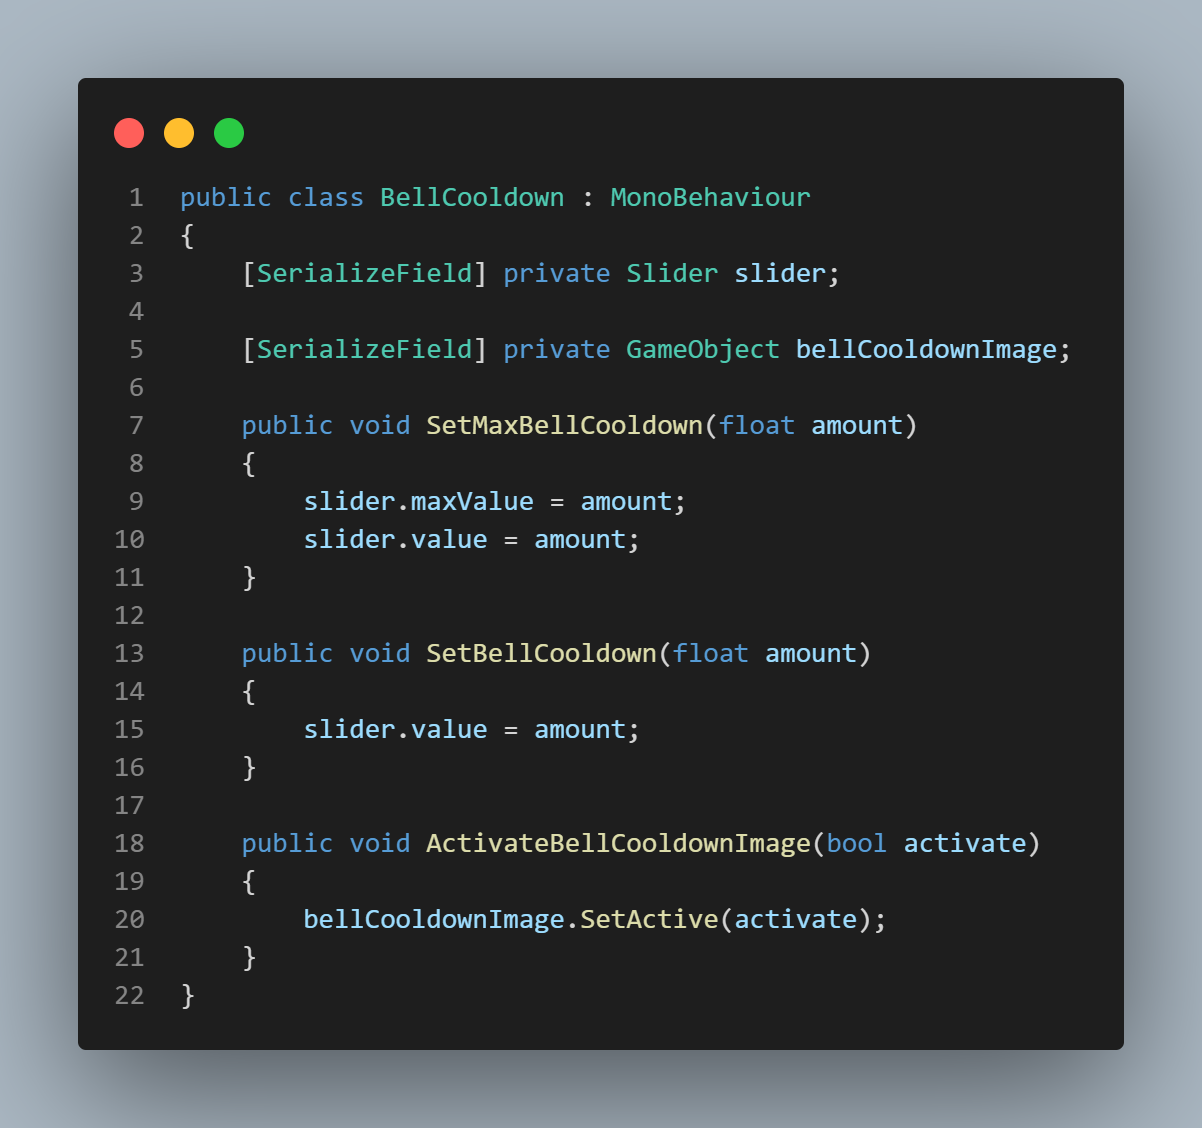
Bell Cooldown | Med Kit Cooldown
These two scripts are identical in code and functionality. The only values that change are what the variables hold. These scripts use a UI Slider & Image to visually show their mechanic.
Both scripts are made up of three methods. One to set the Max Cooldown, the next to set the Cooldown and the last to Activate the Cooldown Image. In the first two methods, they take a parameter "amount". This amount is what lets the slider know how much to update. These values were predetermined by myself and could be changed at anytime. Once the cooldown finishes, the player can use the items again.
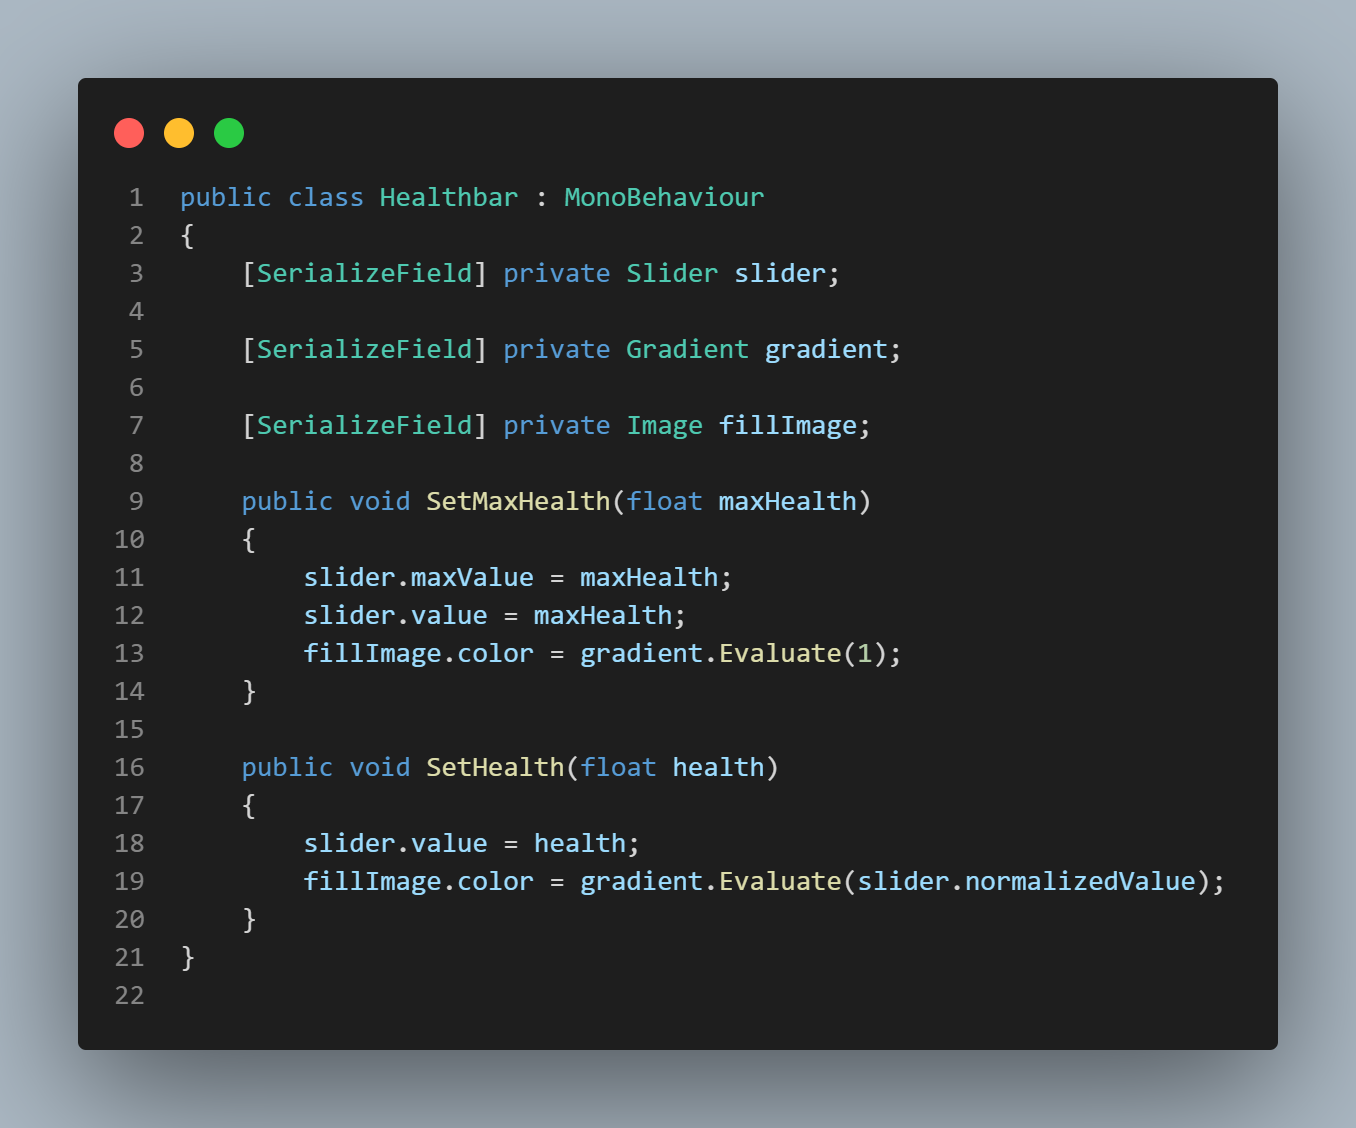
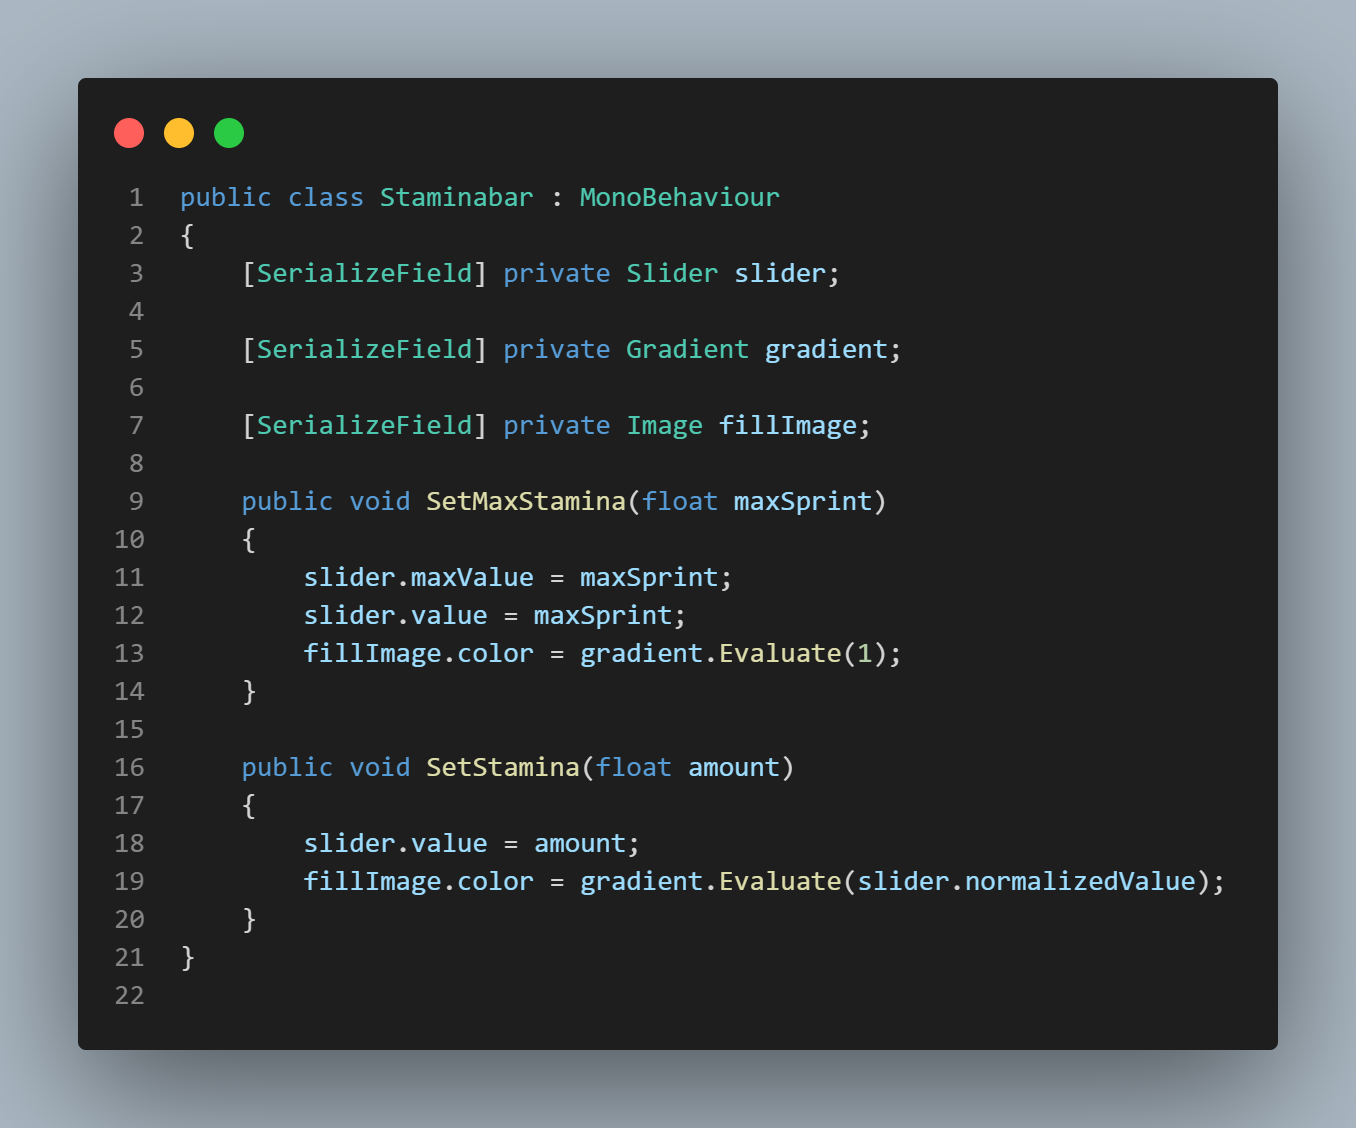
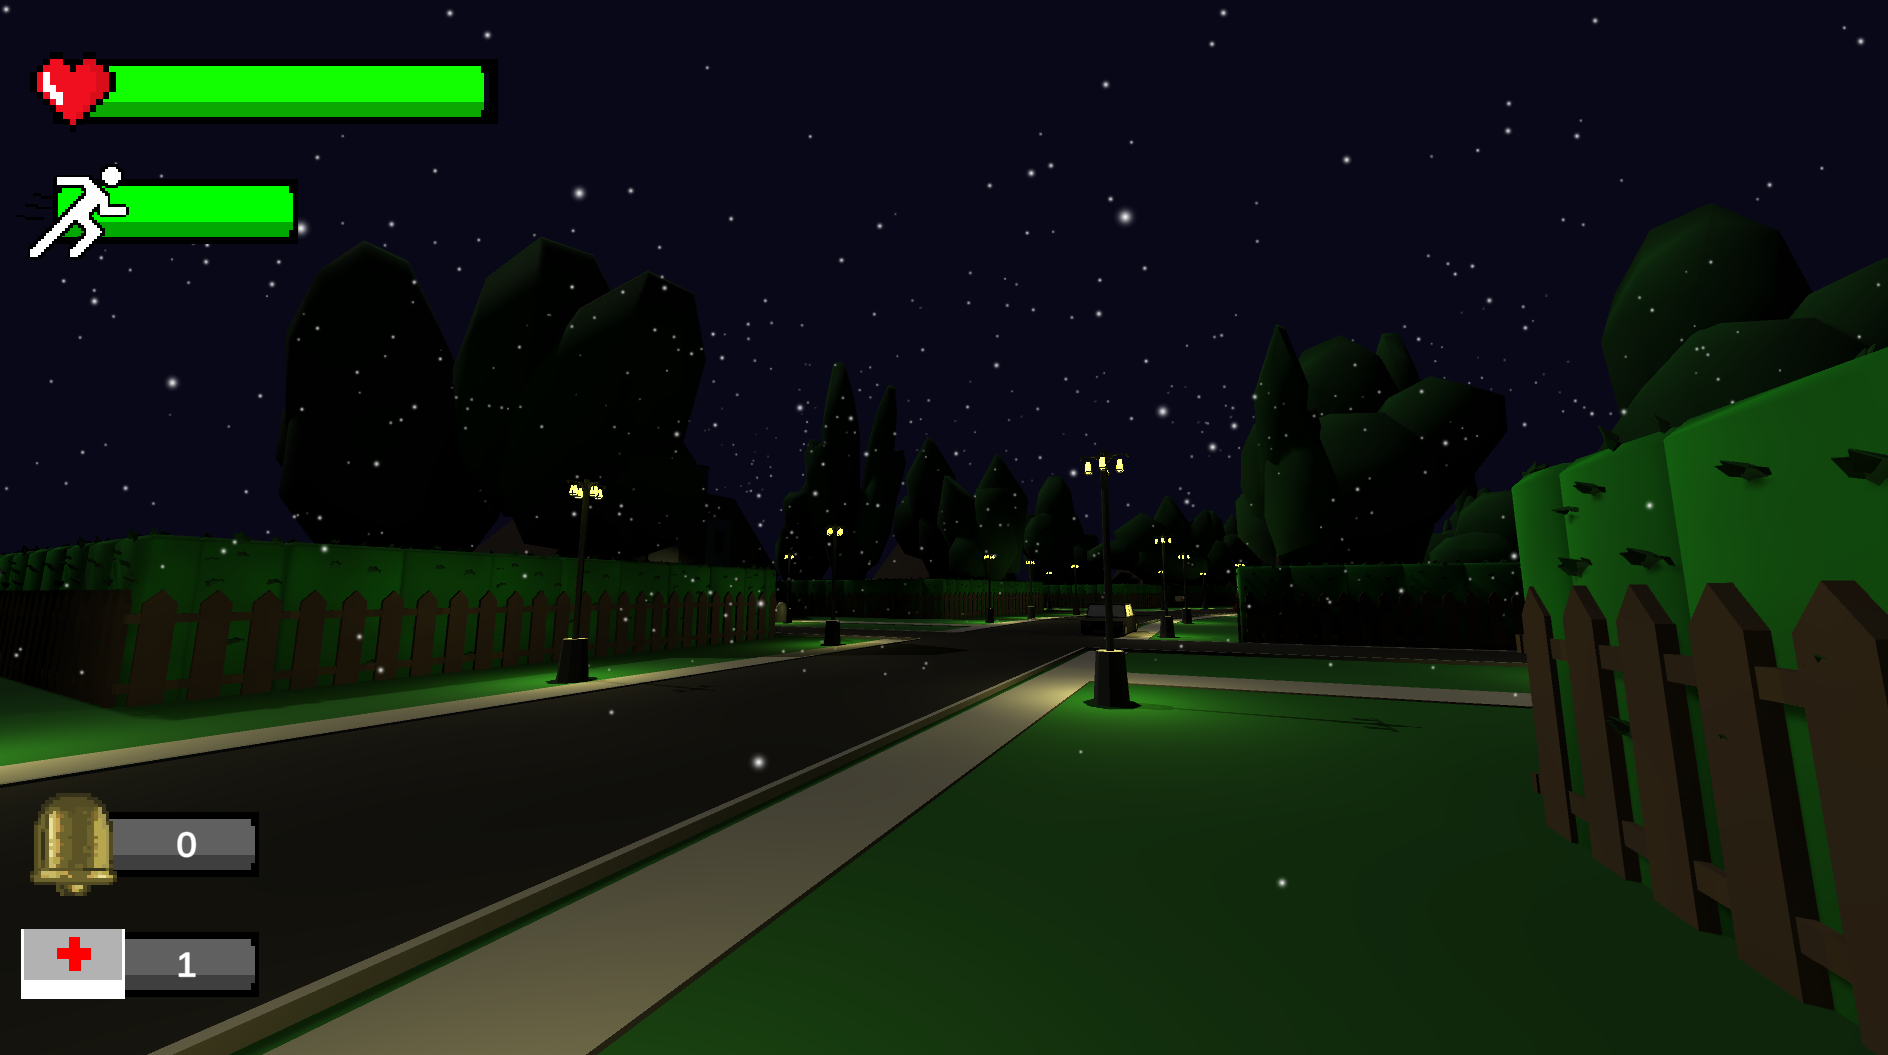
Stamina Bar | Health Bar
Here again, these two scripts have Identical code except for the values that are being passed and how they are connected in the Unity Inspector. Additionally, these two scripts work very similar to the previous two we just discussed. A method sets the Max Stamina/Health and the other updates the current Stamina/Health based on the value being passed into the method. The slider then adjusts according to the passed in value.
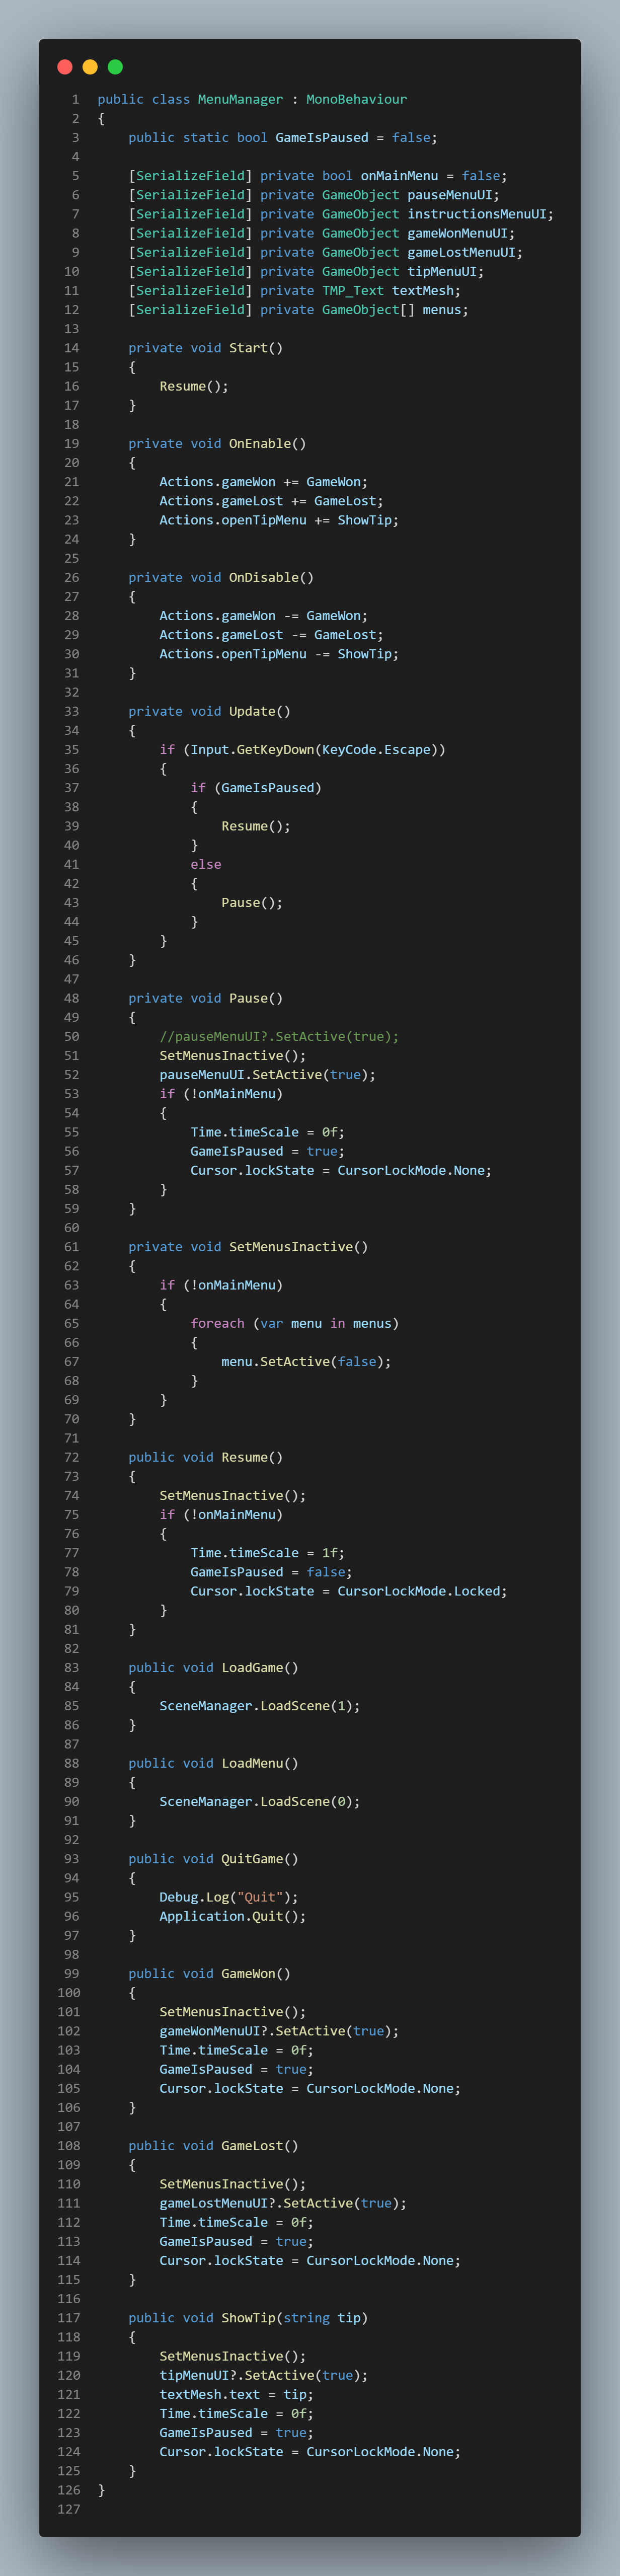
Main Menu UI
Next we have a script that handles the Main Menu. This script is made up of various methods that create the Main Menu's functionality.
First, in the Update method, it checks if the player presses the ESCAPE key. If so, another check sees if the Boolean "GameIsPaused" is true. If true, the game runs the "Resume" method. If not, the game runs the "Pause" method. The pause method works by setting the timescale of the game to 0 in order to make sure everything is stopped. Next the UI text & images are activated and the cursor is unlocked. Another method was created here that sets all possibly active menus inactive before running the Pause method. The Resume method does the exact opposite of the Pause method. The timescale is set to 1, the cursor is locked and the menus are deactivated.
The next several methods handle the level loading and quitting application. Both the LoadGame & LoadMenu methods are very simple. They take the SceneManager.LoadScene and pass in the appropriate index number. The QuitGame method is also very simple and uses the Application.Quit to exit the game.
Finally, the Main Menu script also runs methods for UI other than the main menu. This script also includes the GameWon method which handles UI to be played once the player wins. The GameLost method for displaying the lose game UI and the ShowTip method that shows player's hints on the presents. All three of these scripts work very similar to each other. Their respective UIs are set active, timescale is set to 0, "GameIsPaused" is set to true and the cursor is locked.
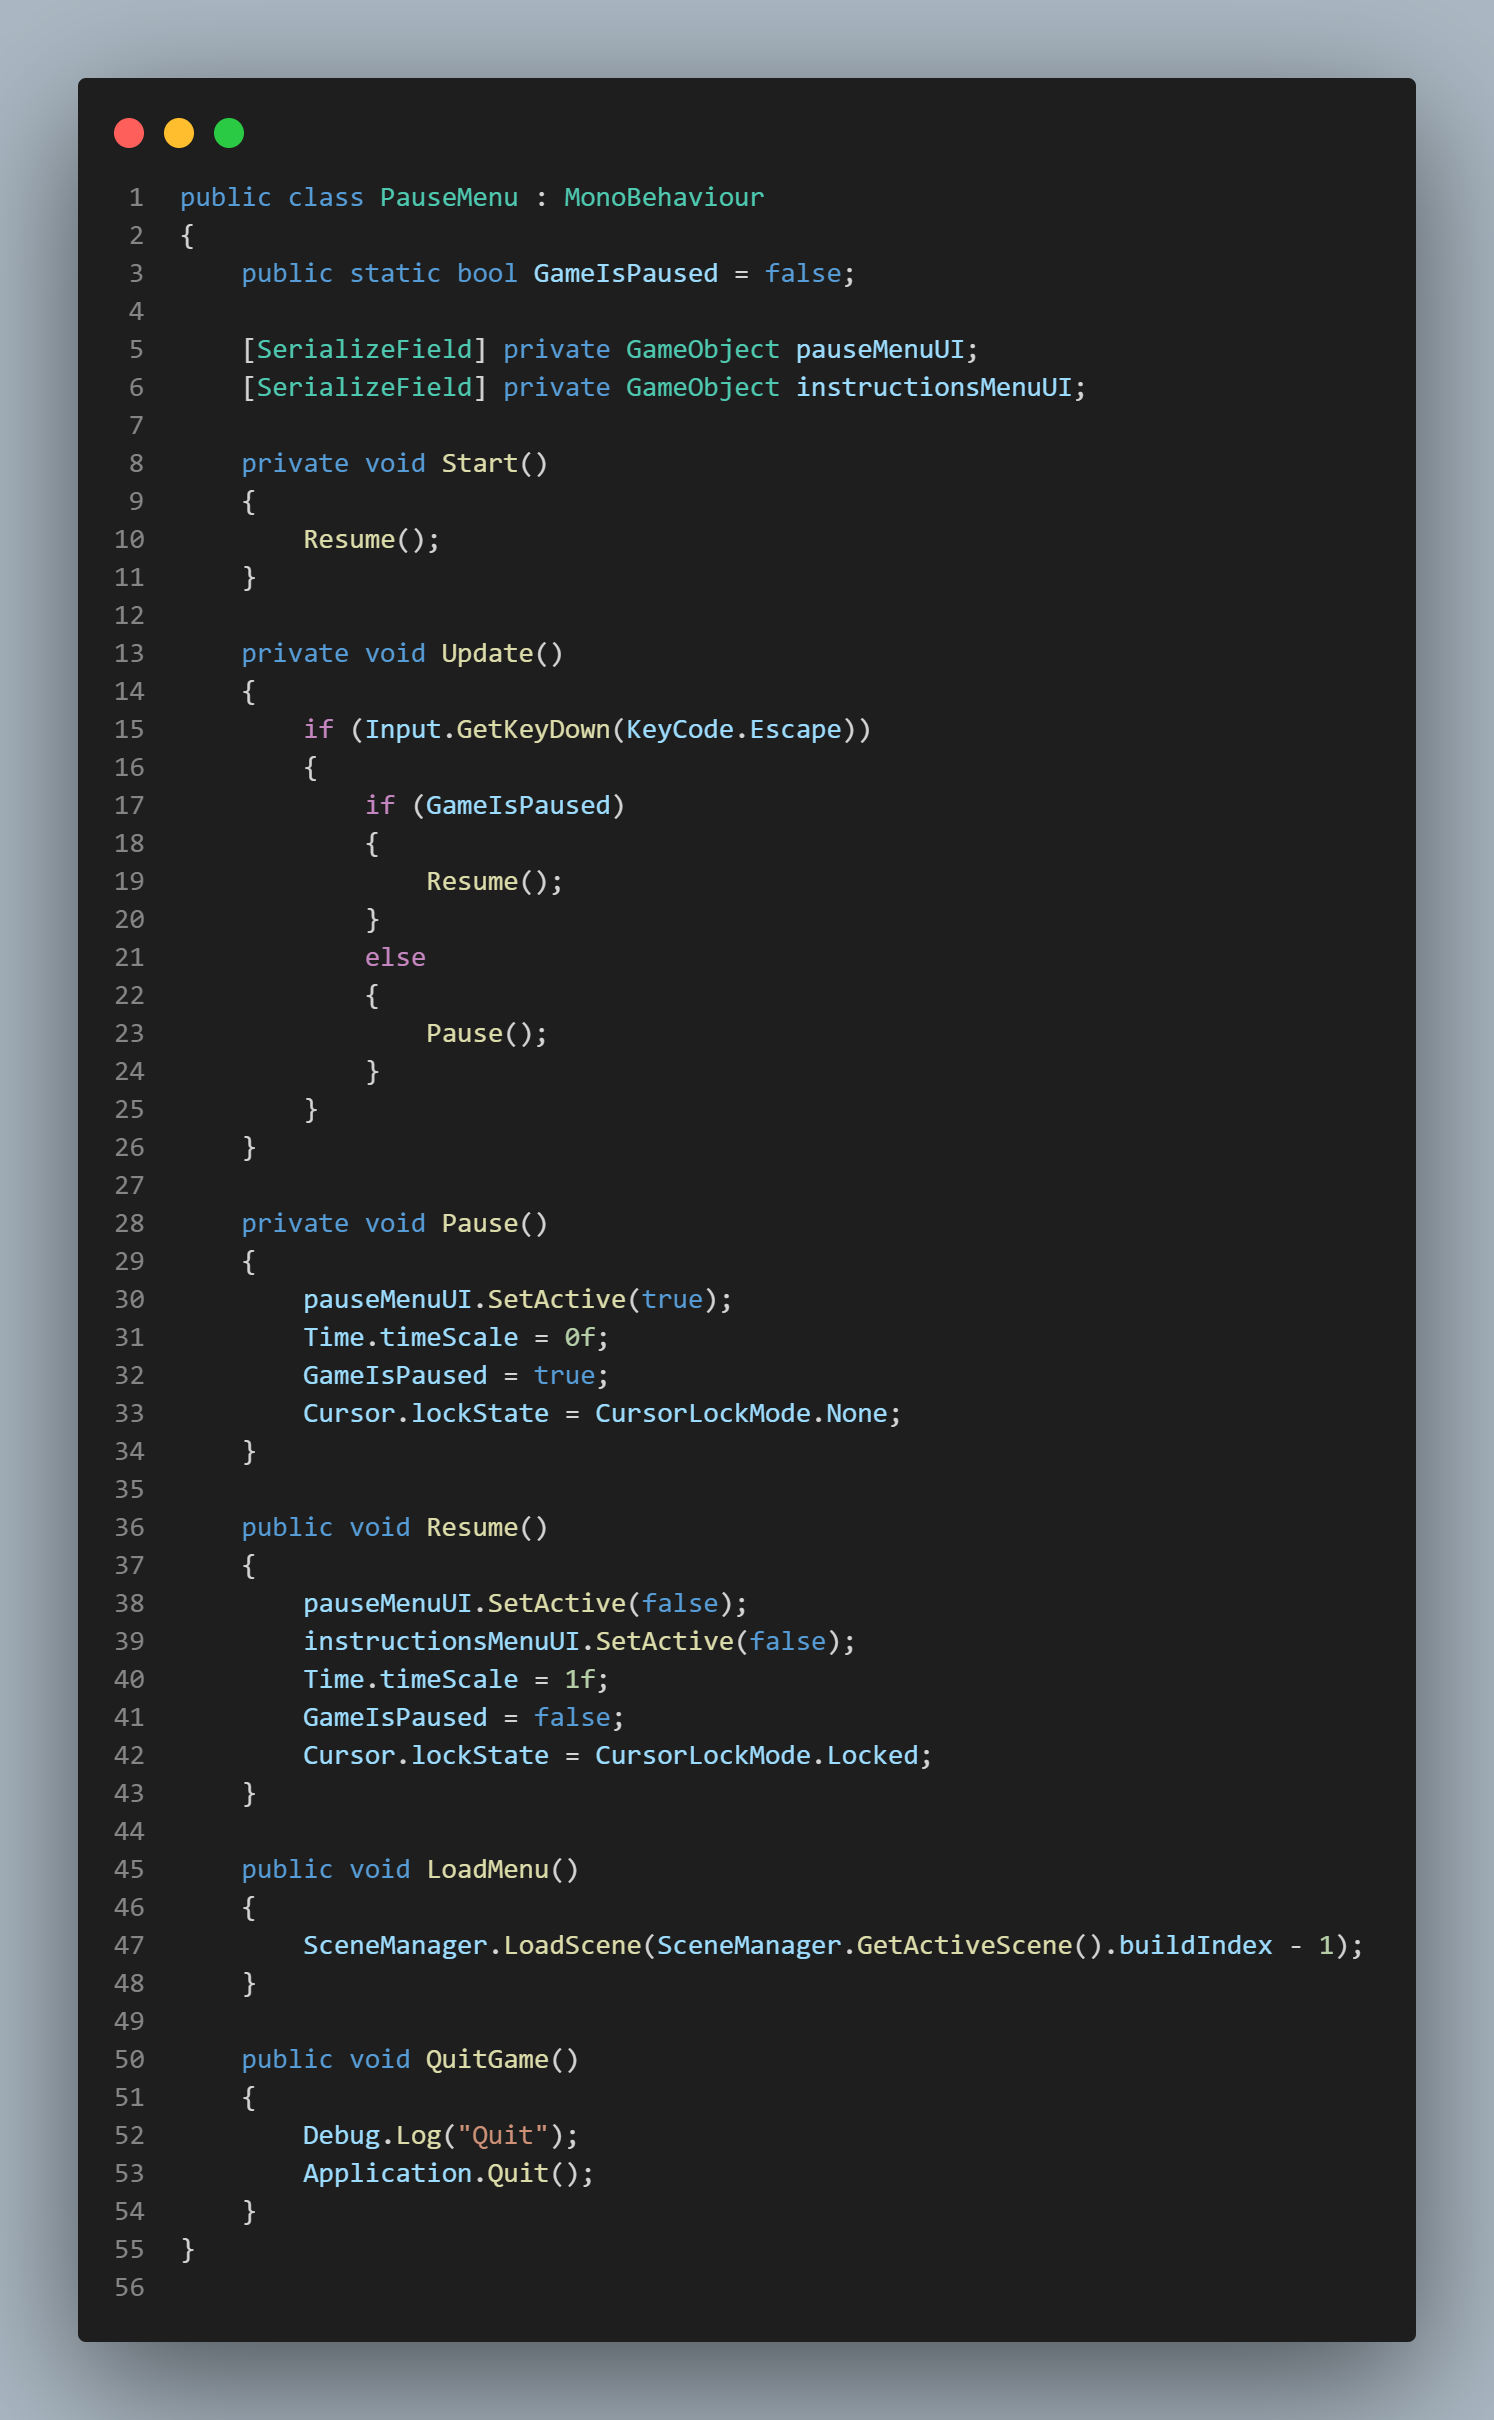
Pause Menu UI
The script for the pause menu is identical to the Main Menu but is much shorter in code. The Pause Menu UI code handles the game's Resume, Pause, LoadMenu & QuitGame methods which contain the same code as the above script.
Gameplay Mechanic Code Examples
Player Controller Script
Here is the script of the player controller code.
Player Controller Code
Player Stats Script
Here is the script of the player stats.
Player Stats Code
Player Collision Handler Script
This handles the player's collisions with the AI.
Collision Handler Script
Med kit Script
This handles the Med kit logic that heals the player
Med kit Logic
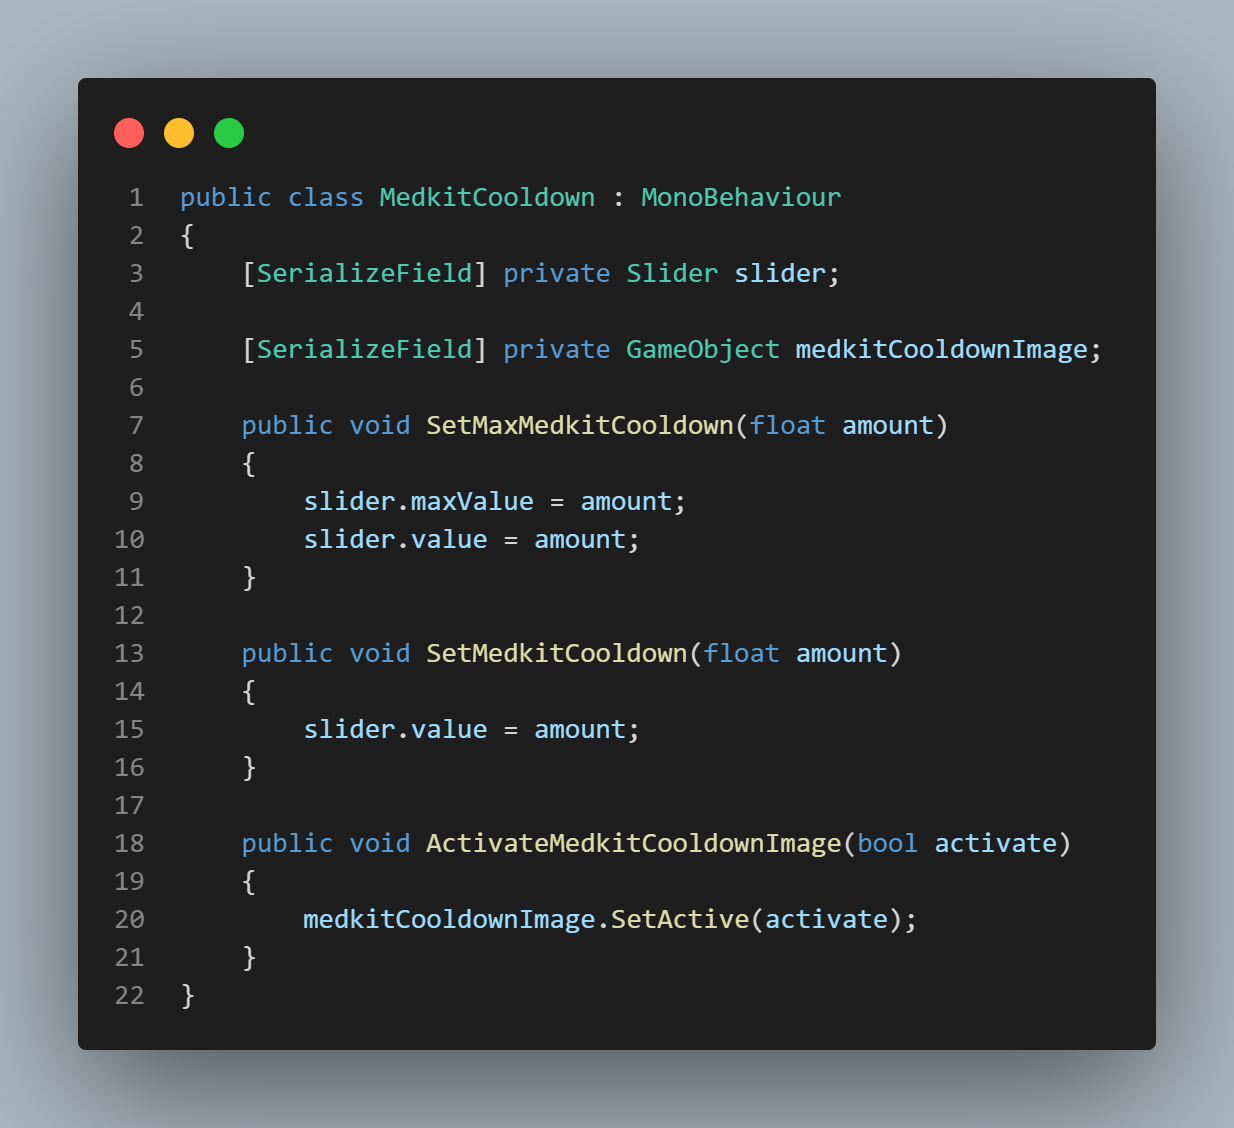
Med kit Cooldown UI Script
This handles the Med kit cooldown.
Med Kit Cooldown UI Code
Player Inventory & Item Collector Scripts
These two scripts handle the player's inventory and the collision pickup of the items.
Player Inventory (Backpack) Code
Item Collector Code
Bell Object & Bell Values Scripts
These two scripts handle the player's bell item and that item's values.
Bell Code
Bell Value Code
PickUp Script
This script handles the player's ability to pick up and move presents.
PickUp Code
Box Manager Script
The Box Manager script spawns the presents randomly and handles the delivery mechanic.
Box Manager Code
Gift Box Script
The Giftbox Script enables the box type, present hints & enables the outline when the player can interact with them.
Gift Box Code
Spawn Point Script
The Spawn Point script checks to see if the present the player is holding is correct and if so, the appropriate objects, particles and audio are instantiated.
Spawn Point Code
Object Oscillation Script
This script allows object to float!
Oscillator Code
Enemy AI Scripts
These scripts make up the Enemy AI Behavior.
Enemy Movement Code
Enemy Manager Code
Detect Player Code
UI Scripts
These scripts UI logic in the game.
Bell Cooldown UI Code
Med Kit Cooldown UI Code
Health Bar UI Code
Stamina Bar UI Code
Main Menu UI Code
Pause Menu UI Code
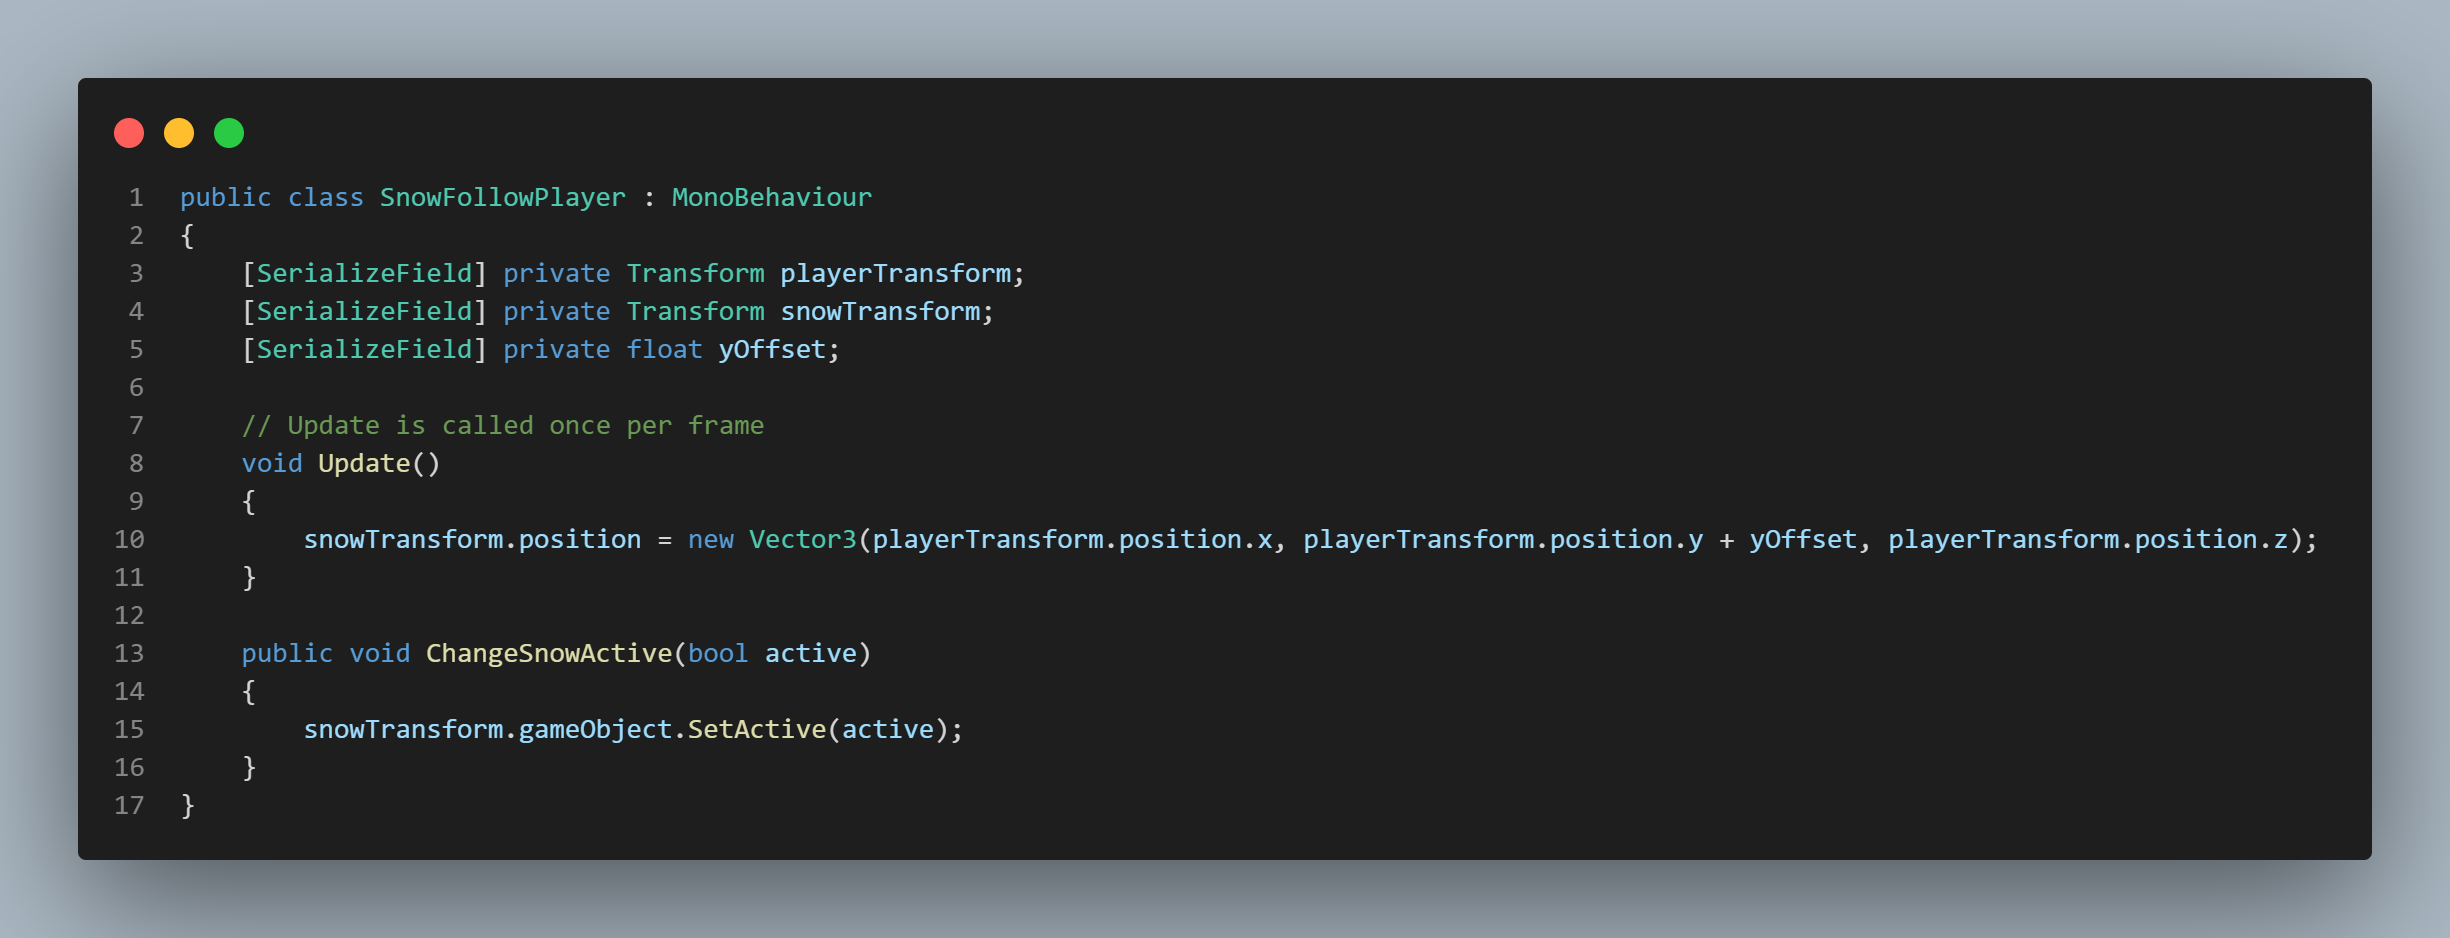
Snow Following Player Script
This final script allows the snow particles to follow the player.

.png)